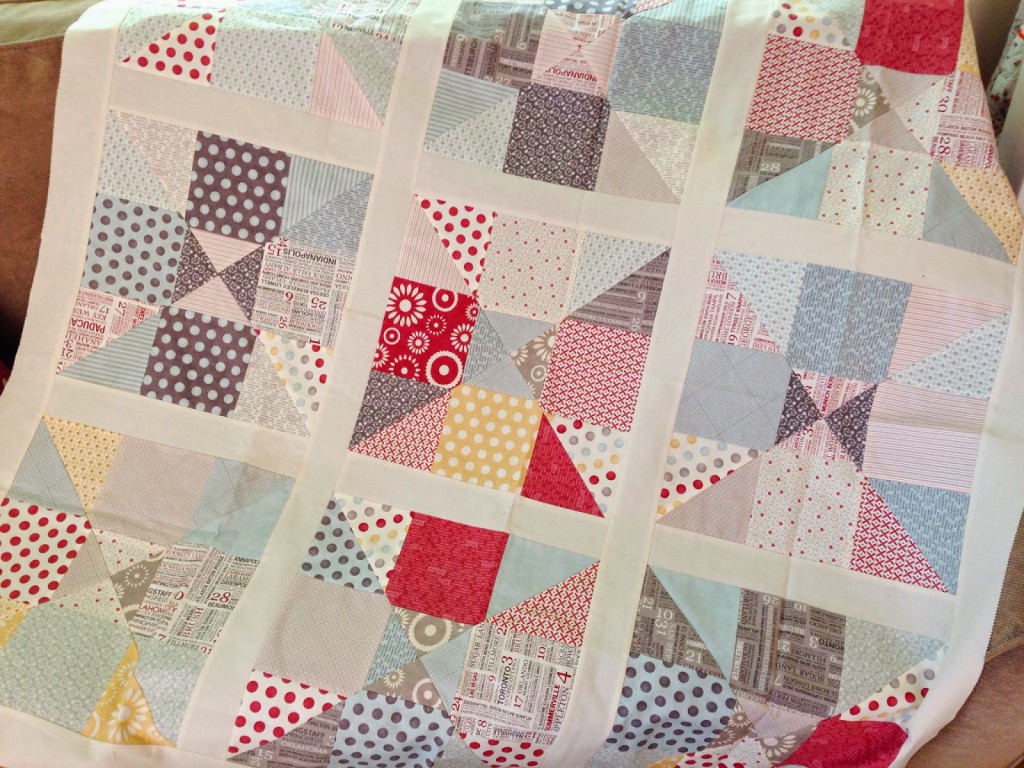
I finally got this tutorial up! Thank you ALL so much for your fabulous quilt name suggestions. I love picking your crafty brains 😉 It was a tough choice, but I decided to go with Home Sweet Home (thank you Anna from Switzerland for the idea!). If you’re familiar with my tutorials, you’ll know that I love simple and quick quilts that require little to none fussy measurements. Well, this is one of them! In fact, this quilt practically requires no measuring! That’s the beauty of pre-cut fabrics – you can whip up a quilt top over a weekend. Check out my tutorial below 🙂
A printer-friendly version can be found HERE.
Materials for a 47″ x 47″ quilt:
- 2 charm packs (or 81 pre-cut 5″ squares)
- Ten neutral colored Jelly Roll strips (or 3/4 yard neutral colored fabric; from this, cut ten 2.5″ x 42/44″).
- 5/8 yards binding fabric
- 3 yards backing fabric
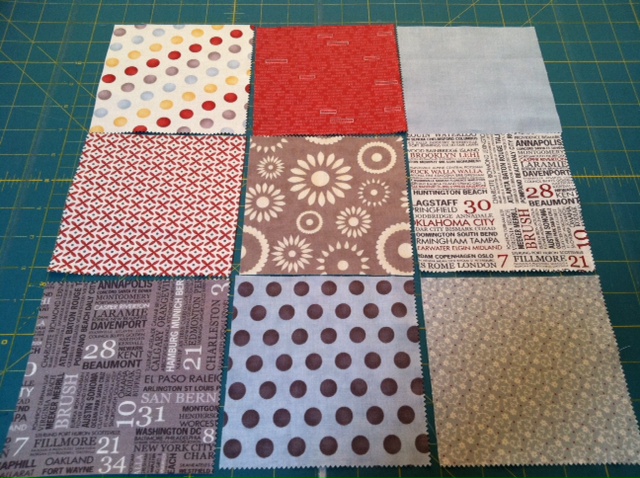
Step 1 – Choose 9 charm squares (or pre-cut 5 inch squares) and make a 9 patch block by sewing 3 rows together with 3 blocks per row.
Step 2 – Using a rotary cutter and ruler, cut 2 diagonal lines from corner to corner as shown below.

Step 3 – Repeat steps 1 and 2 to make a total of 3 nine patch blocks. Cut diagonal lines from corner to corner for all 3 blocks. This will give you a total of 12 triangle pieces.

Step 4 – Here’s the fun part! Rearrange all 12 pieces to your liking.

Step 5 – Then sew the rearranged pieces back together as shown below. This will give you a block that measures roughly 13.3″ x 13.3″. Repeat until you have a total of 9 finished blocks.

Step 6 – Take three jelly roll strips (or three 2.5″ x 42/44″ long strips), and then sub-cut each strip into three 2.5″ x 13.5″ strips. This will give you a total of six 2.5″ x 13.5″ strips. With right sides facing together, sew a strip to the side of a finished block, press flat with an iron and then trim the excess ends (since your finished block measures 13.3 inches, this is simpler then trying to measure 13.3 inch long strips). Sew the remaining strips to create sashing between the blocks that looks like this:
Step 7 – Use two more jelly roll strips (or two 2.5″ x 42/44″ strips) for the middle sashing. with right sides facing together, sew the first row of blocks to the sashing, then press flat with an iron. Repeat until all three rows of blocks are connected by the two sashing strips. Trim the excess ends.
Step 8 – Use two more jelly roll strips (or two 2.5″ x 42/44″ strips) for the top and bottom borders. After sewing them on, trim the excess ends. Lastly, sew the left and right side borders on. Each side will measure roughly 47″ long, so you will need to sew some jelly roll strips together to get two 2.5″ x 47″ long strips. I simply sewed three jelly roll strips together (or three 2.5″ x 42/44″ strips) from end to end and then cut that in half. After sewing them onto the sides of the quilt top, trim the excess fabric. That’s all there is to it! Like I said, it’s a non-fussy cut quilt and fast to piece together. Here’s a picture of my quilting buddy, Bodie, that I thought I’d sneak in. He was ready for a walk in this photo. 🙂
 Happy Quilting! And if you make this quilt, don’t forget to share it on Quilting In The Rain’s Facebook page for all to see!
It just so happens that I have 2 charm packs and some coordinating yardage sitting at the end of my ironing board. I had no idea what to do with all of it but now I do! Looks fast and fun – my two favorite words when making quilts!
Heeeyyy, the name was my idea 😉 but never mind, despite the mix-up, I'm proud that you chose my suggestion 🙂
Thanks for the tutorial
Anna (Switzerland)
I love how you come up with these simple ideas that look so great! This pattern will definitely be a go-to for me. Is this the quilt you are using for your new baby?
Hi Anna – whoops, sorry about that name slip, thanks for letting me know! 🙂 It's been updated. Thank you again for the awesome idea! -jera
@ Suzan and Jamie Lee – glad you like the tutorial! Yes, this one will be for my baby boy 🙂 Be sure to hare a picture on QITR's facebook page when you're done! Thanks for stopping by. -jera
great tut. I had some charm packs that i didn't know how to use!
I love all your tutorials. Precuts are one of my favorite things. Putting this on my very long "to-do" list.
Me gustó la forma en que lo desarrollaste. Es mucho más fácil de como yo lo habría hecho.
Gracias,
Yasmin
That is just soooo clever! I really envy all the creative people in the world. I'm great at following patterns, but if I was asked to come up with one, I'd probably run away & hide… This pattern is brilliant! Thanks!!
I was trying to figure out something new for a baby blanket I need to make and I had some charm packets I bought for it.. this is perfect. Thanks so much Jera.. can't wait for your shop opening! 🙂
Now that is a fabulous tutorial. Thank you. Great design and I love how you used charm packs. Less cutting required. Very nice.
That is super cute!
Wow! This is the best idea I've seen to do with charm packs! I'm back into quilting after a 14 year hiatus and all these pre-cuts are new to me. I've been given a couple of charm packs and had no clue what to do with them! Thank you!
Another great idea dn tutorial. I appreciate all the fun suggestions for boys. The next few babies being born in the family are boys, so these ideas are very timely for me. Your little boy is so cute. Thanks for sharing.
Hope you don't mind that I pinned this on pinterest, if you don't want me to, let me know and I will take it down. I LOVE THIS PATTERN, planning on using this on some of my vintage fabric. THANKS FOR SHARING!!!!!!!!
of course not, thank you for pinning! happy quilting 🙂
great idea…I too have some charm packs that have been sitting for a long time
Great idea
Is it possible to trim the square down to 13" to make it easier to cut the sashing?
I absolutely love this pattern, thank you so much for sharing such a great idea. My only question is, did you mix the two charm packs together when making the blocks or did you make blocks using only the charms from one pack?
Hi Sandy – To make 9 blocks, I used the squares from 2 charm packs. So yes, I mixed them. One charm pack will only get you 4 blocks (since you need 9 charms per block). Thanks for the comment! 🙂
Awesome and easy, I really like your creation….thanks for sharing….
I am new to quilting…can you tell me what a charm pack is?
Charm Packs
Size of cut: 5" x 5" squares
Charm Pack
Description: Charm packs are one of the smallest and least expensive specialty cut. Their popularity stems from the fact that they are affordable, easy to use, and the size is very common in quilting. Charm Packs typically include one square of every fabric within a collection so the number of pieces included varies. The size of charm packs may also vary slightly by manufacturer. For instance, RJR Fabrics cuts their Charm Packs to 5.5" x 5.5". (courtesy of http://www.fatquartershop.com )
look at those eyes. That little corgi is mischievous. Oh yes, thank you for the idea. It is simple and quick and makes a great looking quilt.
Genius!!! Simple, quick and easy….I'm all for this. Thank you so much for posting this and giving a quilter more time to make more quilts! :o)
This is absolutely great. I have been looking for a baby quilt idea.
thanks for the idea
thanks for the idea
Just found your tutorial and am so glad I did. As a newbie to quilting easy sounds perfect! I have two great-granddaughters one is 4yrs old and the other only 7 weeks. No doubt baby quilts will be appreciated! Thank you for being so gracious with sharing your expertise, ideas, and ability.
This is really cute, but it's a shame there's no seam allowance for the corners.
Jera gracias me encuentro muy contenta por haber encontrado ste lindo blog lo necesitaba,muchos exitos, esperando cosas lindas en mi correo para poder hacer para mi casa. Desde Colombia con gran cariño.Mercy
Love the quilt and such a simple block– but looks so complicated when finished!
Hi jera, thank you for such a beautiful tutorial. Your website is just a haven of beautiful creations. I hope you don’t mind me asking, you have put strips around the edge of the quilt, should i add binding too I am not sure at all how to add the backing fabric etc. Thank you for taking the time to read my question.
Thank you so much for this tutorial! I have a box of 5 1/2 in squares and this is exactly how I am going to use them. Making donation quilts, this will be perfect ?!
Thank you for a great explanation. I was looking online for a similar idea and really appreciate it
Vector Format
Wow! I’m new to quilting..did my 1st for this Christmas..have 6 to do for next yr..so I will start in
January! I can follow your directions! THANK YOU!!
Thanks.
If you like your seams to line up nicely you will be disappointed that they don’t in two places when you resew the diagional cut pieces together. I really think you should say this in the instructions because for me it is an annoyance and waste of fabric.
Cute quilt and great easy to follow photos for the blocks. Thanks!
I’ve read this post, nice work about embroidery design.
This is absolutely great. I have been looking for a baby quilt idea.
best embroidery digitizing service
This is the great work
Awesome and easy, I really like your creation. looking so awesome thanks for sharing.
This creation of yours is truly impressive and straightforward. We thoroughly enjoy it! Thank you for sharing it with us.