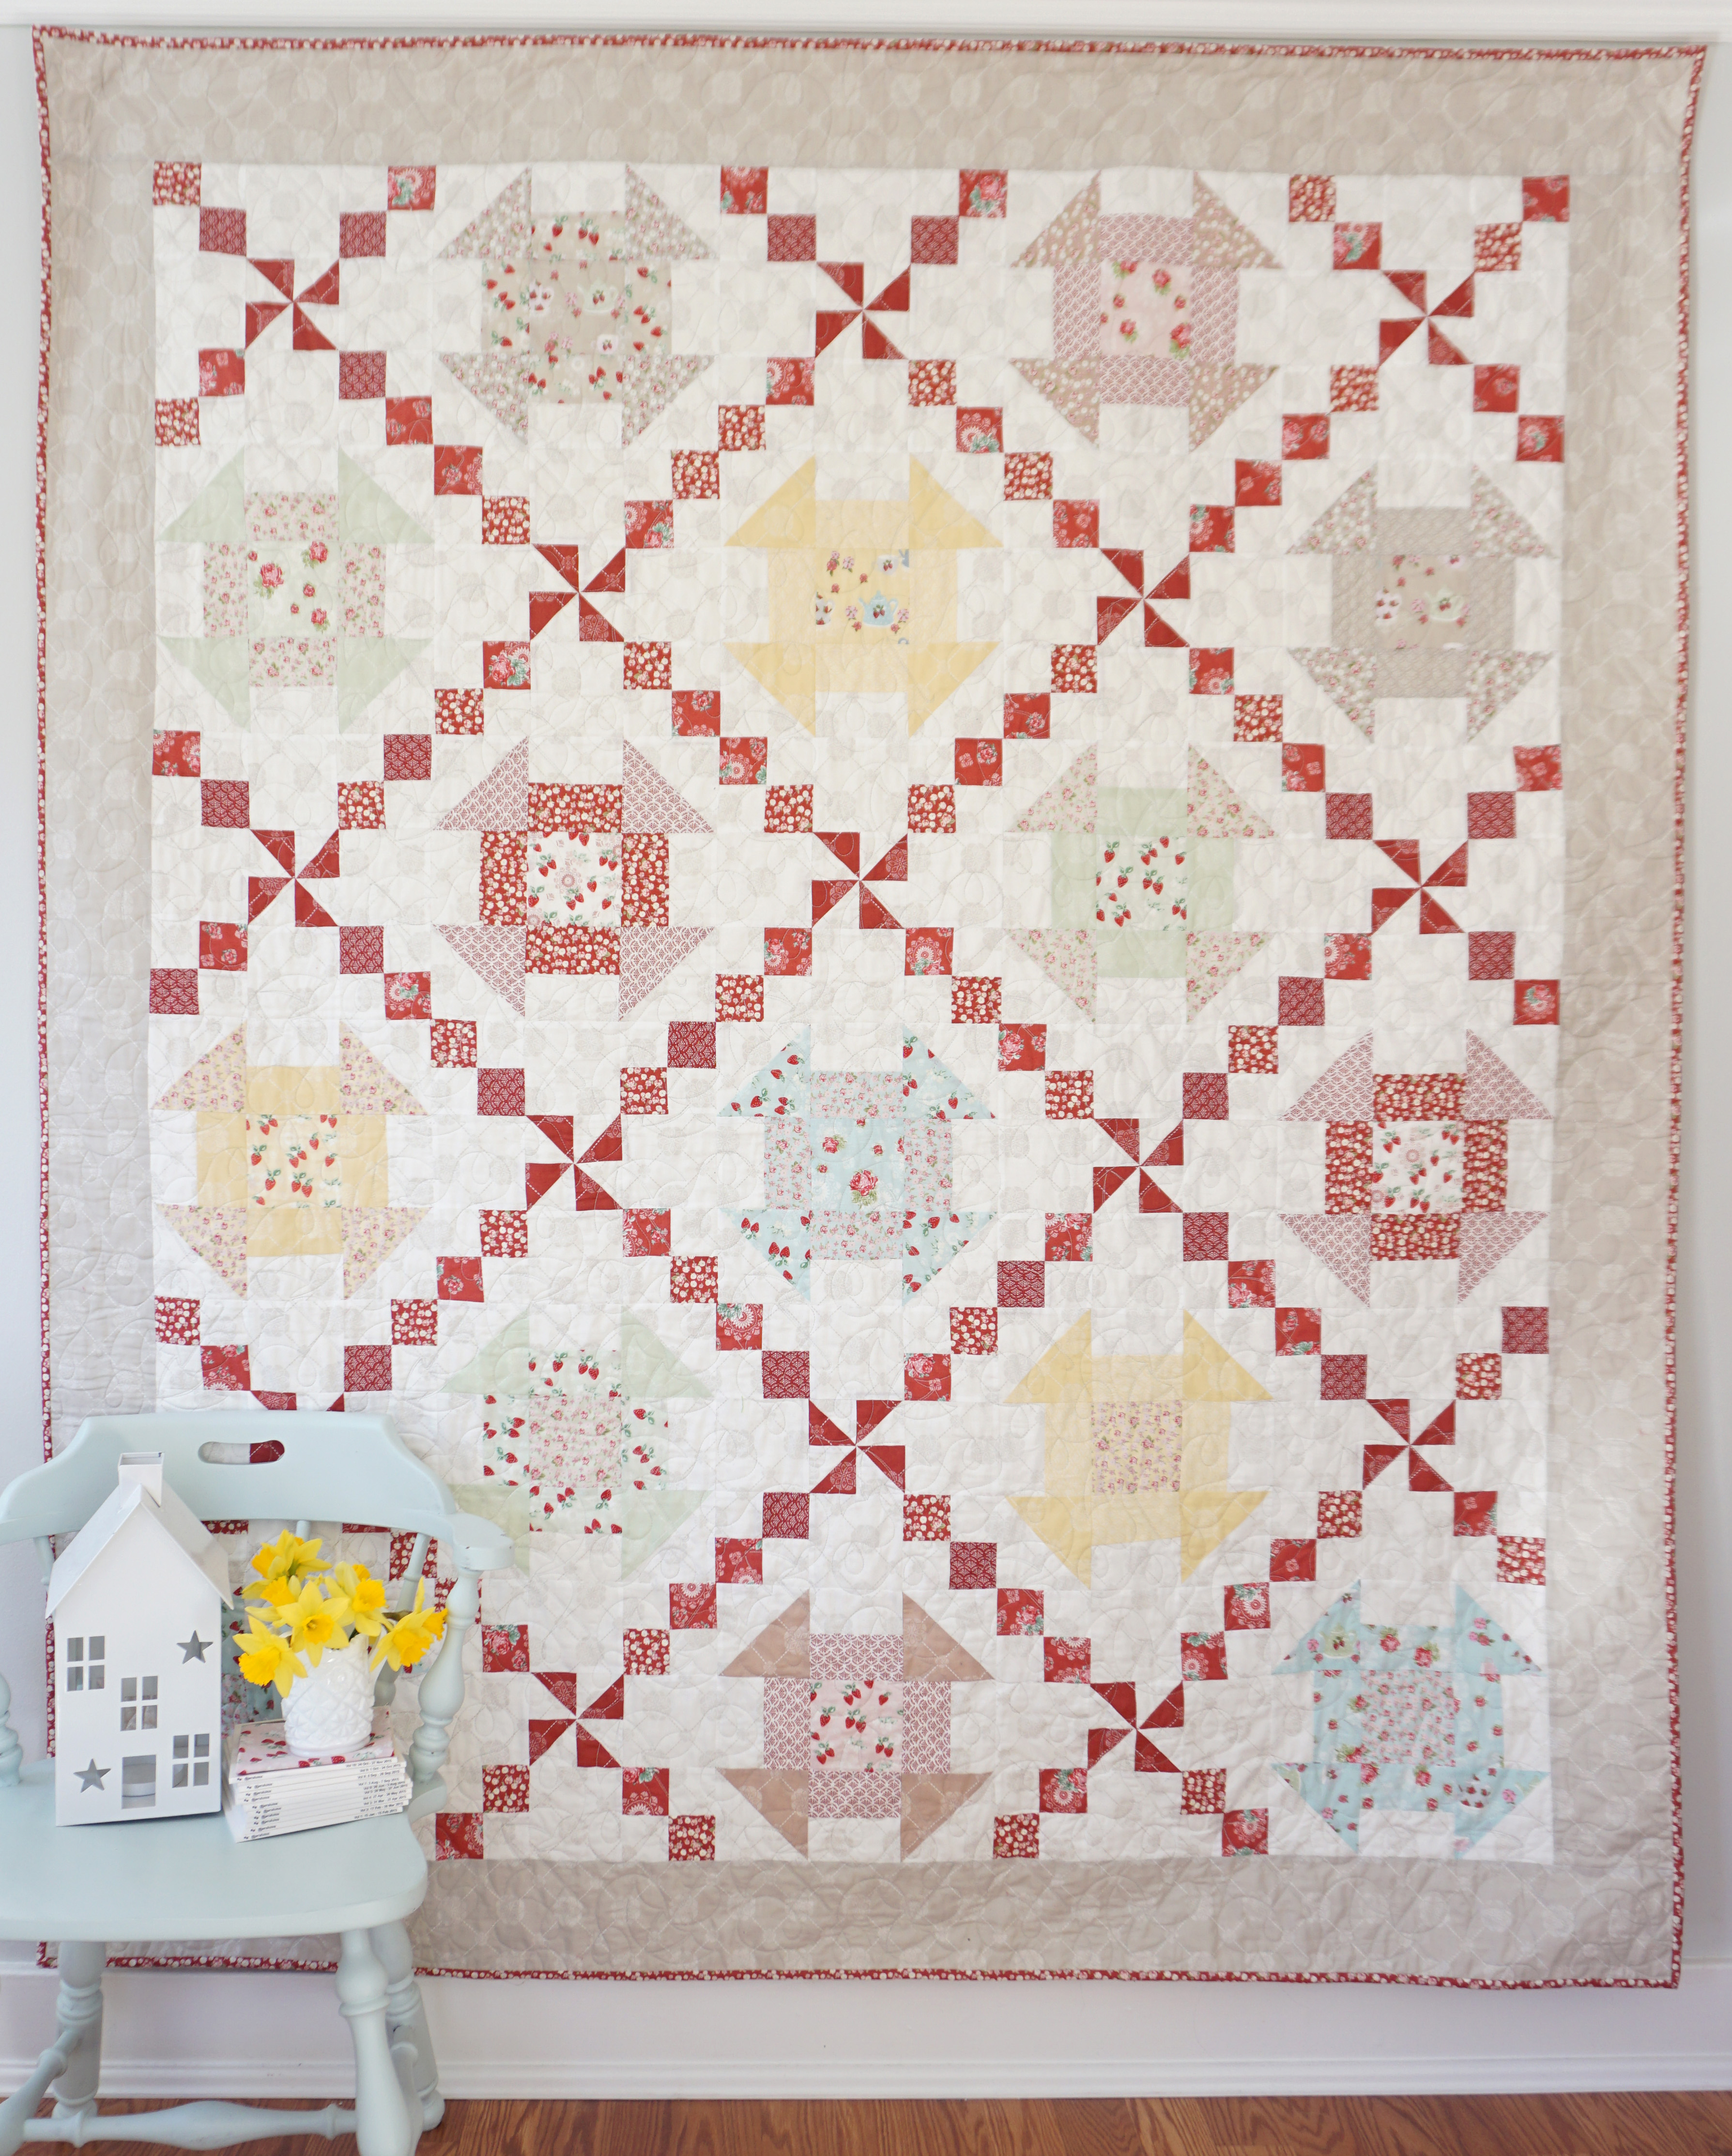
Hello All! I am so excited to share this tutorial for my Tea on the Terrace quilt pattern! I used fabric from my new High Tea Collection for Lecien Fabrics, in stores this August 2016. If you’re a store owner, it should be available for pre-order now from Lecien =)
This is a timeless and beautiful quilt that’s made up of two simple blocks. Definitely easy for a beginner!
Below is the tutorial. I hope you enjoy it!
Quilt Measures 69.5″ x 81.5″
Printer friendly version can be found HERE.
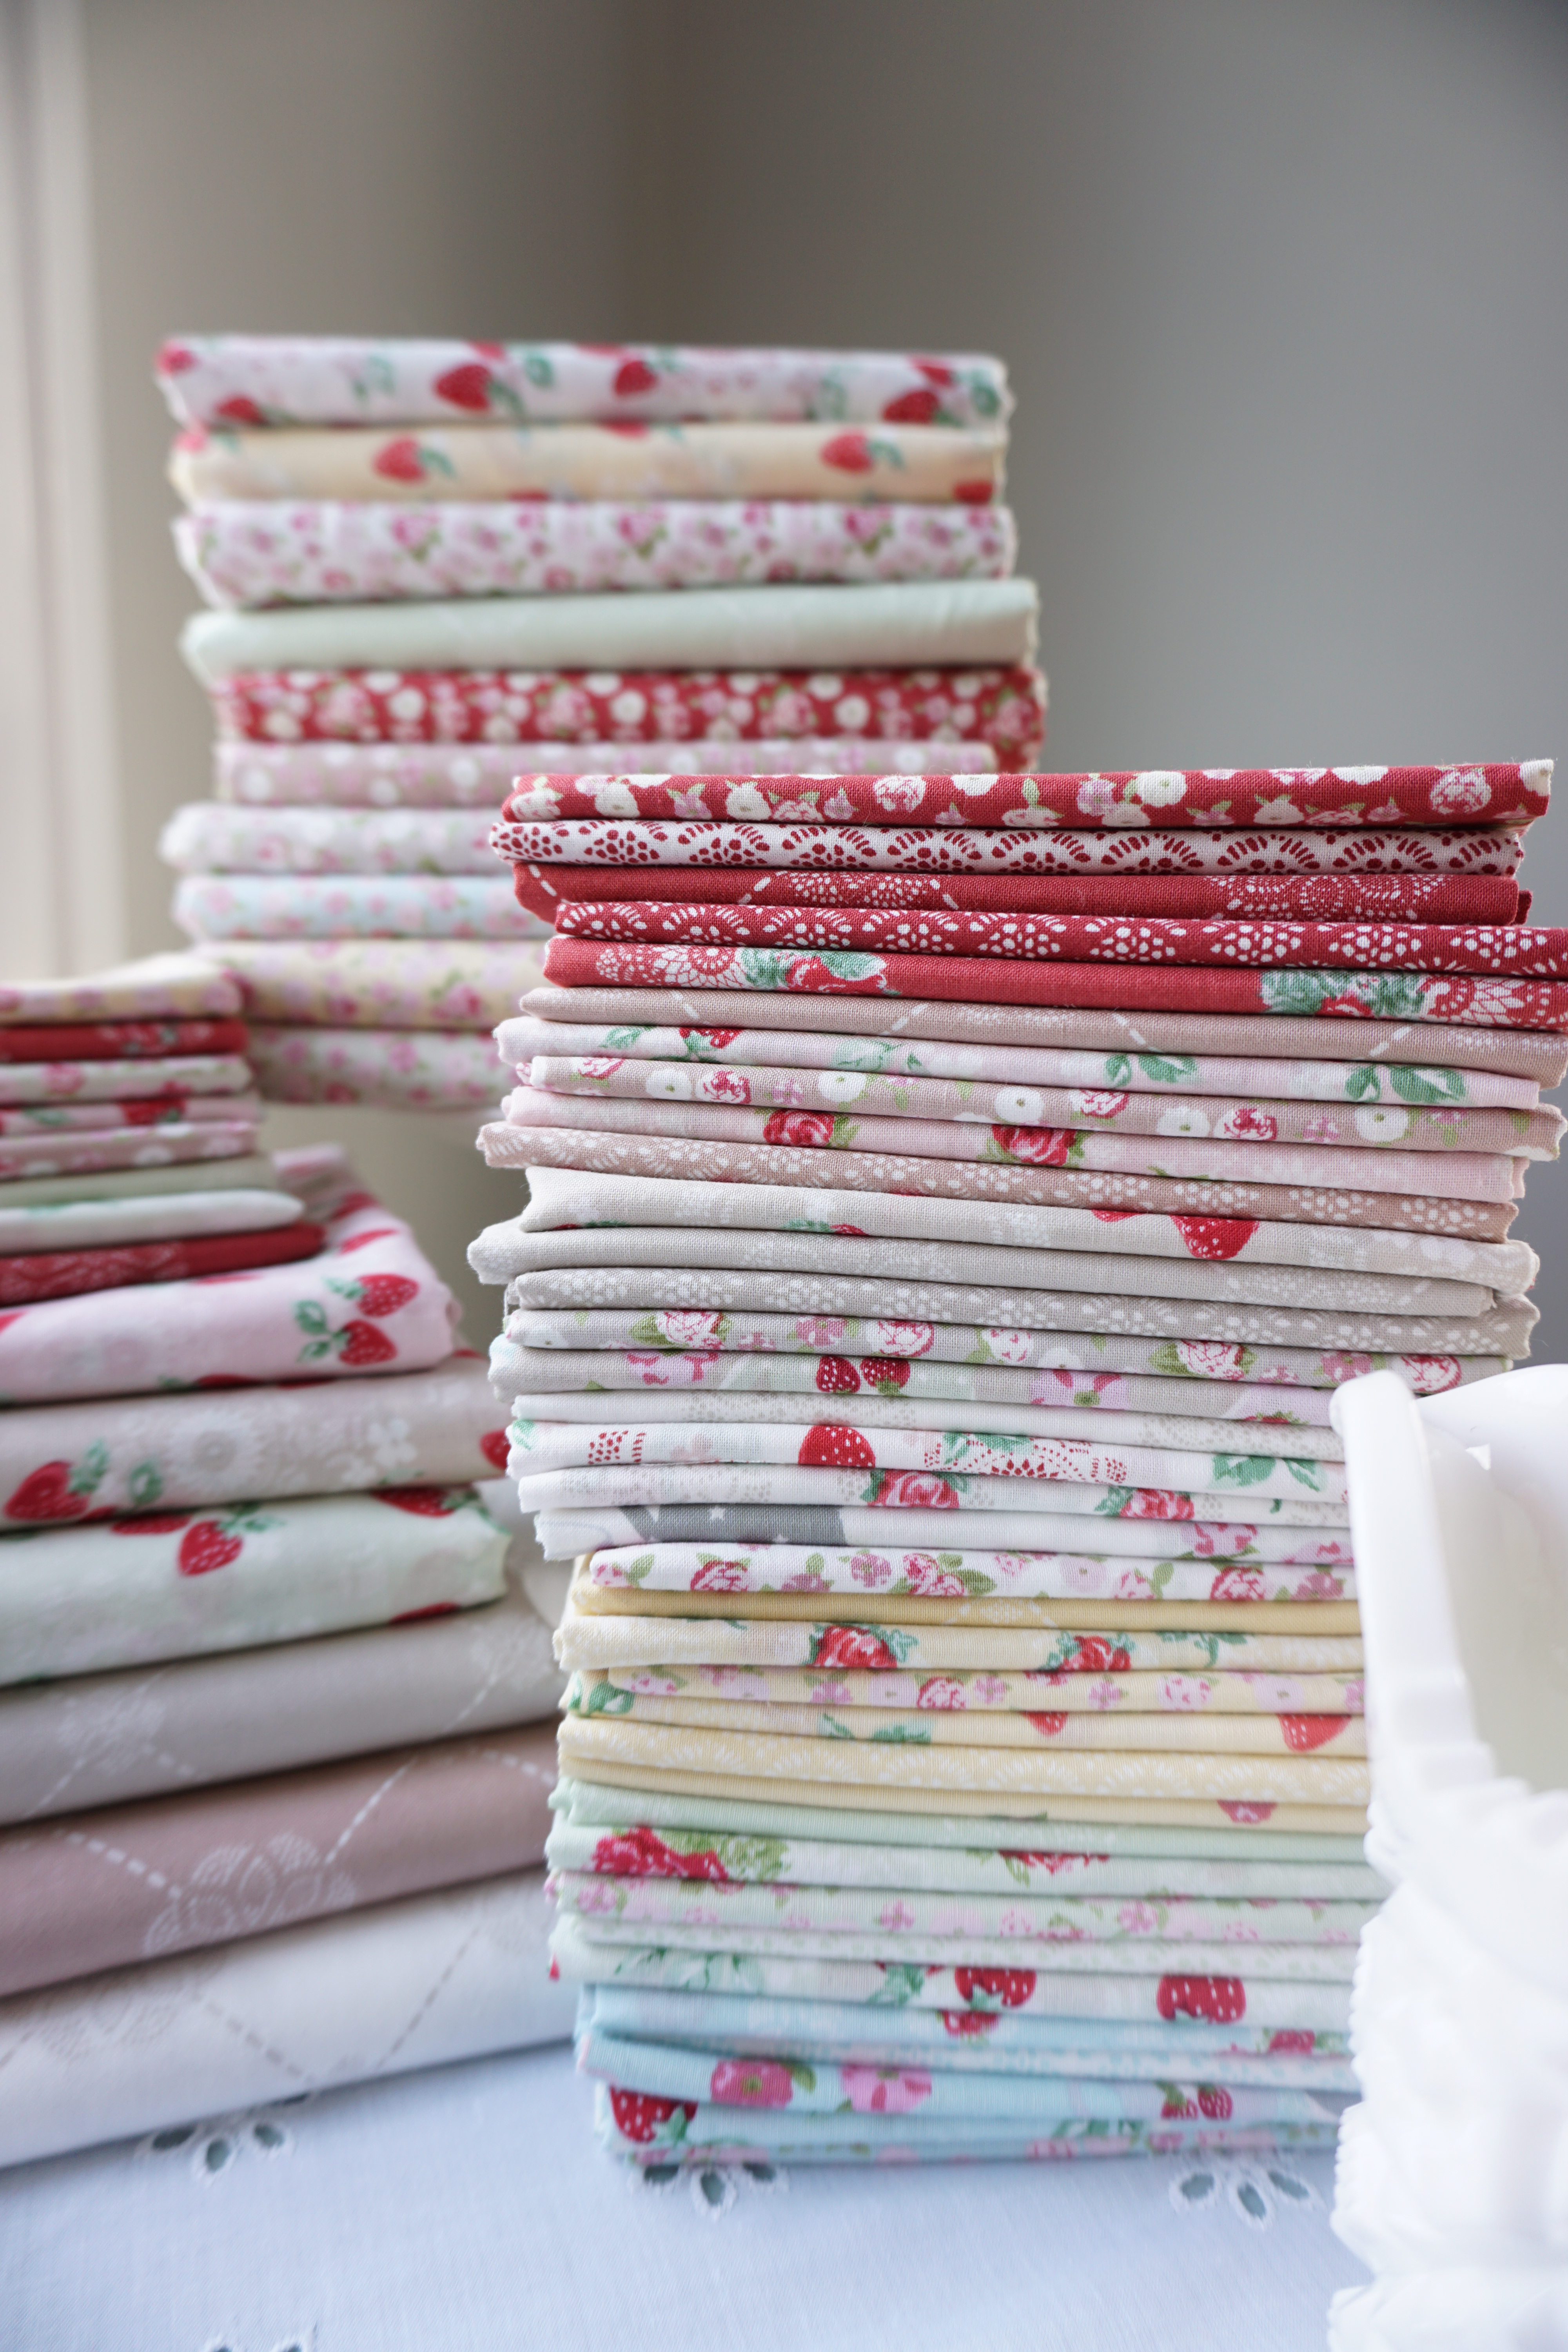
Materials (in parentheses are the sku#’s for the fabrics I used from my High Tea Collection):
– 15 fat eighths or 8 fat quarters/quarter yard cuts
(assortment of all colors from High Tea Collection)
– 1 yard of Red (variety of Red Fig: 31383 Mini Fans – 31, 31379 Doile Rose – 30, 31382 Doile – 30, 31381 Mini Florals – 30)
– 3 yards for background (31382 Doile – 10 Milk)
– 1.25 yard for border (31382 Doile – 11 Brown Sugar)
– 5/8 yards binding (31381 Mini florals – 30 Red Fig)
– 4 yards for backing (31380 Strawberries – 11 Brown Sugar)
Before starting, please note: When sewing/assembling/attaching, use a 1/4″ seam allowance and assemble with right sides of the fabric facing together, then press open with an iron. Also, WOF = width of fabric (from selvedge to selvedge). Enjoy!
Step 1 – Cutting Preparation – (layer fabrics when possible for quicker cutting)
From your background fabric (white), cut the following:
– Sixty (60) 4.5″ x 2.5″ rectangles: Along the WOF cut four 4.5″ strips. Sub-cut each strip into 4.5″ x 2.5″ rectangles.
– Thirty (30) 4 7/8″ squares: Along the WOF cut four 4 7/8″ strips. Sub-cut each strip into 4 7/8″ squares.
– Sixty (60) 4.5″ squares: Along the WOF, cut seven 4.5″ strips. Sub-cut each strip into 4.5″ squares.
– Thirty (30) 2 7/8″ squares: Along the WOF cut three 2 7/8″ strips. sub-cut each strip into 2 7/8″ squares.
– One-hundred and twenty (120) 2.5″ squares: Along the WOF, cut four 5″ strips. Sub-cut each strip into thirty 5″ squares. Quarter each square to get four 2.5″ sqaures from each.
From your red fabric, cut the following:
– Thirty (30) 2 7/8″ squares: Along the WOF cut three 2 7/8″ strips. sub-cut each strip into 2 7/8″ squares.
– One-hundred and twenty (120) 2.5″ squares: Along the WOF, cut four 5″ strips. Sub-cut each strip into thirty 5″ squares. Quarter each square to get four 2.5″ sqaures from each.
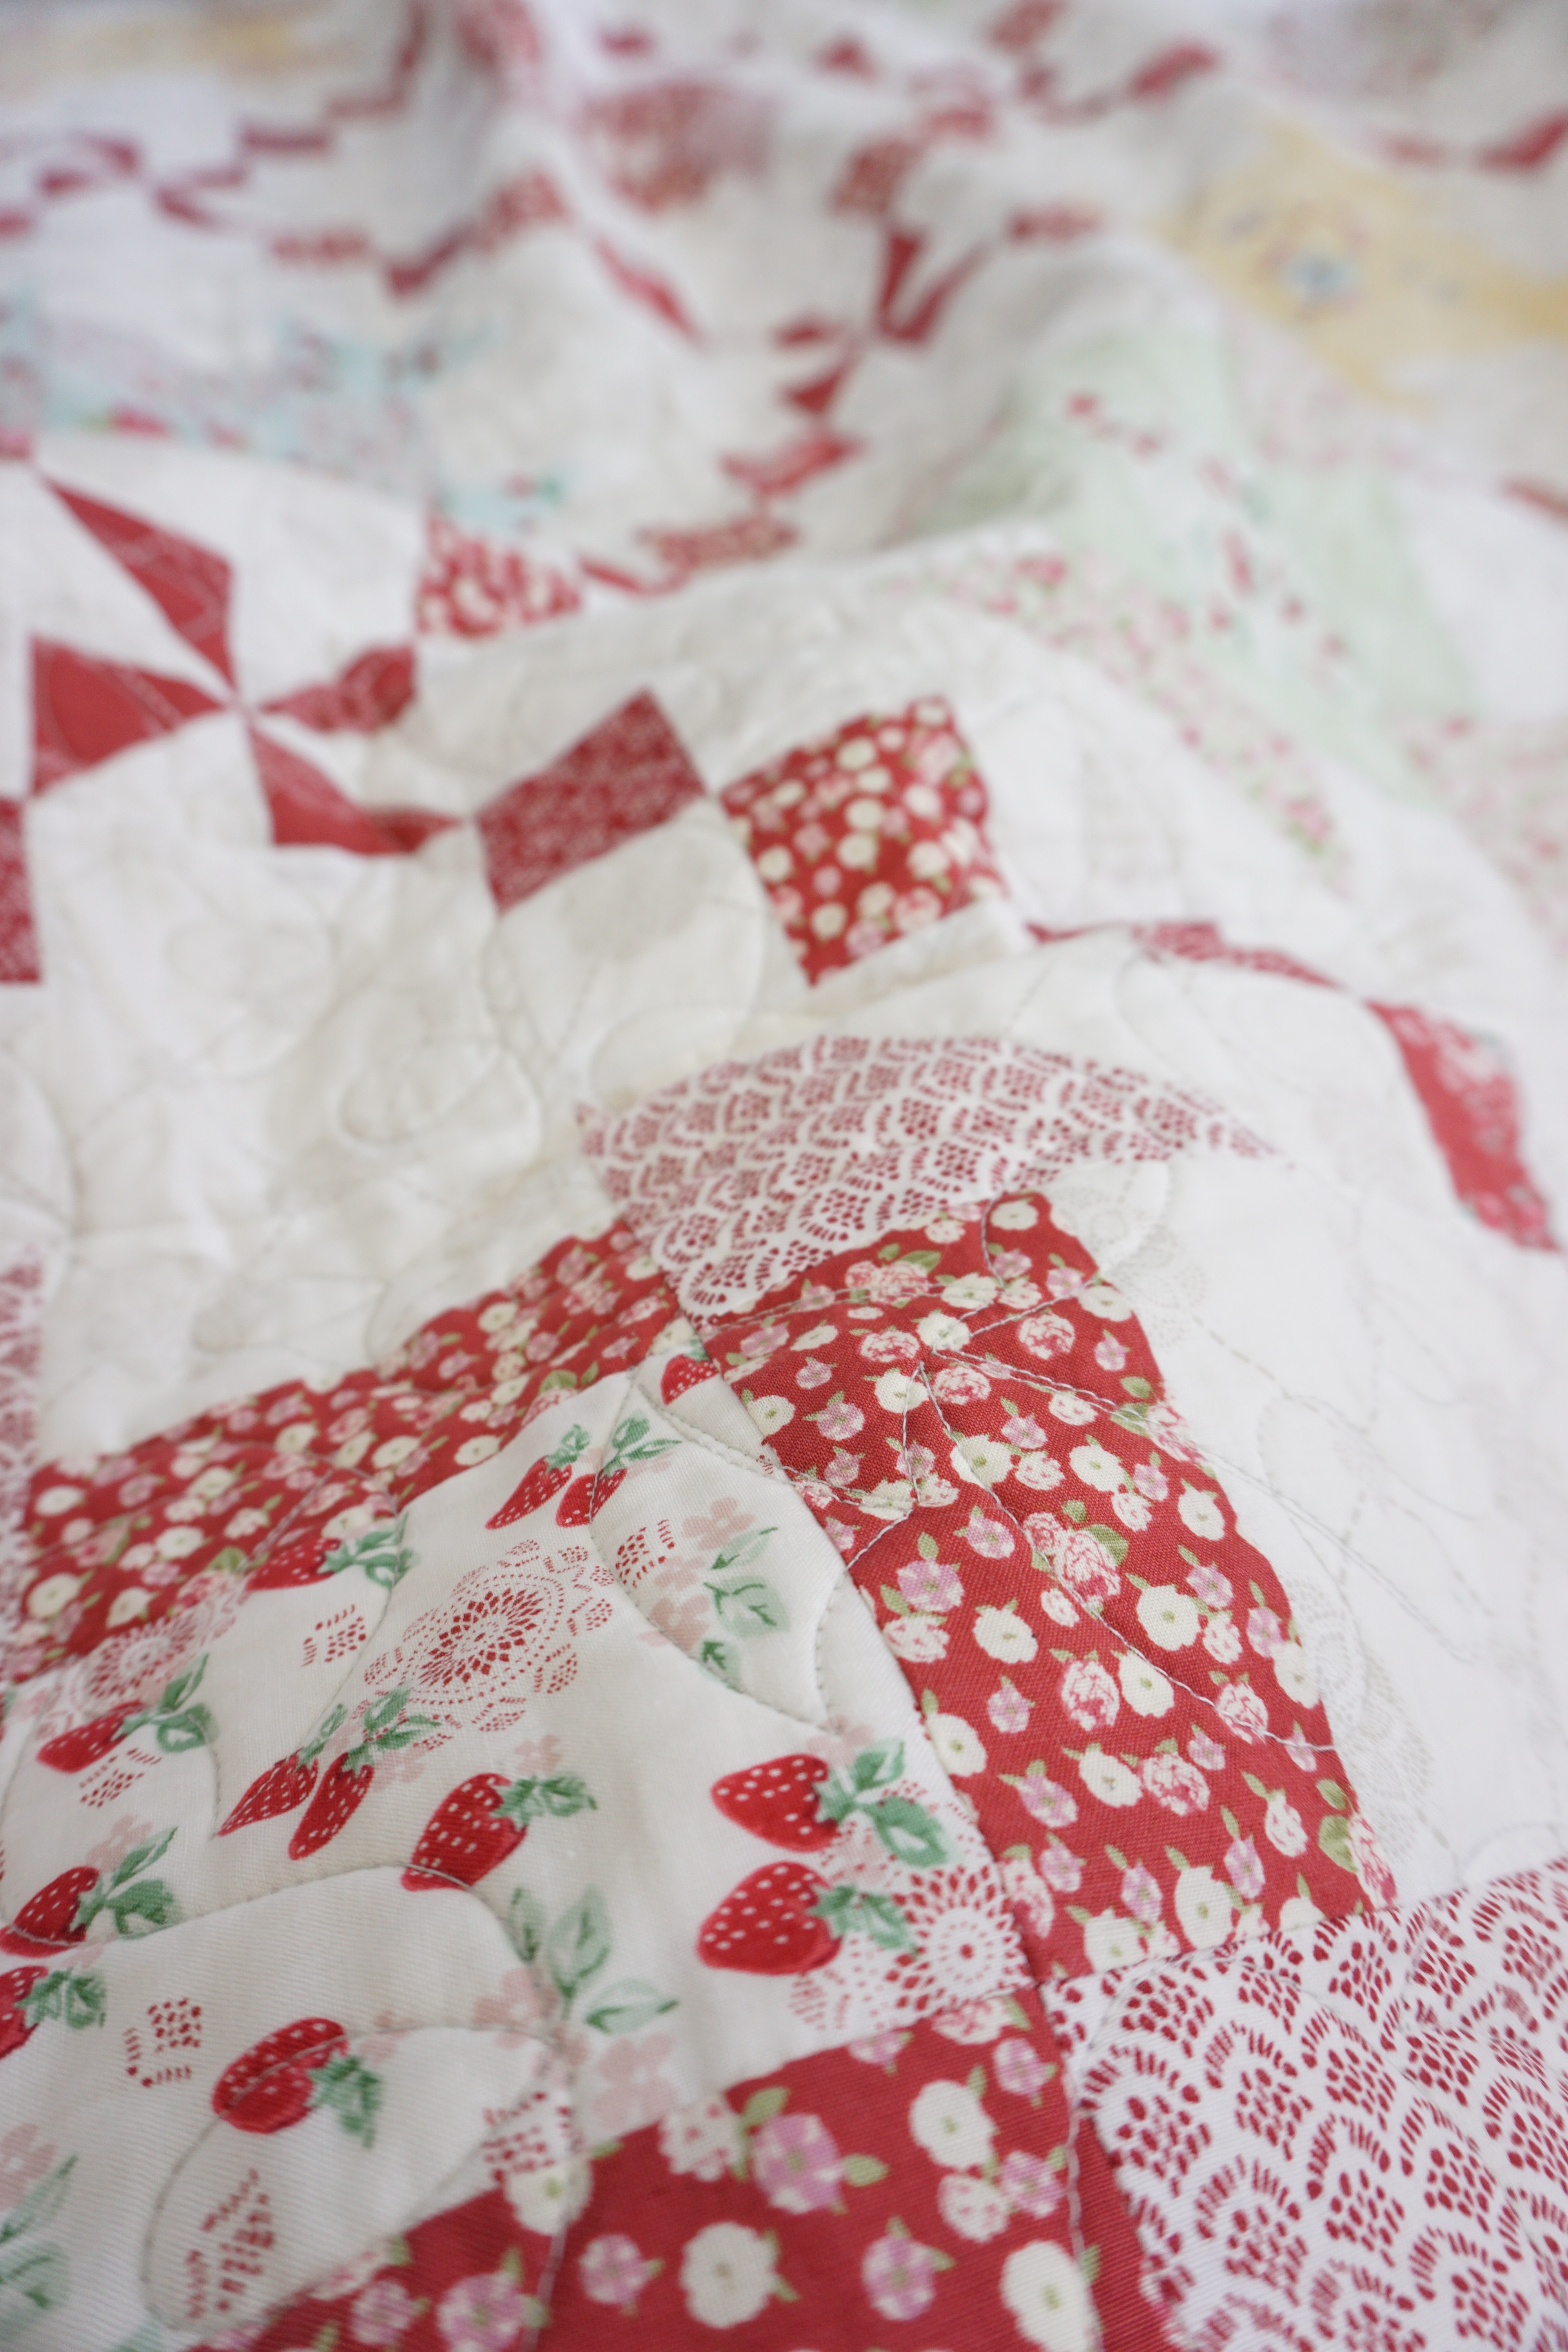
To make one churndash block (Block 2), from your quarter yard cuts choose up to 3 fabrics in the same colorway (example, three different blue fabrics). Then, cut four 4.5″ x 2.5″ rectangles from one, two 4 7/8″ sqaures from another and one 4.5″ sqaure from a third. I cut these on the go as I was assembling the blocks, so that I could choose which print combinations I wanted.
Okay…good job cutting. Now for the fun part…!
Step 2 – Block 1, Criss Cross Block
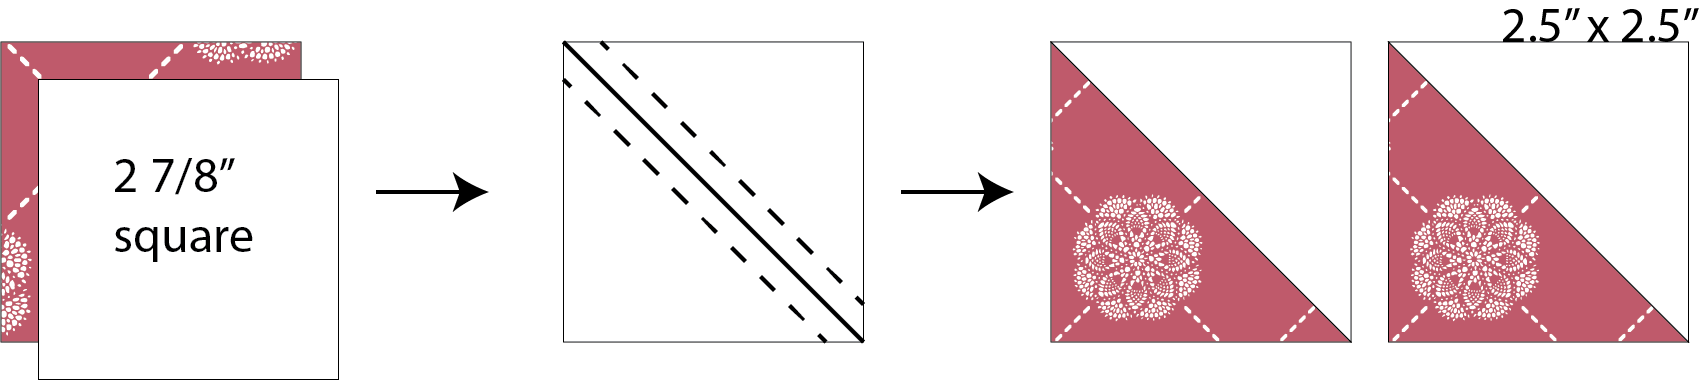
Make 4 half square triangles (HST): Take one white 2 7/8″ square and one red 2 7/8″ square and layer them with right sides facing together. Mark a diagonal line going from corner to corner as shown below. Sew along both sides of the diagonal line. Cut along the diagonal line orignally marked. Press open to yield two HST’s. Repeat to make a total of 4 HST’s.
Assemble the 4 HST’s as shown below to create a windmill.
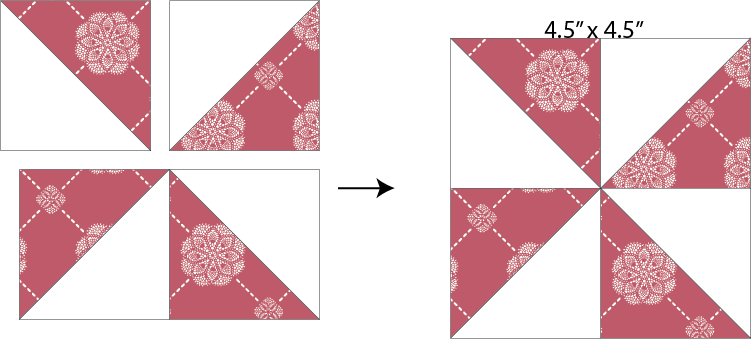
Next, take two red 2.5″ squares and two white 2.5″ squares and assemble as shown below to create a 4-patch block. Repeat to make a total of four 4-patch blocks.
Take one windmill, four 4-patch blocks and four 4.5″ white sqaures and assemble as shown below.

Repeat to make a total of 15 Criss Cross Blocks for your quilt top.
Step 3 – Block 2, Churndash Block
Cutting prep for one block: From your assortment of quarter yard cuts, choose up to 3 fabrics in the same colorway (example, three different blue fabrics). Then, cut four (4) 4.5″ x 2.5″ rectangles from one, two (2) 4 7/8″ sqaures from another and one (1) 4.5″ sqaure from a third.
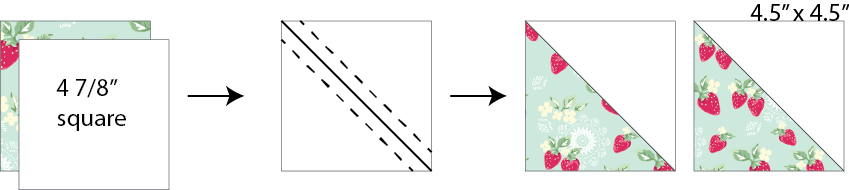
Make 4 half square triangles (HST): Take one white 4 7/8″ square and one color 4 7/8″ square and layer them with with right sides facing together. Mark a diagonal line going from corner to corner as shown below. Sew along both sides of the diagonal line. Cut along the diagonal line orignally marked. Press open to yield two HST’s. Repeat to make a total of 4 HST’s.
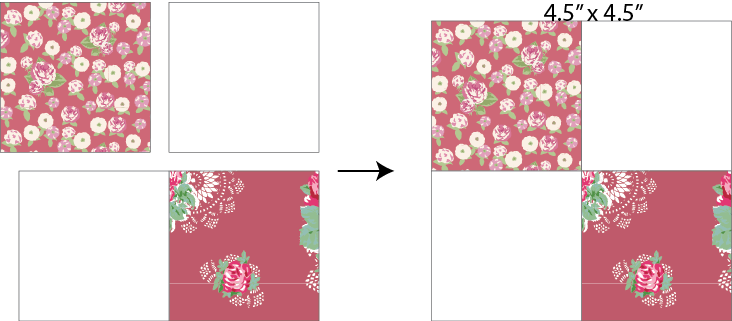
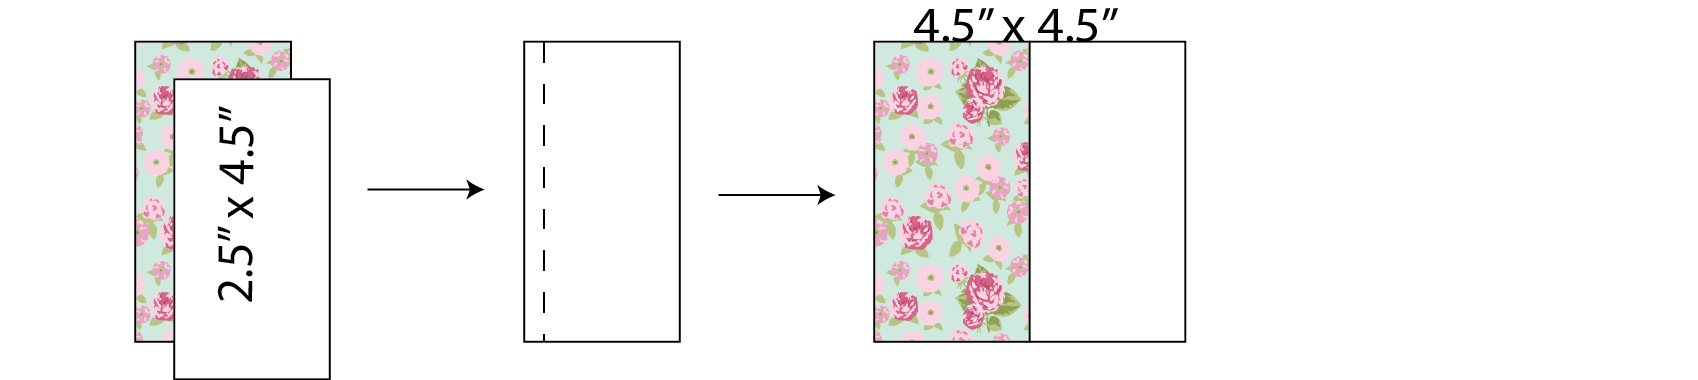
Next, take one white 2.5″ x 4.5″ rectangle and one color 2.5″ x 4.5″ rectangle. With right sides facing together, sew along the length. Press open to yield one 4.5″ square. Repeat to make a total of four.
Assemble as shown below.
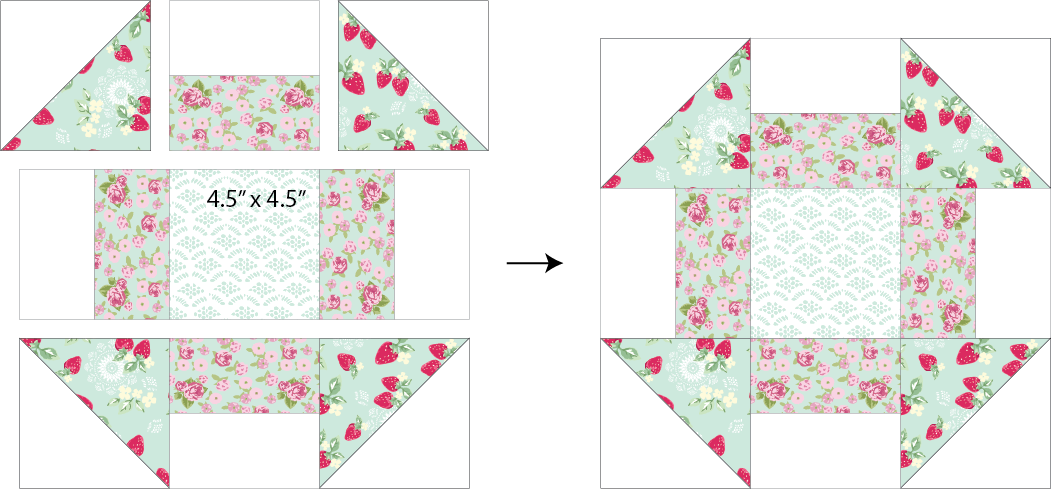
Repeat to make a total of 15 churndash blocks for your quilt top.
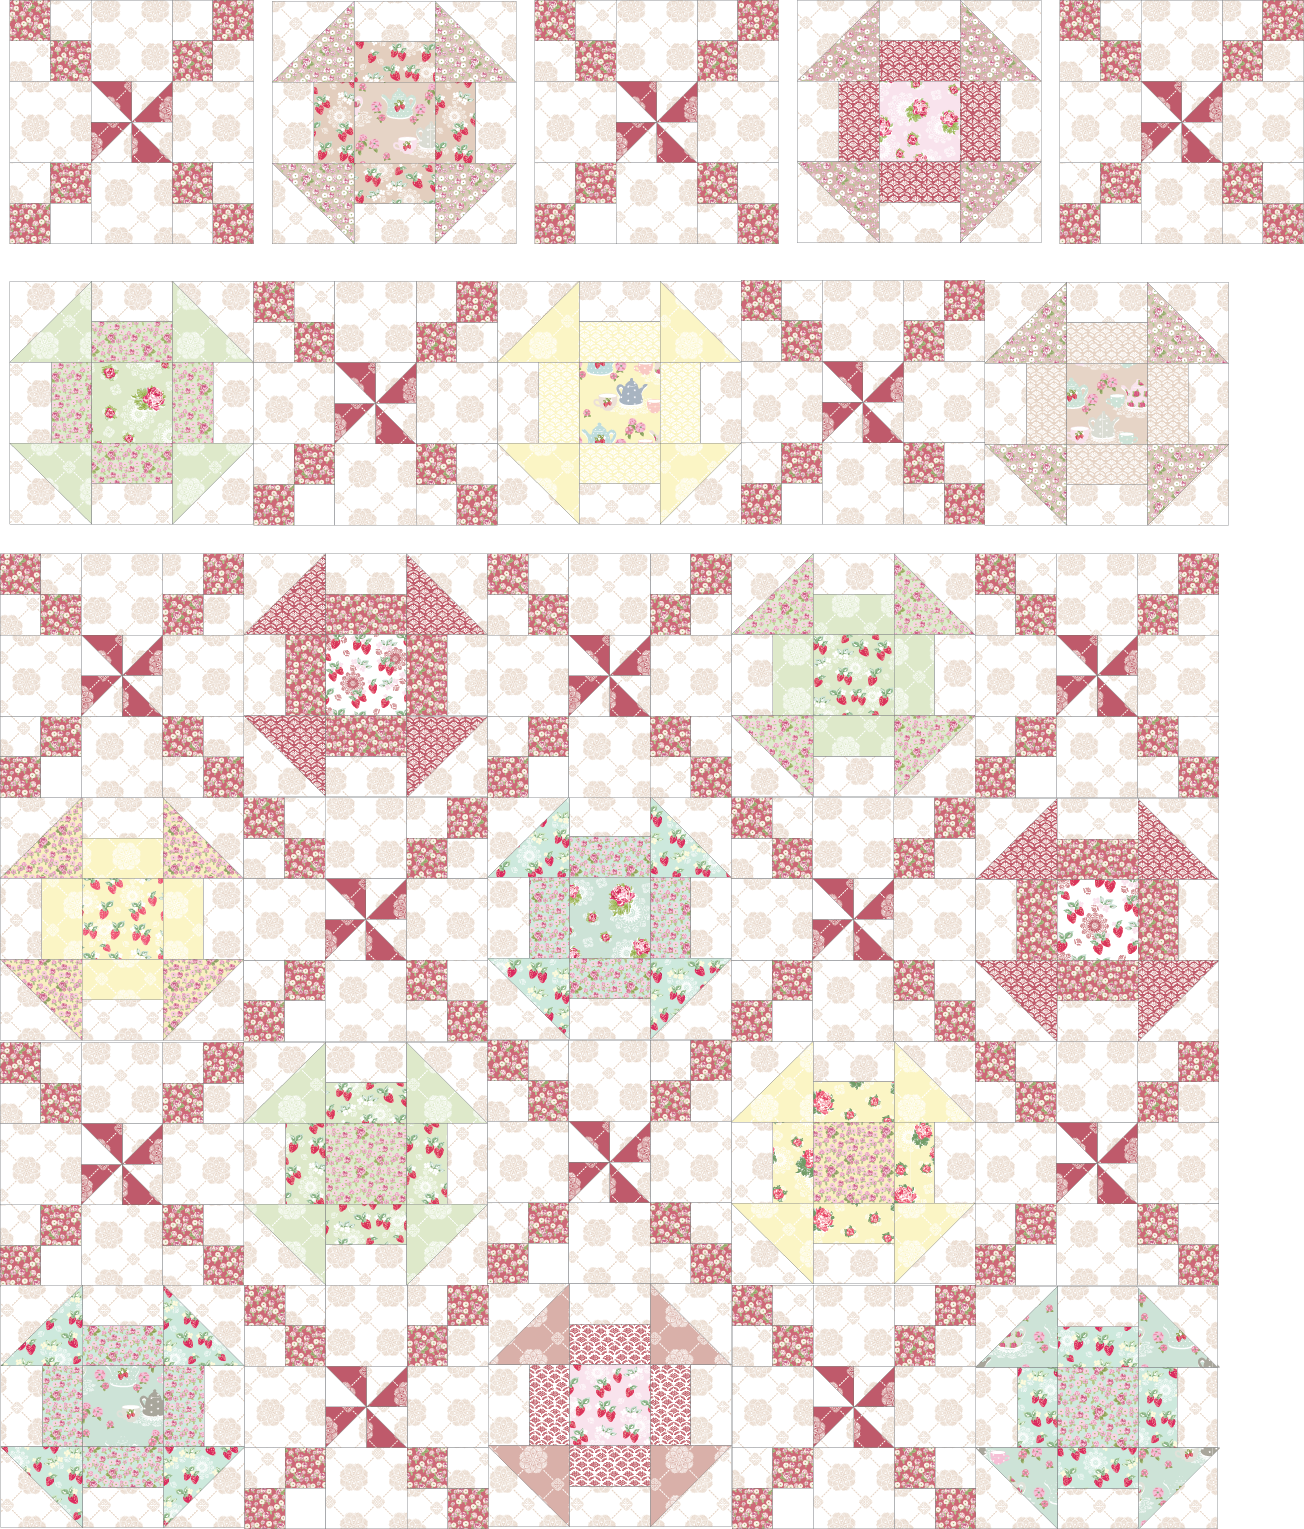
Step 4 – Assemble the Quilt top
Take all 15 of your criss cross and 15 churndash blocks and arrange them in a 5×6 formation as shown below. Start by assmebling each block within each row together, then assemble each row. together.
Borders: Cut eight (8) 5″ strips along the WOF. Sew two strips together at their ends to create one long strip. Attach to the left side of the quilt, then trim off excess. Repeat but on the right side, followed by the top and bottom borders.
Backing: Cut your 4 yards in half to yield two 72″ x 44″ pieces. Trim off the selvedges, then sew along the length (72″ side) to create one big backing piece.
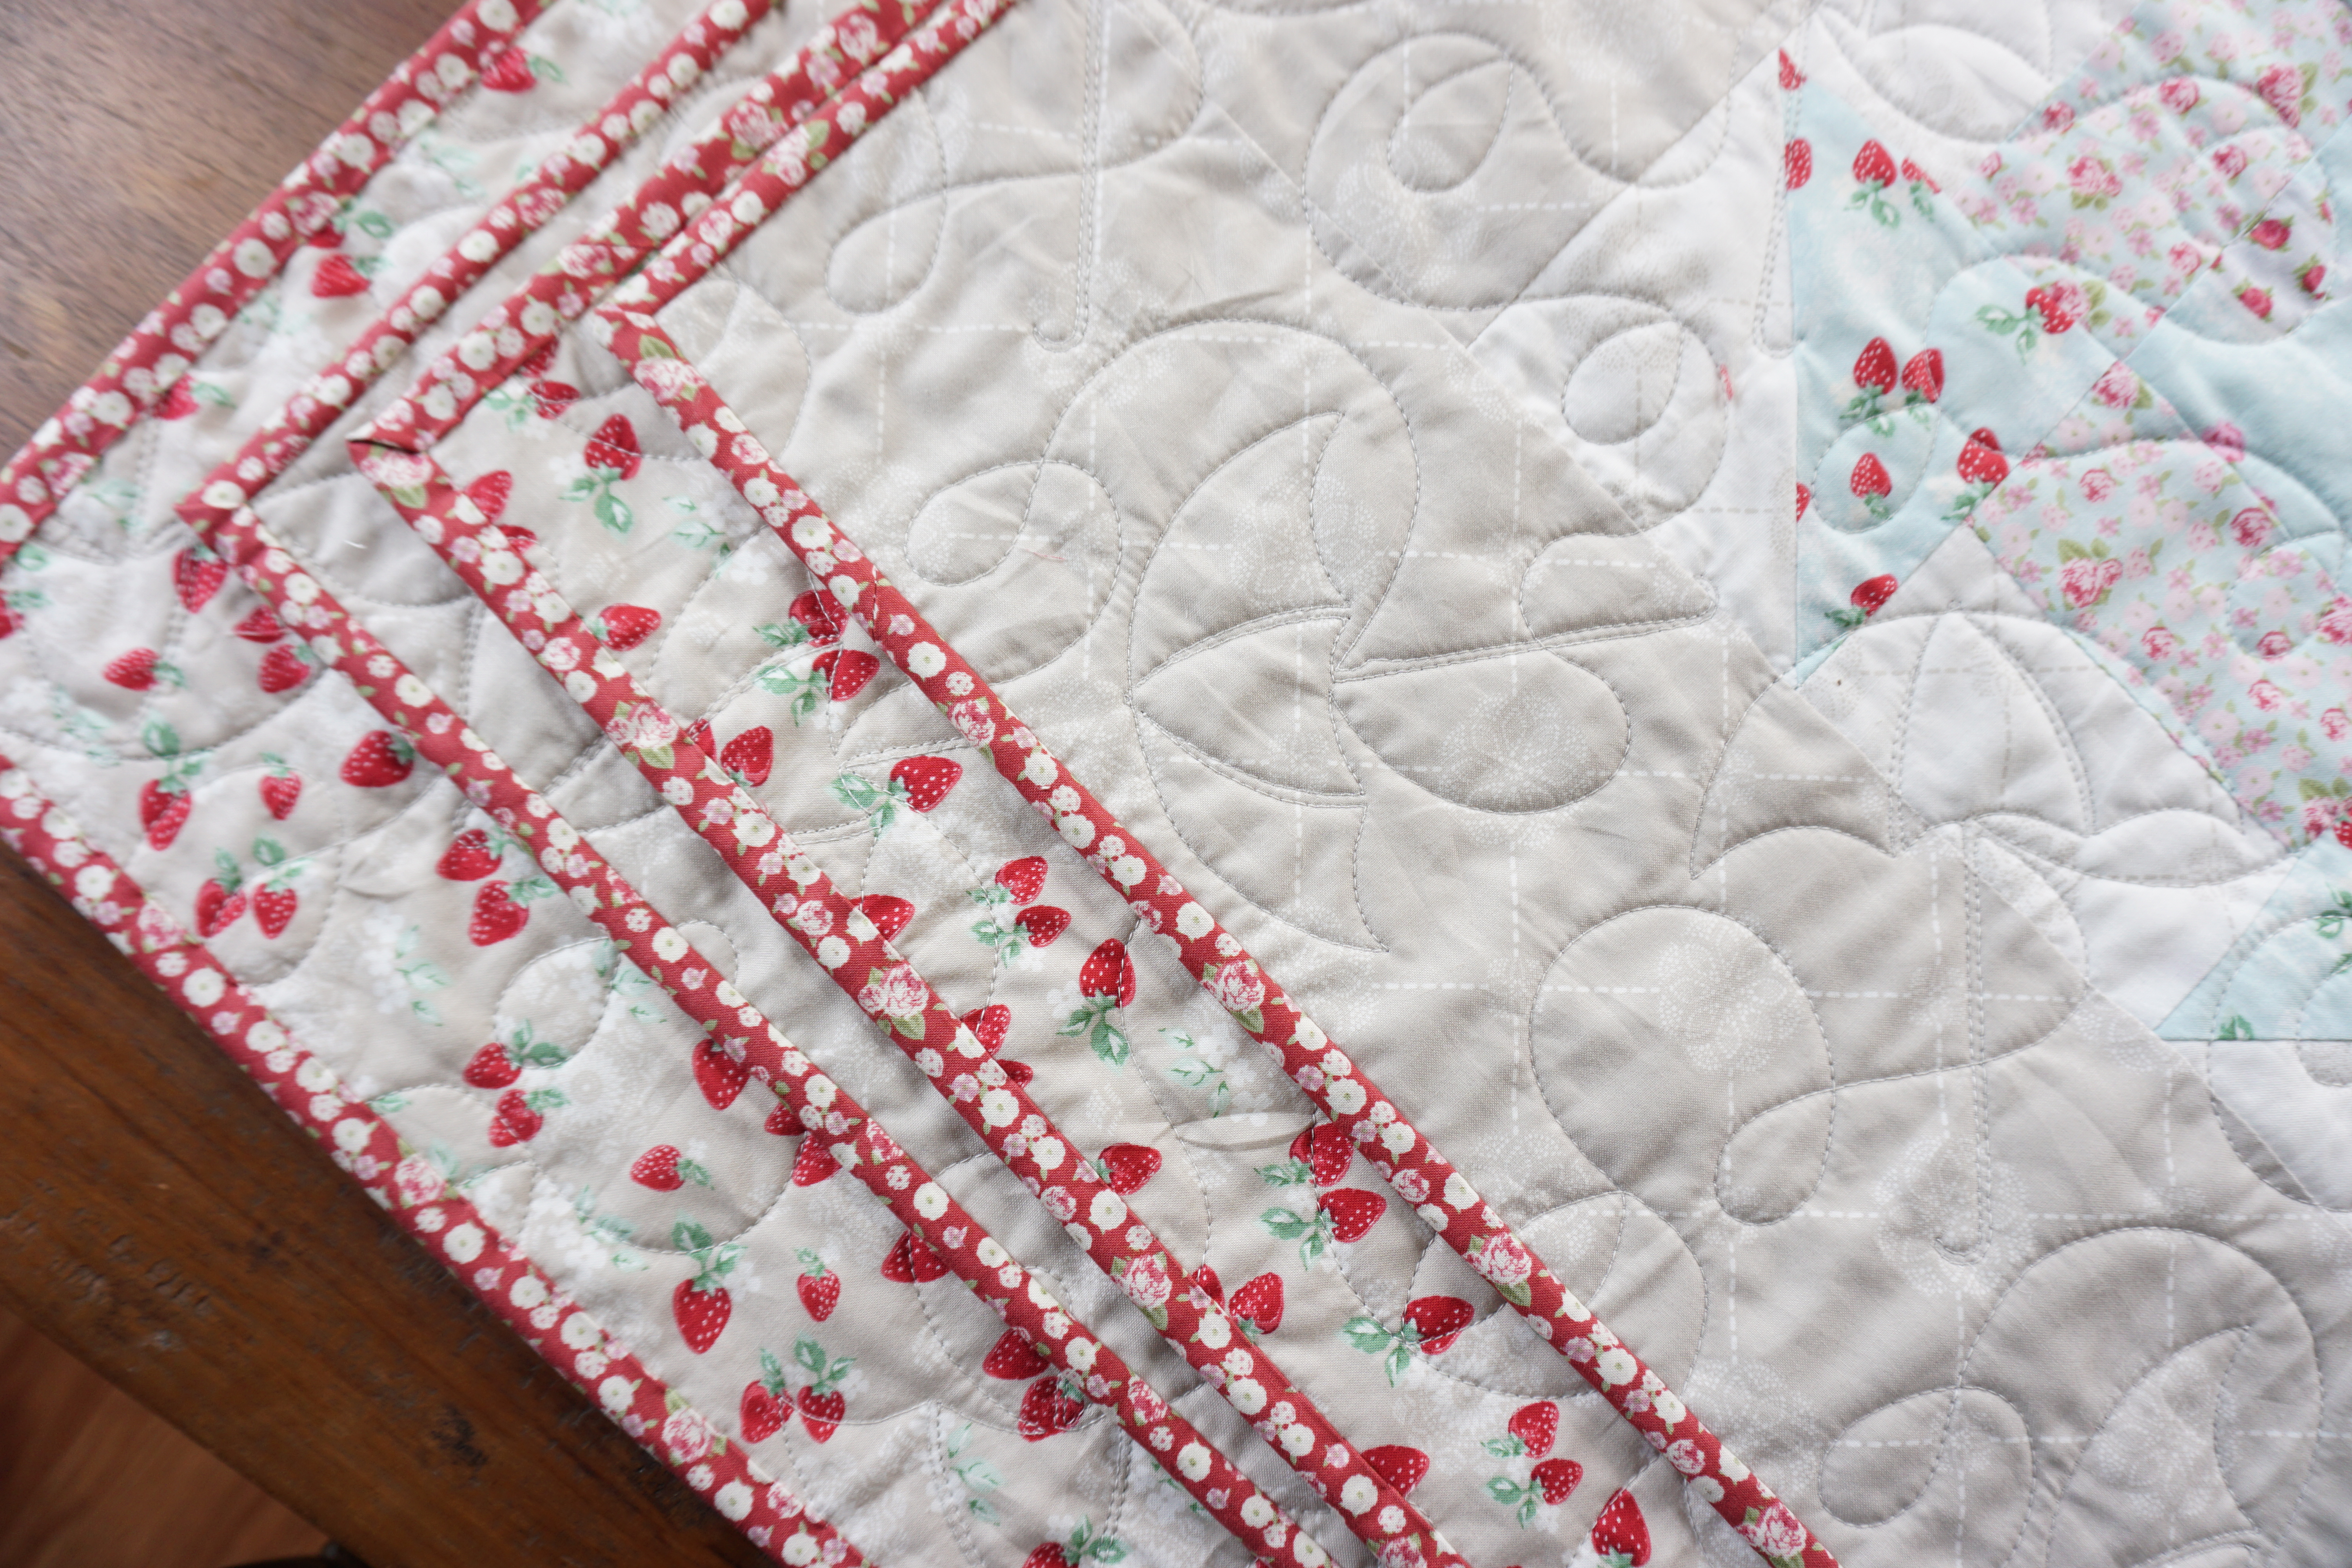
Binding: Cut eight 2.5″ strips from the WOF for your binding.
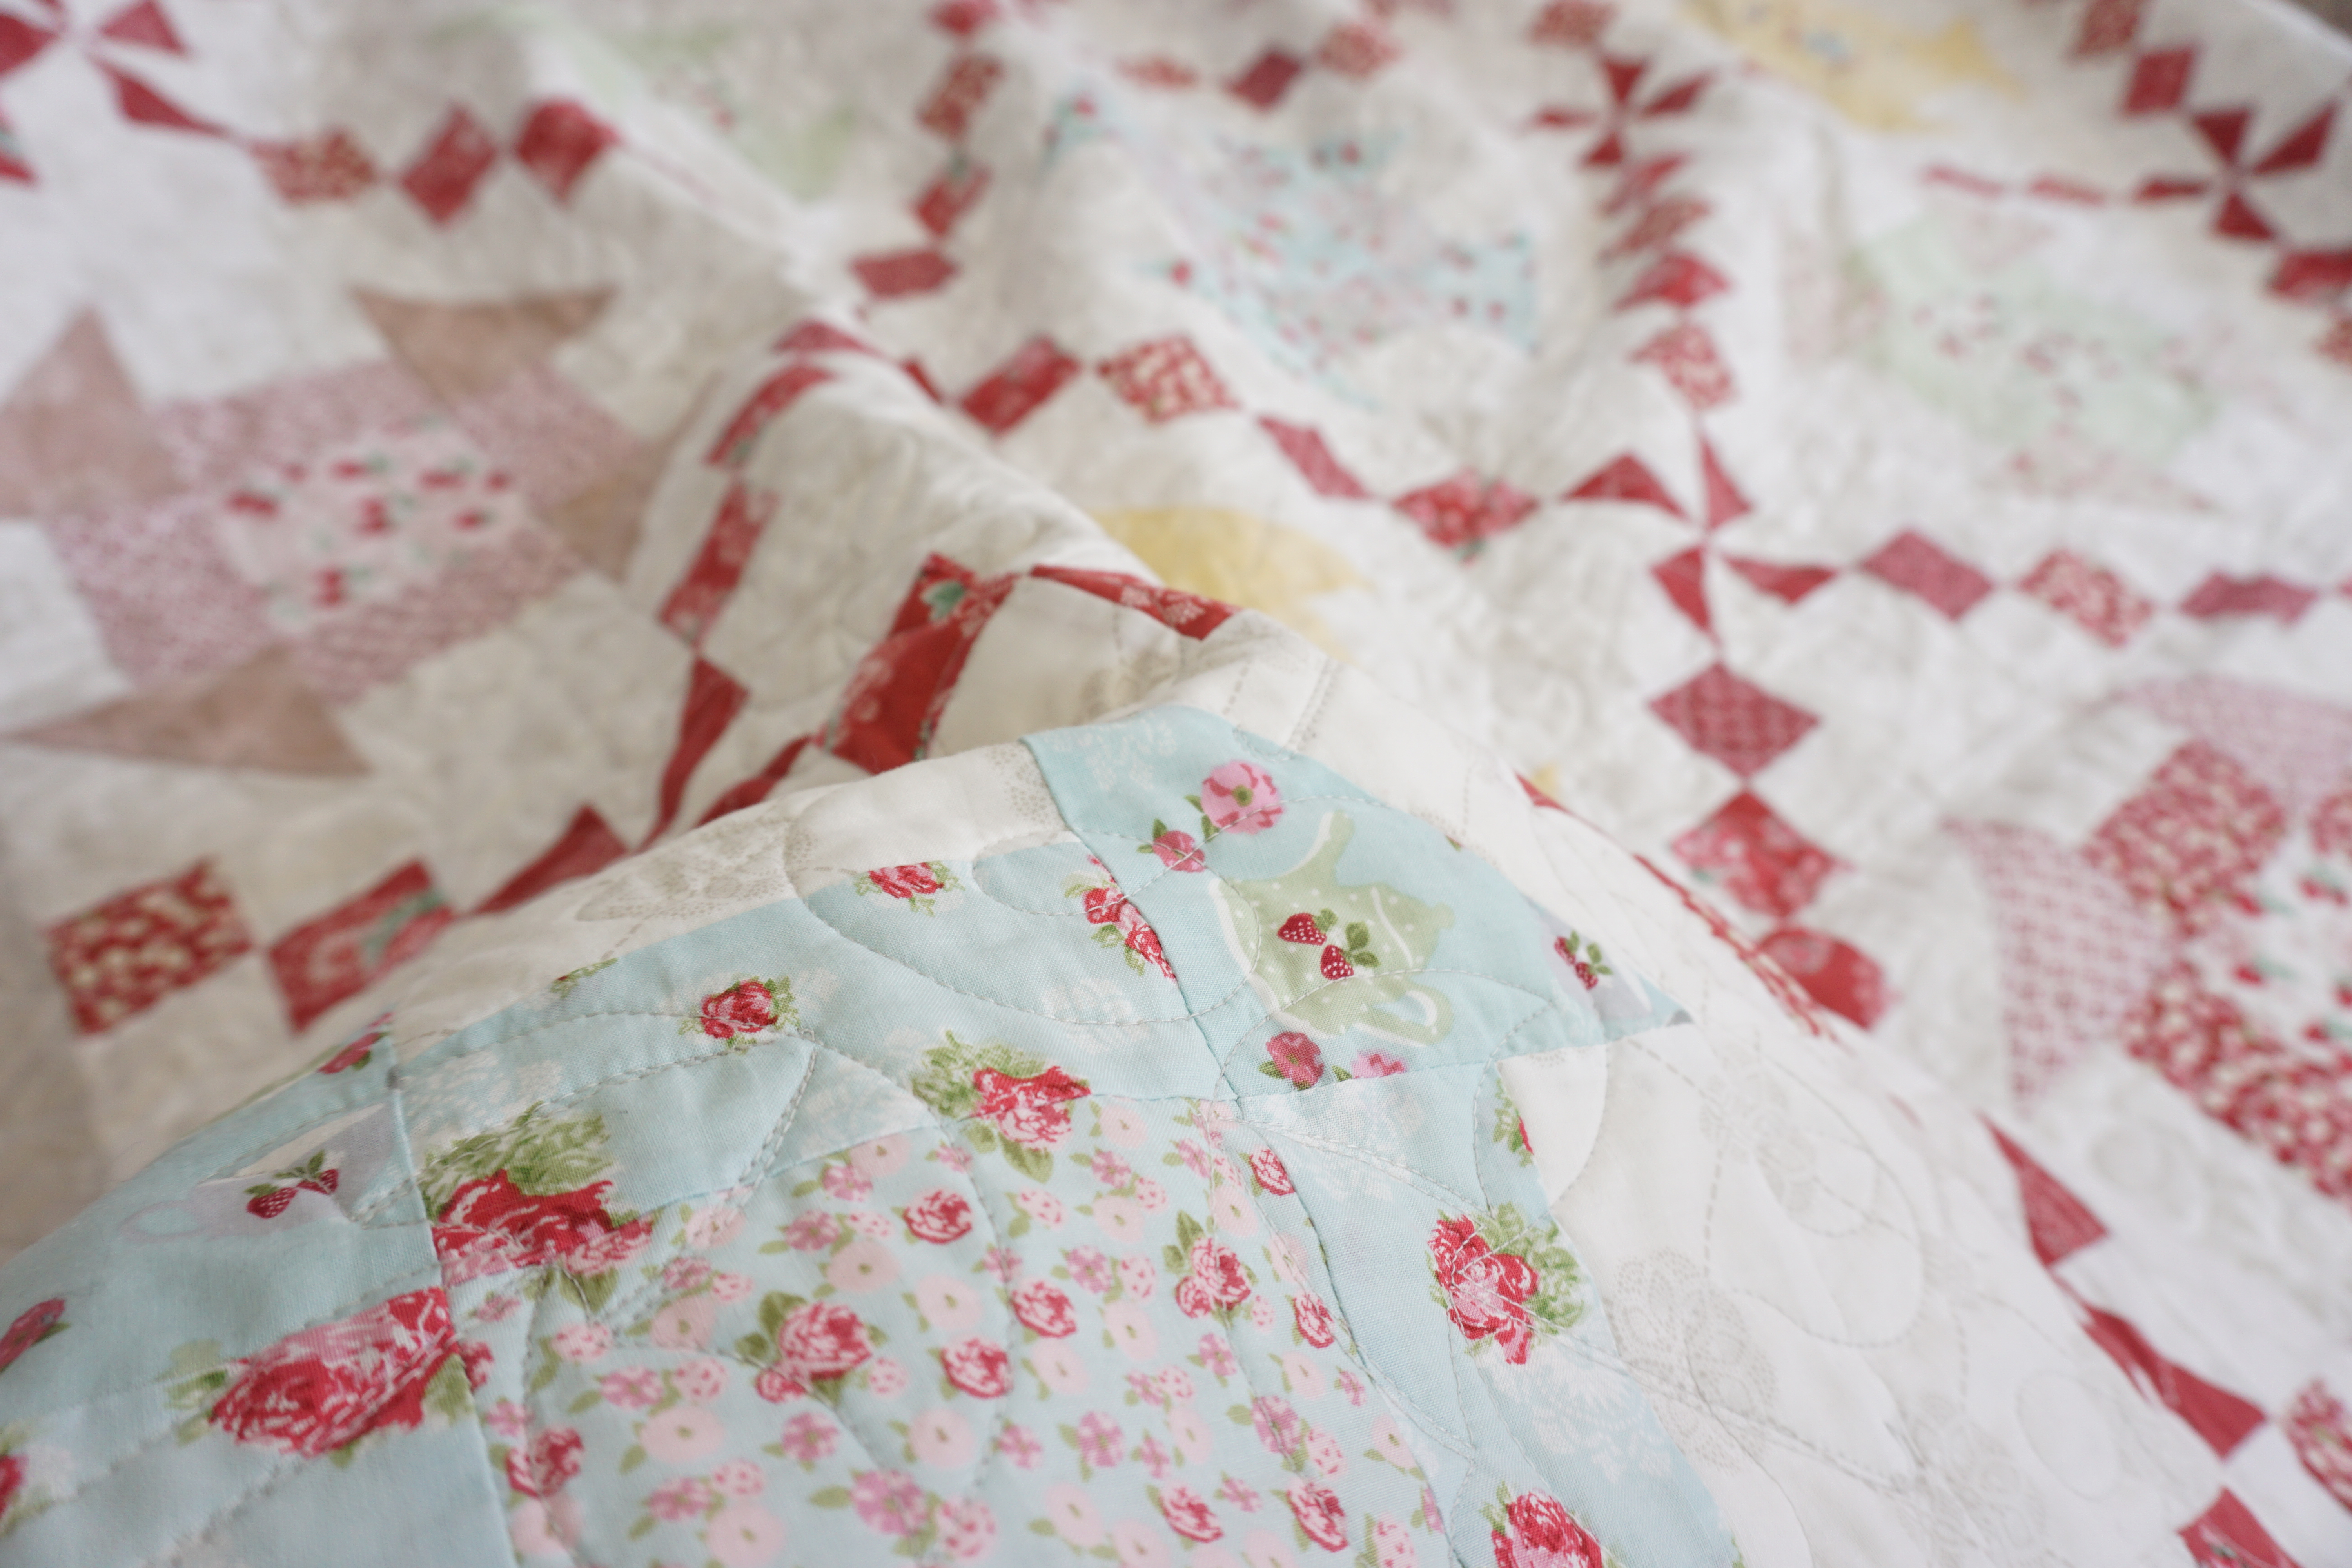
I was lucky enough to have my dear friend Monica from It’s Just Sewing finish my quilt with these perfect little Quilting in the Rain umbrellas! So in love!
And that’s all there is to it! Two simple blocks for a beautiful and timeless quilt. I hope you enjoy my tutorial. Thanks so much for stopping by!
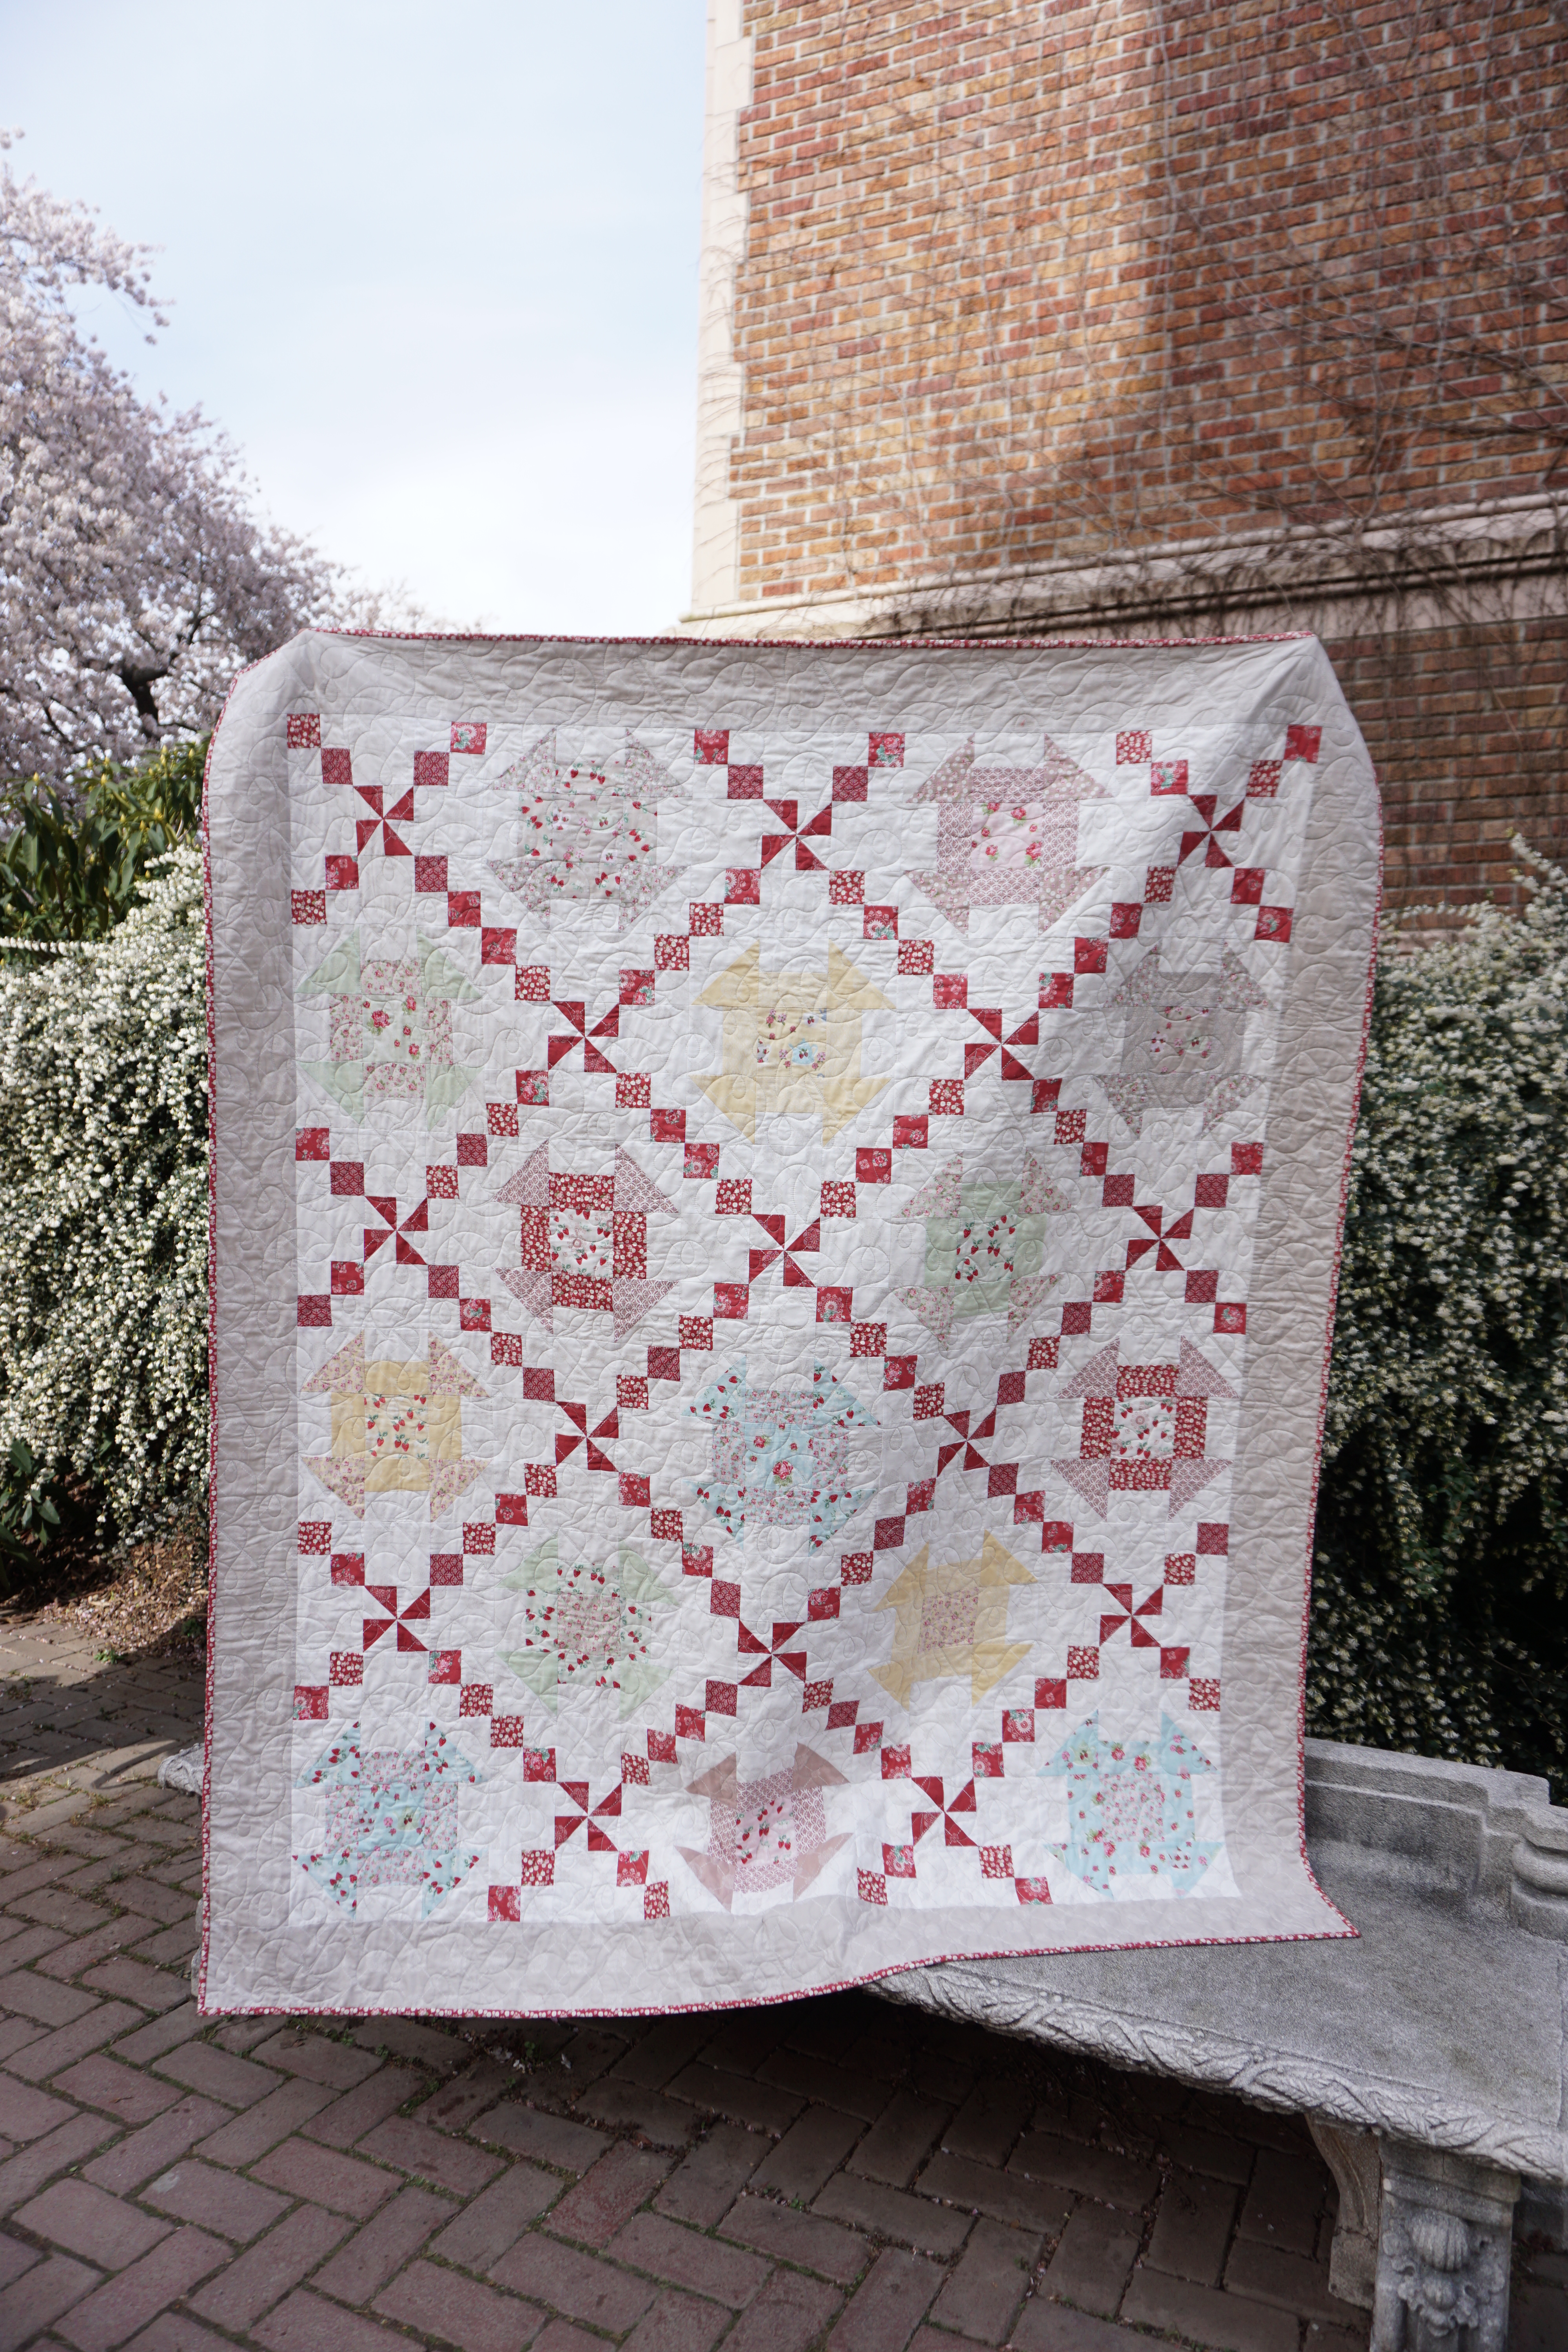
Above photo taken at the University of Washington. Thanks to my husband for holding up my quilts time and time again in public places. ;-p
-jera
Lovely quilt and the umbrella quilting motif is perfect!
Beautiful fabric line! Thank you for sharing the tutorial for this lovely design.
Beautiful quilt! Love the soft colors of your fabric line. Thanks for sharing the pattern. It does indeed look simple to make yet refined when put together.
This is so beautiful! Love the little pinwheels in between. Beautiful fabric line! Thank you for sharing the tutorial of this pretty quilt!
It’s beautiful and perfect with the fabric choices! Thank you for the pattern – pinned it so I can snag one of those fat eights, when they appear, and make a quilt!
What a pretty quilt, this pattern displays your High Tea collection beautifully! I’m glad you decided on this border color, it’s just perfect. I forgot you were sharing this as a tutorial, thanks so much for that…I’m looking forward to making this little gem 🙂
Gorgeous quilt! The fabric is beautiful and the umbrella quilting is perfect! Thank you for the tutorial!
Jera, this is such sweet quilt. I love these blocks and they are so easy to whip up.
Your fabric is just perfect!
I agree with the ladies, a sweet quilt and the fabric and quilting are beautiful. Thank you for the tutorial, it will be used.
This is a gorgeous quilt! Thank you for the pattern! I can’t wait for the fabric to be sold!!
Susie
So sweet!
I am so looking forward to this beautiful fabric line of yours hitting the quilt shops!! I have so many ideas of things I am wanting to make with these!! August seems so far away! @darice4581
I did find shop that only offered yds and then another offered all. So do some research. Pluse pkace was goid price.
I’m so looking forward to this beautiful collection being in the shops. I’d make a summery quilt with it for starters, but probably also a table runner and bunting for the outdoors dining area. I love it!
Oh! I can’t wait for this to release! It’s so pretty! I’d probably make a mini quilt I think ?
Beautiful quilt and thanks for sharing the pattern. I can’t wait to get started on this great summer stitch.
I hace obtained my jelly roll, mini squares, xharm pack and 4 FQ’s. I dont know what to make. I wonder outside of backing will i have enough fabric to pull this off. I will have to do the math. I niticed i know u use QAYG but this tutorial didnt nention batting. I guess I should reread my QAYG to refresh my memory. I could do it like a regular quilting but need some help finishing. I wonder did you quilt this traditionally and not as you go because design is nice umbrellas.
I LOVE that quilt and pattern….and isn’t having a great husband a plus! I have one as well. ♥
I love this collection. Is there a place where I can buy the quilt kit to make this quilt? I’ve googled and am not finding anything.
I am starting this beautiful quilt in a different color way. On the pinwheel, the 2 inch HST when sewn together cannot make a 4.5 inch block! Luckily I didn’t precut all my fabric or I would have to go buy some more. The beginning squares to make the pinwheel should be 3 3/8 instead to make 2.5 inch HST to sew together for a 4.5 inch square pinwheel.
Hi there – sorry for my late response. I just saw this. Please start with 2 7/8″ squares as my pattern reads, and not 3 3/8. Squared these HST’s will measure 2.5″ x 2.5″. Finished they will measure 2″ x 2″. I made an update to my pattern on page 2 of 4 to clarify: https://quiltingintherain.com/wp-content/uploads/2016/04/Tea-on-the-Terrace_for-lecien_edits.pdf
But please be assured that my cutting measurements of 2 7/8″ squares are correct. Thanks and sorry for the confusion!
i just ordered all the fabric and I cannot wait to start this! I love this fabric!!! Thanks for sharing!
I had a friend who mentioned making this quilt and I looked it up, finding your post. It is a beauty, especially in Lecien fabrics! I wish they were easier to find where I live. In all the dozen plus shops around me, no one carries much, if any at all. =P
Hi Jera. I purchased the fabric to make this quilt not long after it became available. I missed getting two of the colors, but its working out fine. Even though I bought it long ago, I am just now making this beautiful quilt, and am going to love it when its finished. I’m writing now because I am hoping that its not too late for others who have just discovered this High Tea pattern to save a little time. One of your instructions can be changed to greatly reduce time and headache when sewing the four patches. Rather than cutwww.ting a 5″ square into quarters, making four little 2.5″ squares, it would be much faster and easier to cut strips into 2.5″ lengths of both the background color, and the red…of whatever color is being used for the four patches…sewing them together lengthwise, then sub-cutting them into 2.5″ rectangles. I’m sure you know the procedure I’m talking about, and it would be so very helpful to a beginning quilter to have these directions. Just wanted to throw my two cents in here, and to tell you that I love the fabrics and the pattern…I’m using all the fabrics you used, except I couldn’t get the red you used for the pinwheels…using the fans instead…and its beautiful!!
Perfect fabrics, perfectly easy pattern, just beginning my quilt, I’m gonna
Love it!! Thanks so much for sharing your talents ! This one will be for me!