 Binding your quilt is the LAST step in creating a quilt! There are several ways to bind a quilt, and this is one of the FASTEST ways because there is no blind stitching (by hand) involved. Also, in this method you don’t need to cut and prepare binding strips. Instead, extra fabric from the back of your quilt will be folded around to the front of your quilt top and fastened by sewing a straight stitch with your sewing machine. You will need about 1.5 inches of extra backing fabric around the perimeter of your quilt top.
Below is a quick and simple 5-step binding tutorial:
Step 1
As shown below, cut any excess batting material from your quilt sandwich (FYI for any newbie’s, a quilt sandwich consists of the quilt top, batting, and backing fabric in that order – batting is the fluffy stuff sandwiched between the quilt top and backing fabric).

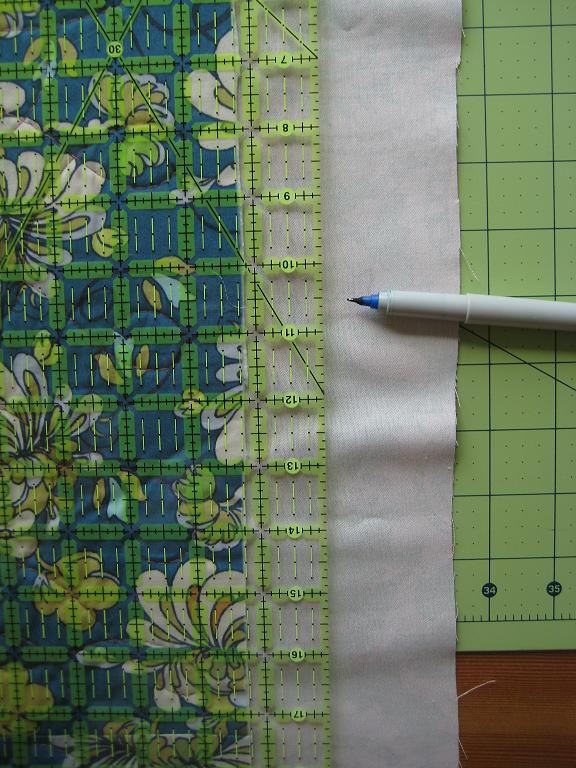
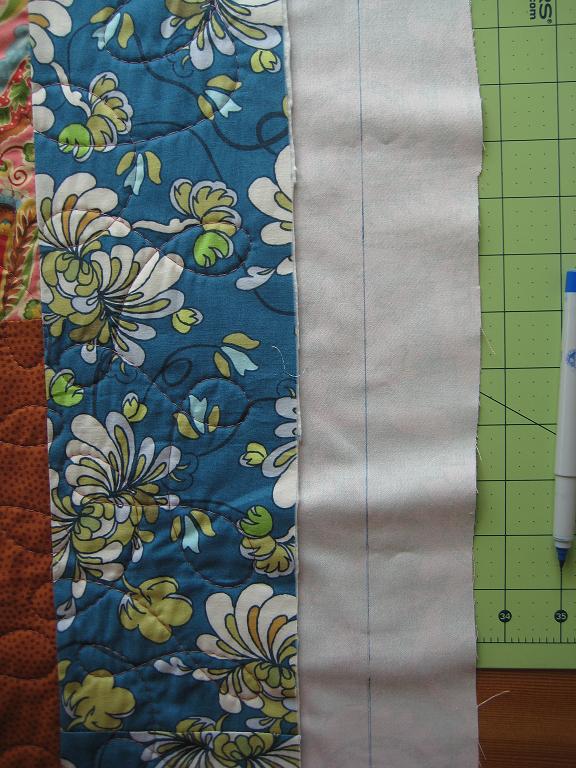
Step 2
Using a ruler and marker, mark 1.25 inches on the backing fabric around the perimeter of your quilt top (shown below).
 |
 |
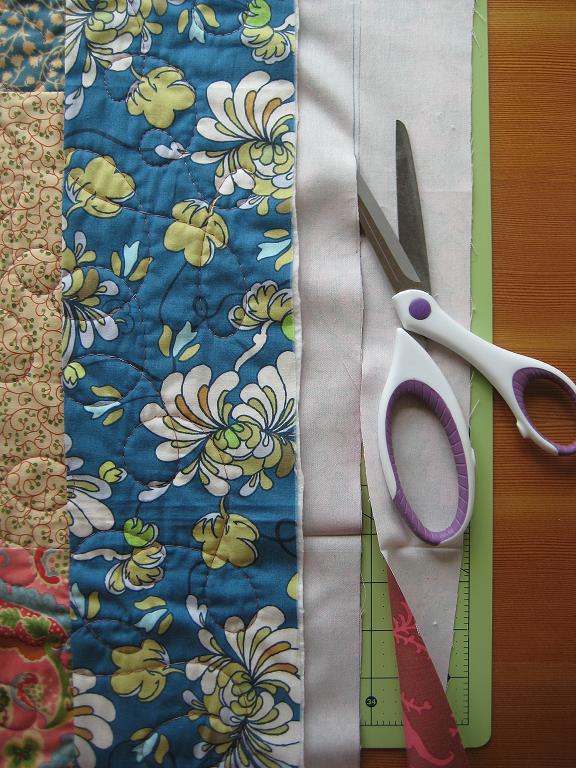
Step 3
As shown below, use fabric scissors to cut along the line you marked from Step 2. This will result in 1.25 inches of backing fabric around the perimeter of your quilt top.
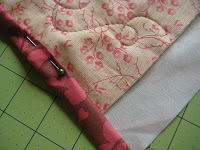
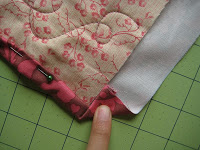
Step 4
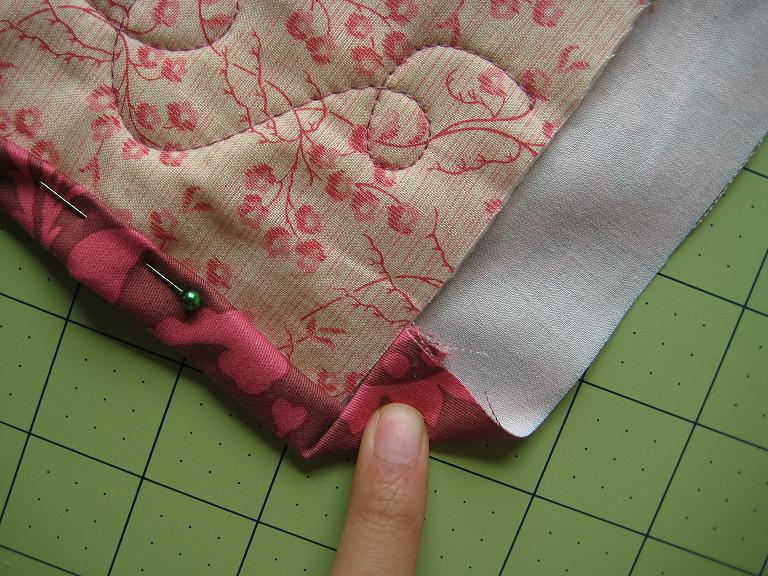
Fold the backing fabric in half lengthwise (shown in 1st picture below). Next, fold that over onto your quilt top and pin to keep in place (shown in 2nd picture below). Do this around your entire quilt. I placed pins every couple of inches.
 |
 |
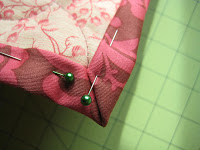
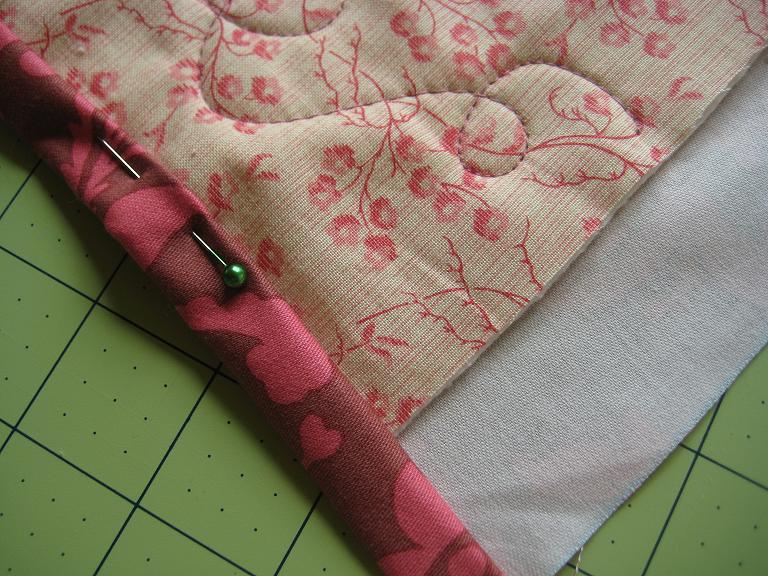
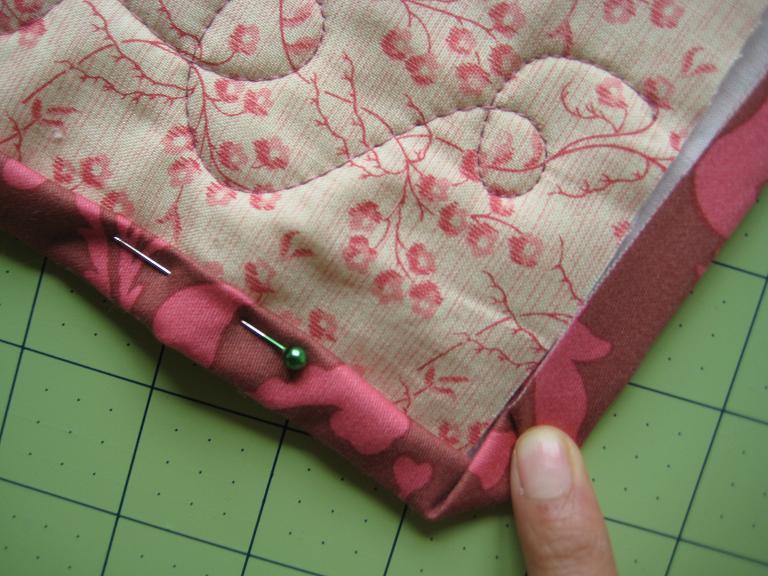
When you get to the corners, follow steps 1 and 2 (below) for folding and pinning all corners:
- Fold the corner over so the edge of the binding is aligned with the quilt top.
- With the corner folded over, fold the backing fabric in half lengthwise. Then, fold that over onto your quilt top and pin in place.


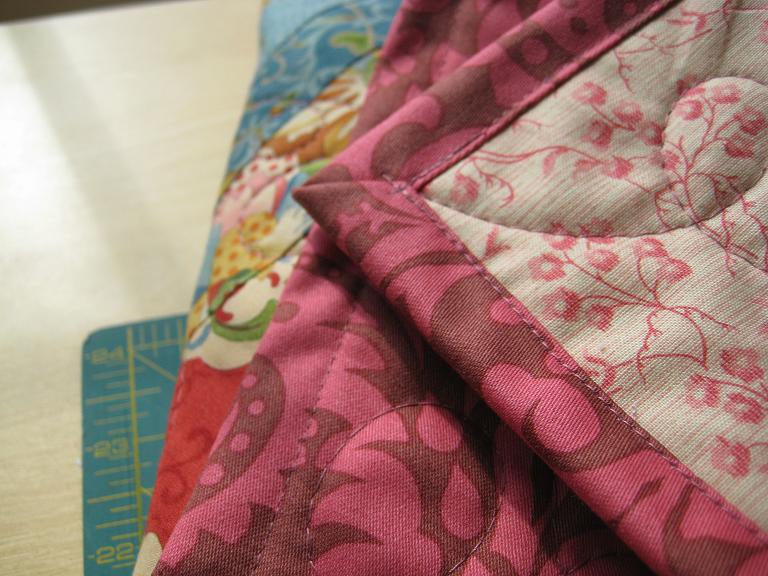
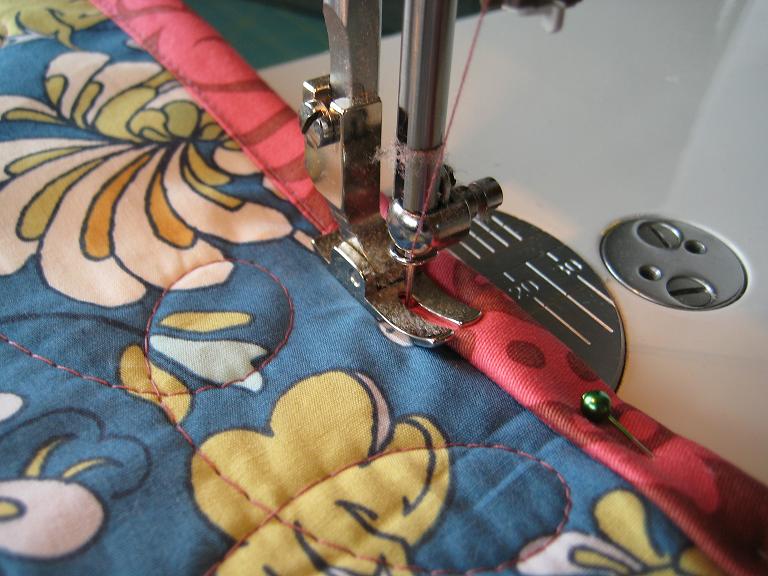
Step 5
As shown below, sew a straight stitch along the edge of the folded binding. Remove the pins as you sew. You can also sew a zig-zag stitch instead of the straight stitch.
And that’s all there is to it! Quick and simple : ) Let me know if you have any questions.
so clear! Thanks. I always struggle with binding corners, even after years of quilting!
Ooohh that looks so easy! I'm gonna have to try it out on the next quilt I make.
OH MY GOODNESS!!! I am sooooooo going to do this. Who are you? Some sort of fabric fairy?? Your ideas are super awesome, thank you thank you thank you!
I was having nightmares last night about this very step in my wall hanging — you are a genius! Thanks so much for sharing!
I have seen this idea on a finished quilt, but now I have the measurements and great pictures, I can't wait to try this. Thanks, so much for sharing. :^D
This is sooooo fantastic!!! So simple!
I finished my first quilt a couple os months ago and put it on a shelf because I was afraid of batting and backing it. Your explanation is so clear that I definitely feel up to it now.
Thanks for sharing.
It sounds so simple, and yet I'm still afraid. I've got my quilt top sitting…waiting to be made into something more. But I have tons of excuses why it's not done yet…so maybe it can wait a bit longer. 🙂 But when I DO get to it, this info will help.
Thank you Thank you Thank you!!! I just completed my very first quilt! Followed this tute for the Binding, and your cuttin' corners tute at the bake shop for the quilt. I used squares from a Tranquility layer cake by Sandy Gervais, and the quilting was done with a walking foot (Since I don't have a darning foot)and inspired by film in the fridge: http://www.filminthefridge.com/2009/09/22/another-fall-quilt-the-mini-version/
Ahhhh, I feel so good, I just want to stare at it all folded up and pretty!
Missavene – thanks so much for your comment! It made my day :)This type of thing is why I started my blog. I'd love to see a picture of your quilt and do a blog post on it – if you get this, send me a photo at quiltingintherain@gmail.com Hope to hear from you!
Love the tutorial Tonya. Thank you for putting it on your blog. Hugs, Jan
I just started quilting and started with a table runner – the binding was the thing that I'm just not doing well. Thank you so much for this – I can't wait to try it. It also takes the stress out of trying to match up something to use for the binding when you can just use the backing!
You are Awesome!
Beth from Tennessee
i used this today and i just want to say thanks for posting it! My quilt turned out great!
Your bindings are incredible. The binding has been a nightmare for me. This is the best method I've found after hours & hours of searching, and several classes. Now I can finally finish my daughter's denim quilt. Thanks for sharing your talents with us.
Do we need to use a walking foot to do this binding since it is going through multiple layers of fabric?
I love your site and tutorials! Very easy to follow and so helpful!
Jera, I think you just saved my quilting career, such as it is! I tried my first quilt and made a mess of the binding… this looks so much easier, I cannot wait to try it. Thank you, thank you, thank you…. you are so talented, and I really appreciate you sharing these tutorials with us!
Recently tried this on a quilt for a friend and this technique worked so well! I used a stitch slightly more decorative than zigzag and it looked much more professional than I was afraid of. If anything, it added a nice look to the overall quilt. I don't think I'm going back to making binding strips and hand-sewing the binding to the back anymore. Thank you so much for sharing!
To the person who asked if you need to a use a walking foot, I did not and it was fine. The layers fed smoothly as they were quilted together already. Hope it goes smoothly for you too.
I am making a quilted blanket for my daughter with the Eric Carl fabric (Brownbear, brown bear) on top and the backing is a very soft bubble velour. Would this method work? Or should I make a simple baby blanket instead?
Wonderful ideas on your blog.
Thanks,
Sabine
Thank you so much for taking the time to explain this is such a clear-cut way! Your generous sharing stands in the best tradition of the Internet.
JB
Thank you so much – I am fairly new at quilting and the corners were a bear!!! This is terrific, thank you.
Great tutorial! The binding is a very important part of a quilt. I did this style on my very first quilt because I did not know how to bind any other way and it turned out nice. (not quite as neat as yours tho)
I'm a newbie, so I love this tutorial. Thank you!
Janetta
Great tutorial! Thanks!
Now THAT makes sense!! I've been stuck rereading instructions that I just could not figure out!! You have made it so clear for me. Now I can't wait to bind my next project. Thank you sooooo much.
Woodlandbeauty
Olá, sou a Luzia Raposo, moro em Brasília, Capital do Brasil, adoro seu blog, seus trabalhos sempre são maravilhosos…
obrigada por ensinar.
abraços – Luzia Raposo – meu e-mail é luz.r@hotmail.com
Thankyou, this was perfect for my miniquilt with the bonus of properly mitered corners! xRose
Thank you. I can no longer hand sew so this is exactly what I have been looking for in machine binding.
This is the first time I have seen someone else use this…I have been doing this for about 4 years for the cancer center quilts I make, the patients need to be able to wash and dry these quilts as many times as needed and the secure stitching makes that possible. Great to see others use this method 🙂
I love this tutorial! Thank you!!
I used it to make a blanket and also linked to it on my blog:
http://ahappystitch.com/2013/02/12/favorite-blanket-of-all-time/
Thanks for sharing! Love that cozy blanket you made 🙂 the binding looks great on it
Wonderful that I saw this just as I was attempting to do it for the first time !
This was just the tutorial that I needed! Thanks for the easy to follow instructions. Here's the quilt that I used it on: http://craftyquiltycool.blogspot.com/2013/03/cuzco-complete-pink-and-black-cuzco.html
This is exactly what my friend was looking for!!!! if we had this just over 2 months ago, it would have been perfect! There will always be another quilt to make and use this method correctly 🙂
Could this method be used for Potholders too? I have a horrible time with binding, I am a newbie age 64 and have been dreaming of making quilted items for a long time!
Took one quilting class over 25 years ago. Never did it again until this week. Thank you so much for the easy method. Completed a wall hanging. First one ever. This was to display a Counted Cross Stitch piece I had done in 1987. Now it is in the Center of my Wall Hanging Quilt.
I have used this method of binding before but struggled with the corners, no more struggles.
Great!!! But, the stitching will show on the back
I'm getting so many good tidbits from your tutorials! Thanks for sharing!
I just used your quick binding technique and it worked beautifully! I'm so excited I can hardly stand it! Thanks again for ALL of your tutorials. I plan on trying every last one of them! =)=D
i just started sewing and have been lost.your pics and directions are amazing thank you so much
i've been using your binding technique for placemats & mugrugs (those that are just too small and fiddly to join the binding ends gracefuly)…it is a joy!…thank you for sharing!
Thanks so much for the great tutorial! I make quilts with the ladies from my church to donate to the local CASA chapter and I've stuck to rag quilts because I *HATE* binding! I made a scrappy trip around the world quilt to donate and ended up with a good amount of backing fabric and found your tutorial…SUCCESS! It worked like a charm, and I have lost my aversion to binding!
E um prazer segui la amei tudo aqui,to começando agora mas to amando tudo beijos fica com Deus!
you sure make it look so easy, thank you for this awesome tutorial.
I love this! I'll try it on the next one.
Thanks for the help!
I used this method many years ago, but I always felt like I was cheating. Now I don’t feel so bad.
This is how I have been binding my quilts. Thanks for confirming that I have been doing it correctly.
OMG this tutorial made it look so easy for me. Thanks for taking great pics and sharing.
Very clear, concise instruction, thank you! Tomorrow I shall attempt this method as I do not like the traditional binding method. ?
Good luck! 🙂 Thanks for the nice comment!
The binding on the quilt looks very good but what are you doing with the bottom fabric you used for the binding it’s not quilted or attached to any thing in other words it’s lose.
The backing of the quilt serves as the binding. Once you see it over to the front, it’s attached.
Do you sew the corners together where they meet?
Dear Jera, thank you very much for this nice tip. It was easy to sew and my baby quilt is finish now.
This method also saves time and fabric by not having to cut binding, fold the strips, sew the strips to the front, hand sew the binding to the back. I think that the backing should be just as interesting as the front of the quilt and using the backing as the binding makes an excellent frame for the front. Nice tutorial. Thanks.
Going to finish lap quilt with this method. Very clear step by step tutorial, thank you.
I’m so happy I saw this post. I have a project I’ve been putting off finishing because I wasn’t crazy about dealing with binding. This is going to be the perfect way for me to finish off my project. Many thanks!
Hi Jera, You are very talented and am glad I found you on Pinterest. I am making a king size wool quilt made from thrift store sweaters and have some questions. At this point it is very heavy. I want to add a backing and possibly some batting. I am afraid that if I add the batting and backing that it will be so heavy that when I wash it, it will never dry. What do you think? Also, I don’t have a fancy machine and no special feet. I was thinking about stitching in the ditch and somehow stitching on each side of the ditch – to make a nice edge. Should I go out and purchase a special foot that would get the job done?
Hi, I am new to this so I have a few questions for you. I am thinking of making a blanket with cotton fabric on one side and fleece on the other side. It is for my nephew in Miami. Do I need to put battling between the two fabrics? I’m thinking it might be to warm if I do since it is always hot there. Also, how do I finish off the middle part? Do I sew a big X over the middle, or crisscross or tie little threads all over? What would you suggest? I don’t want it to puff up in the middle. By the way, I love your explanation of Quick Quilt Binding. I tried it on a small piece of material and it worked awesome. Thank you for that.
Thank you for any help you can give me!!
Patty
I thought I was the only one who stressed over binding… I have the second book and have the step three joining down. It’s great, but binding is killing me.. Thank you for these steps…
When and if I am able to, this is the method I use. It’s so simple and no antra fabric neededing to be cut for binding. I even do this with my flannel backing!!!! Love love love it!!!
The problem with this binding is that it doesn’t hold up well to wear and tear. Where the binding is folded over, the threads are running lengthwise and only a few threads are on the fold. It doesn’t take much wear and tear before the first thread breaks and it starts to fray. Bias binding has the threads running at right angles to each other and is more resistant to wear and washing. If a thread breaks, the unraveling is only an inch.
Would it look too bad if you stitched diagonally to each corner also?
Also, fabric is really thick at corner, how can you help with this problem?
Excellent instructions and photos, so much easier than separate binding, was shocked how quickly it finished and looks lovely. Thank you!