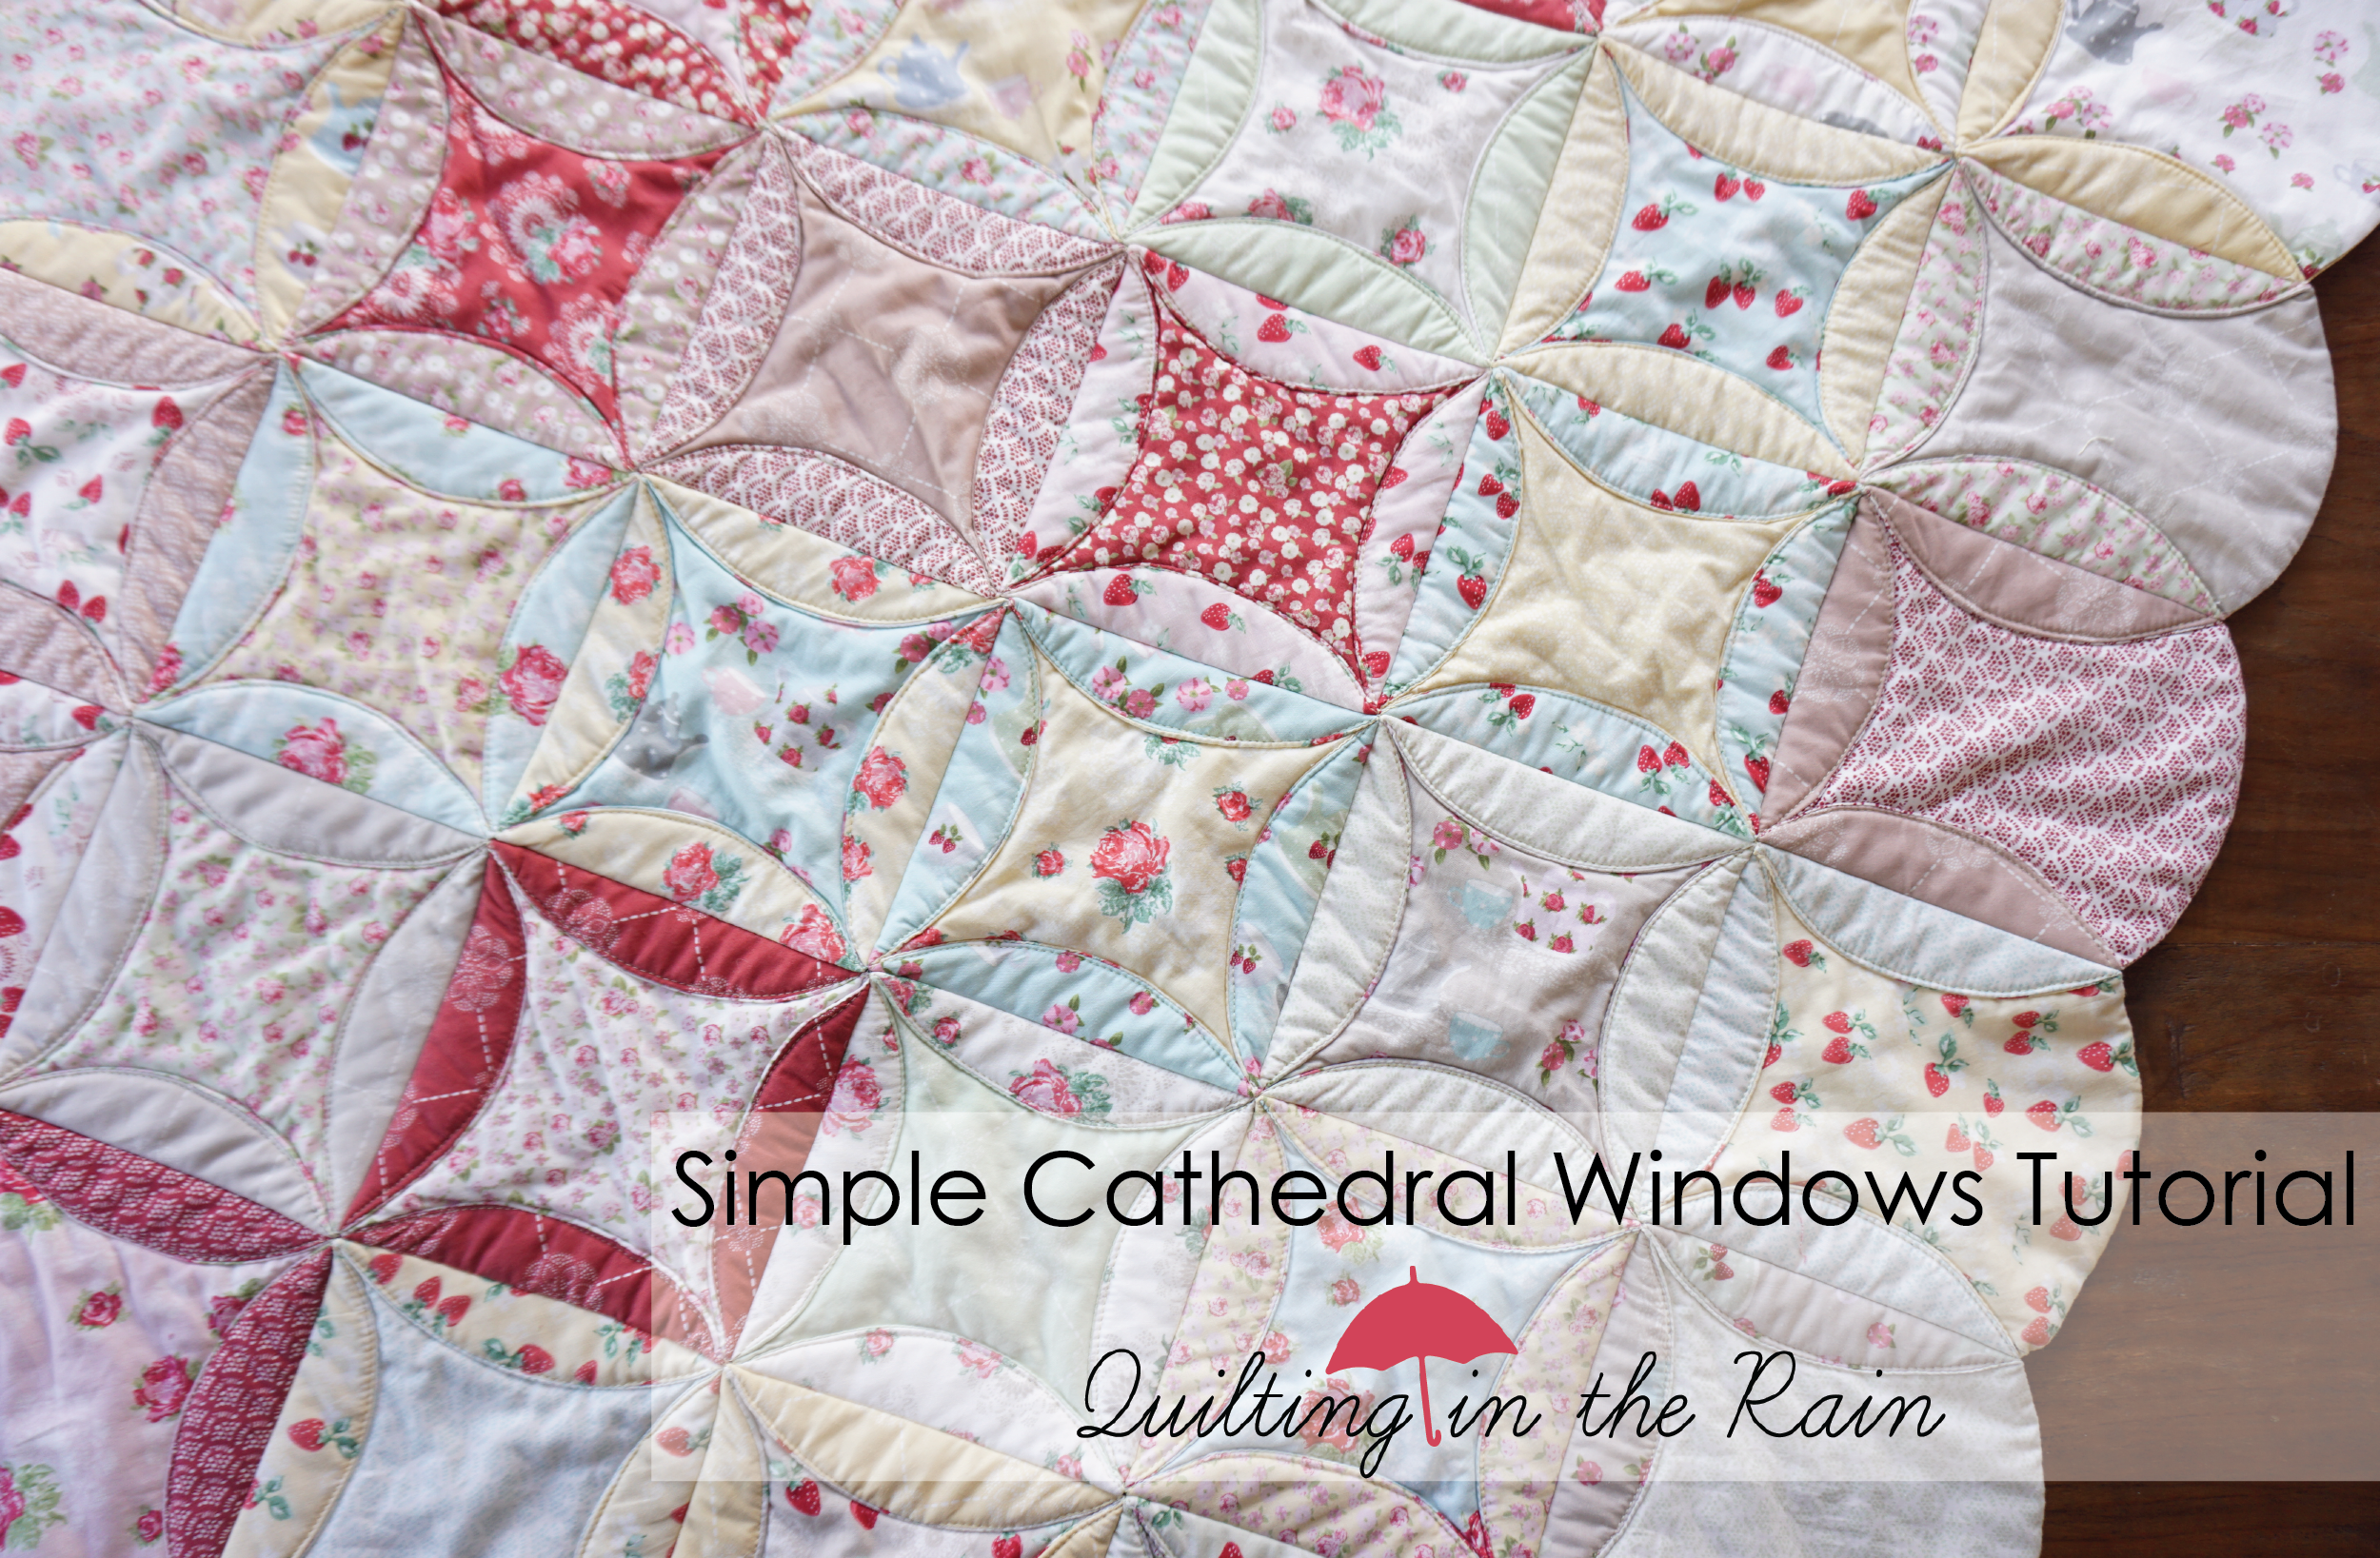
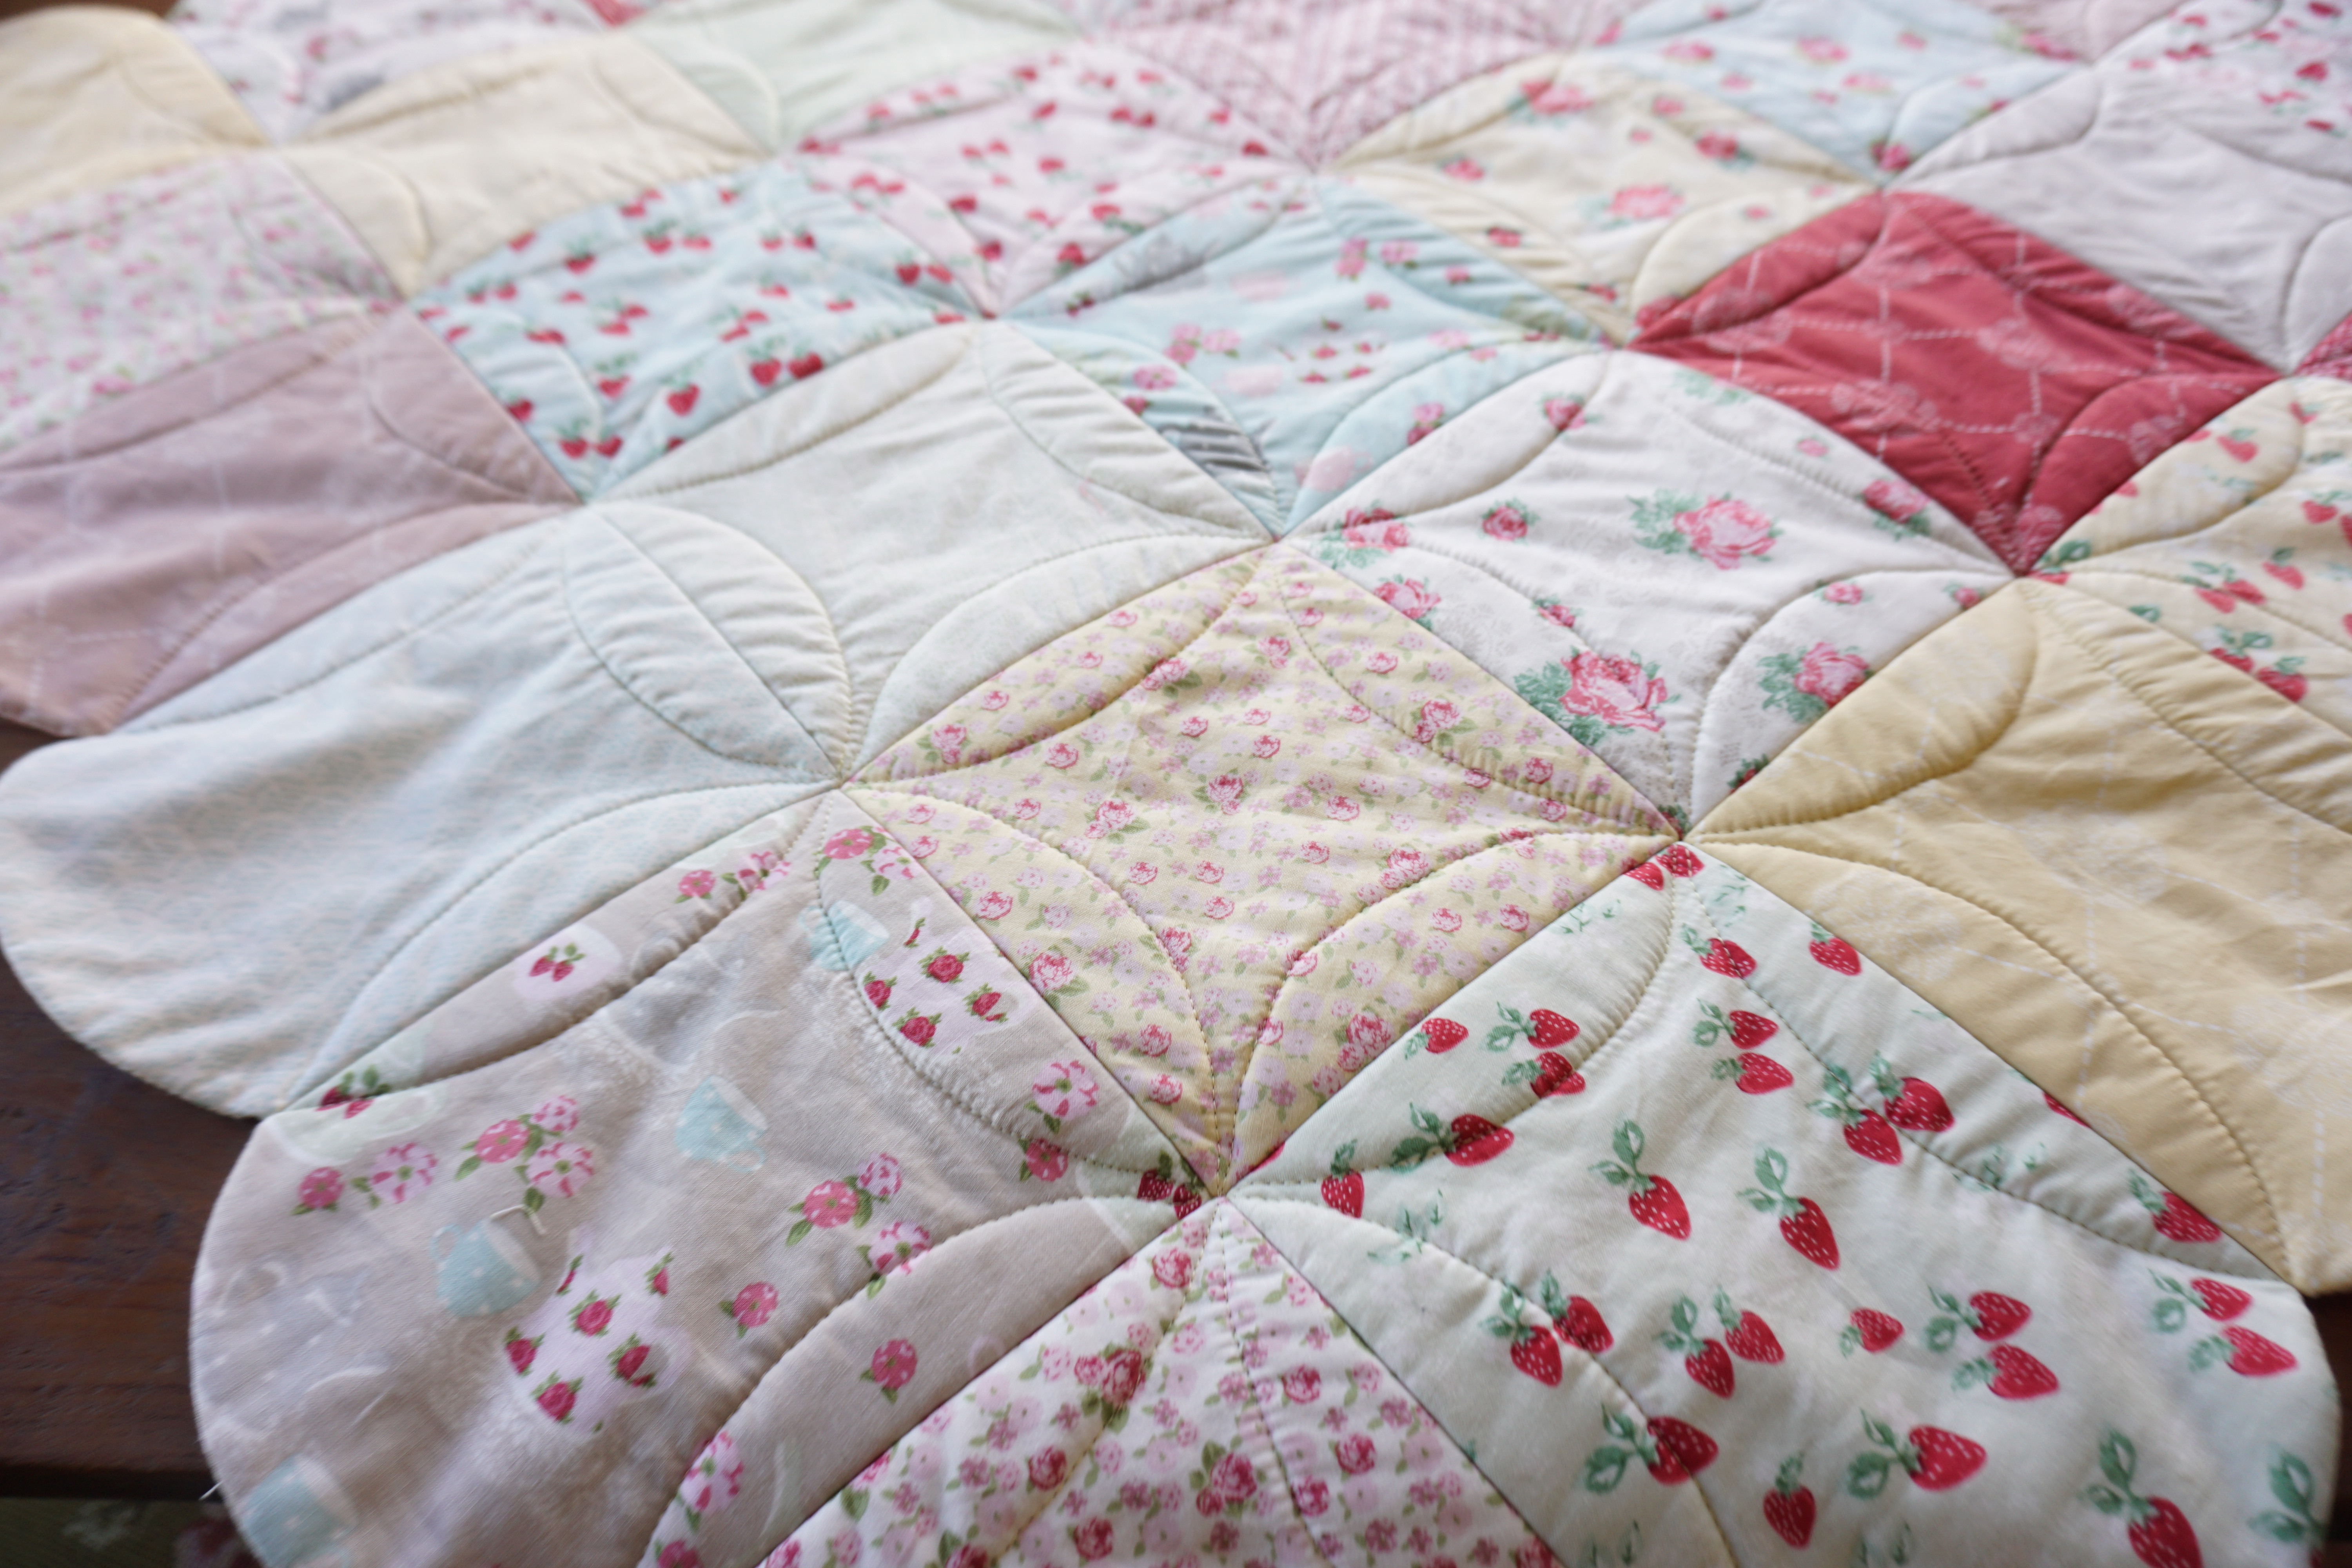
This is a simple Cathedral Windows quilt tutorial that uses circles and is also Quilt As-You-Go! I really enjoyed making this quilt – it’s refreshing to make something different from your traditional patchwork quilt for a change. It comes together fast and beautifully! Simply prepare your circles and then sew them together, and no binding needed!
Please scroll down to see my tutorial, which is comprised of 7 steps: steps 1 through 6 are video tutorials, and the last step are photos.
This is my first time doing a video tutorial on my own, so forgive me if I drifted out of the frame for a few seconds here and there ;-p
The fabrics in this quilt are from my new High Tea Collection for Lecien Fabrics, available for shops to order this Spring and in stores this Summer, August 2016!

Inspired by my love of vintage china and tea cups, my High Tea fabrics are a delicate, soft and romantic collection.

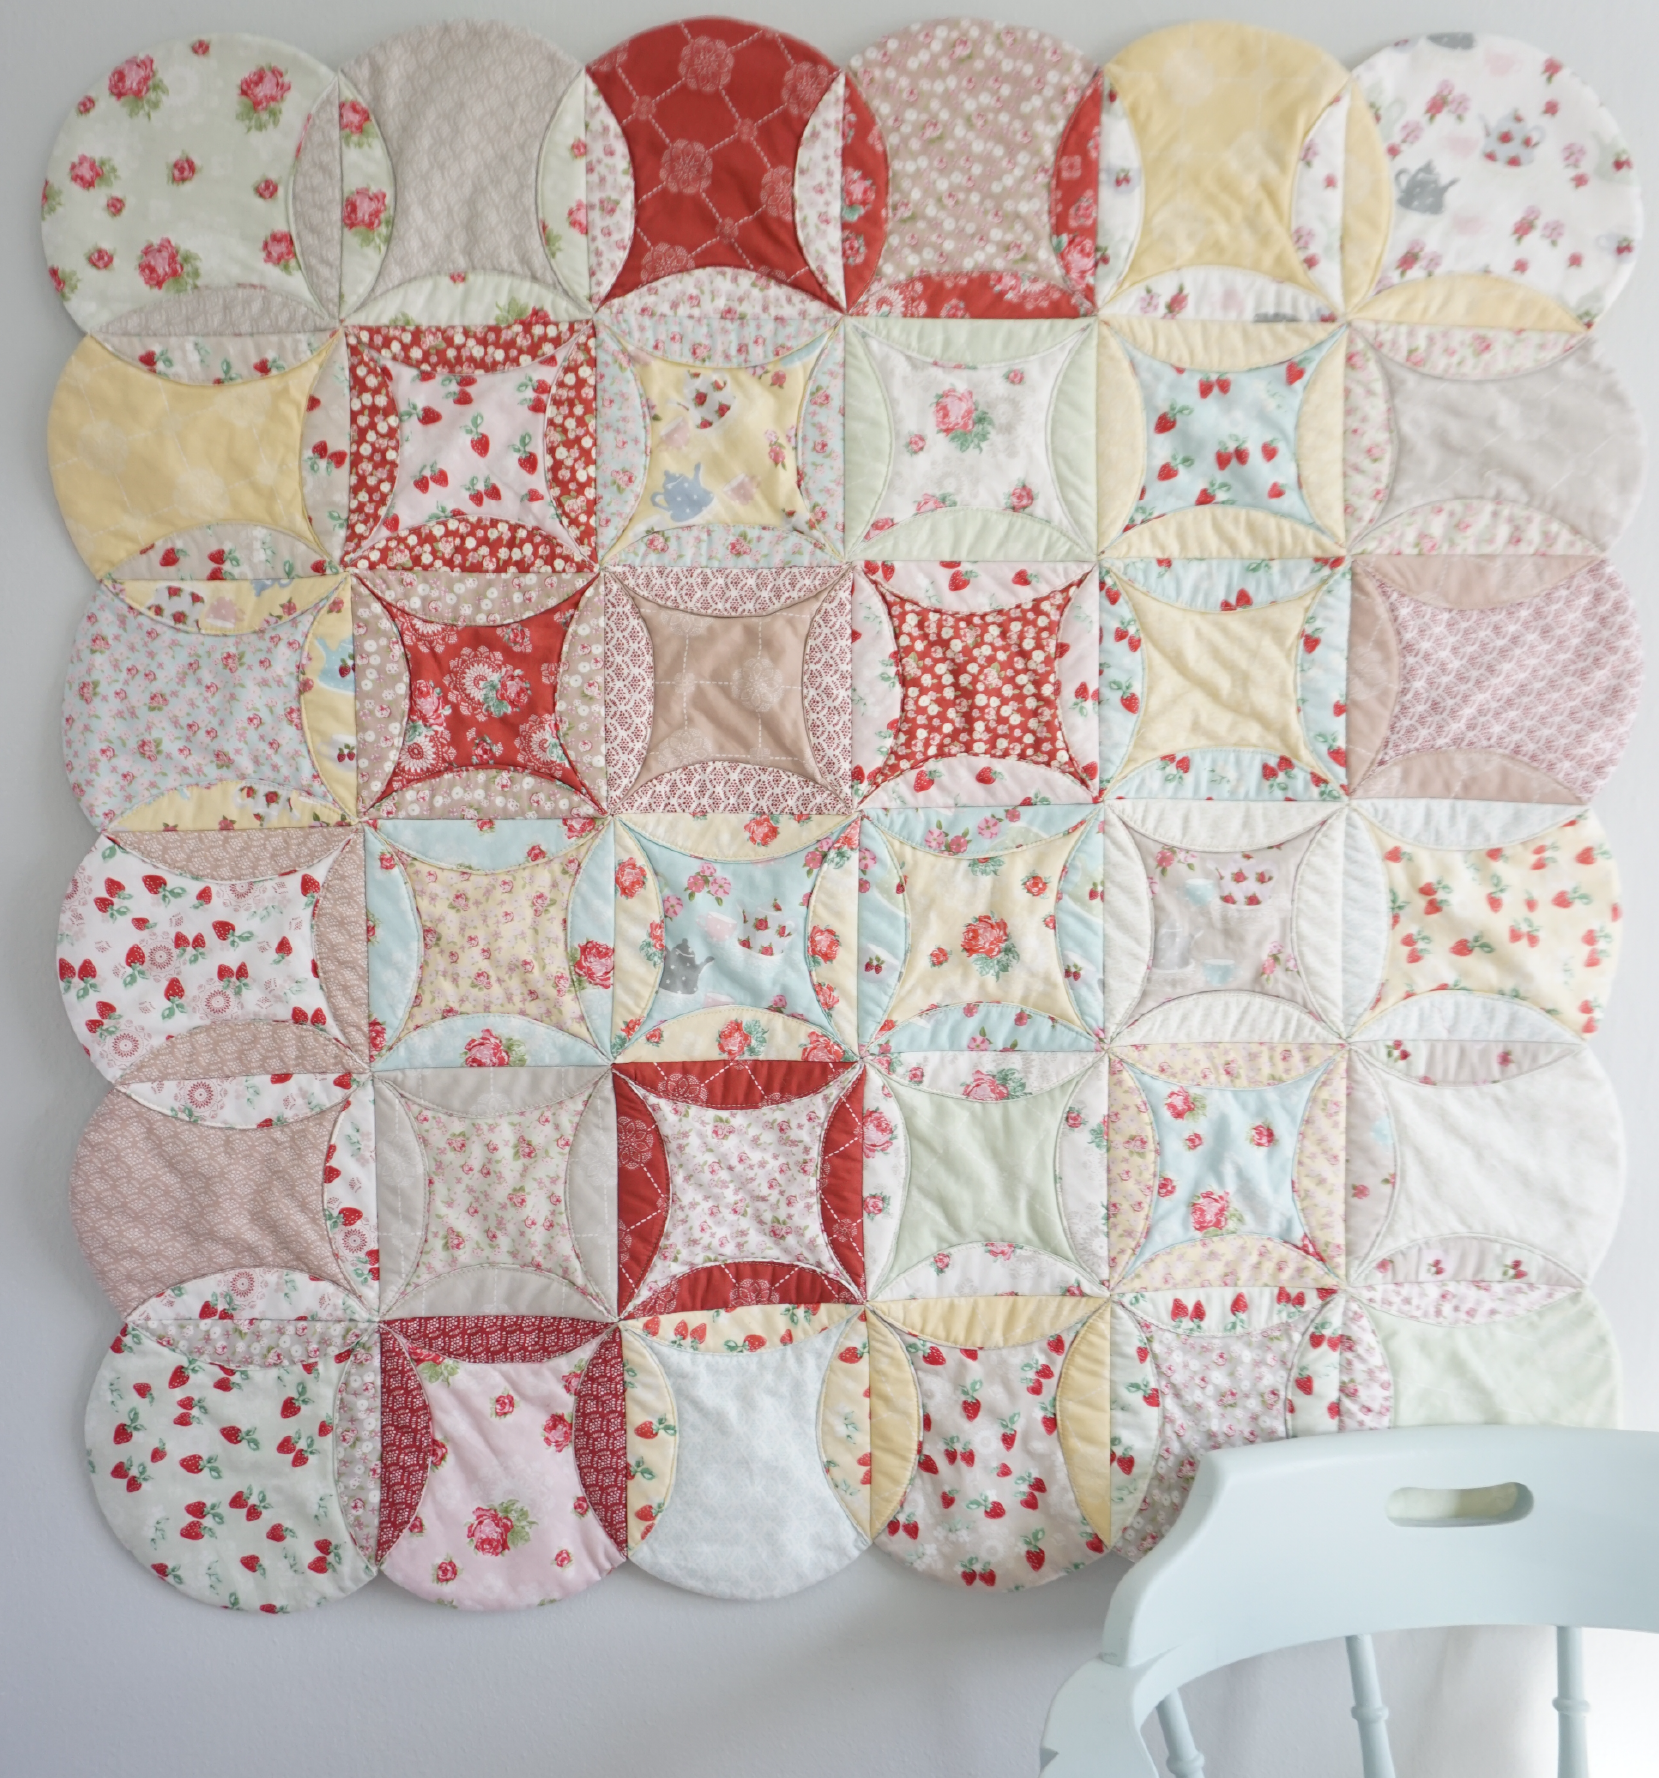
My High Tea collection has a total of 36 prints, so I decided to make this a 6×6 quilt (6 rows with 6 circles in each row). This size makes a great wall-hanging or baby quilt that measures approximately 37″x37″.
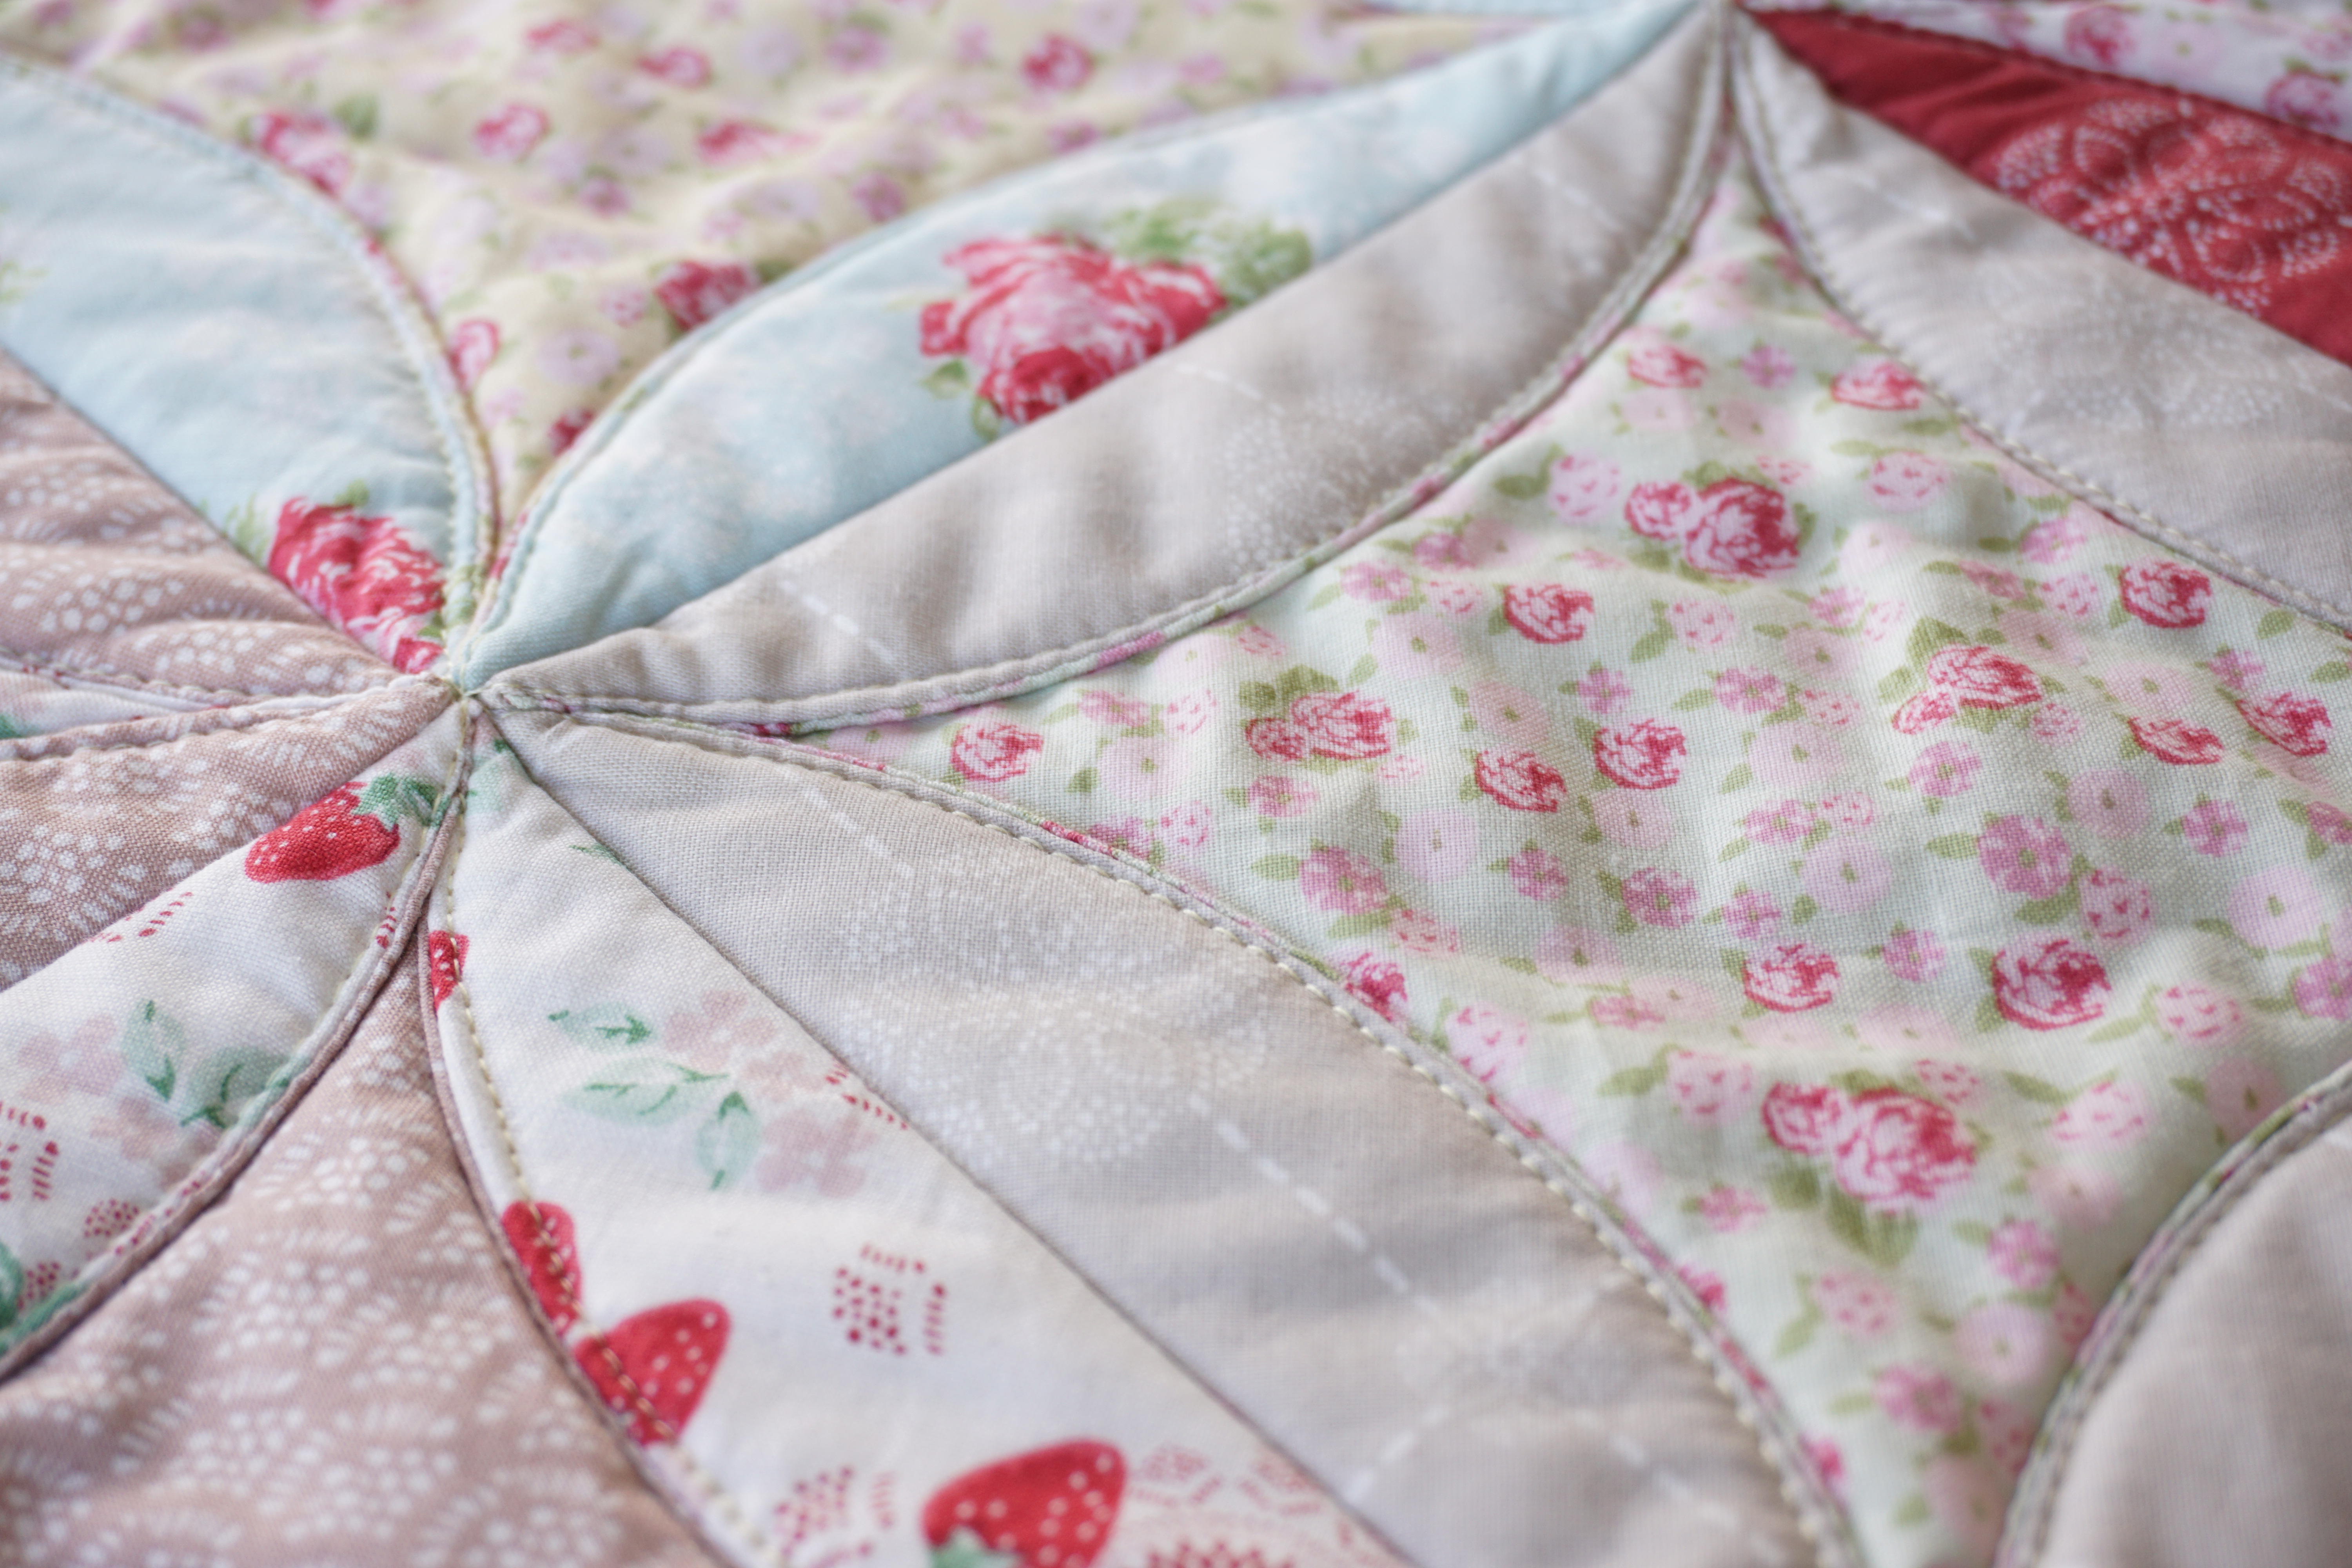
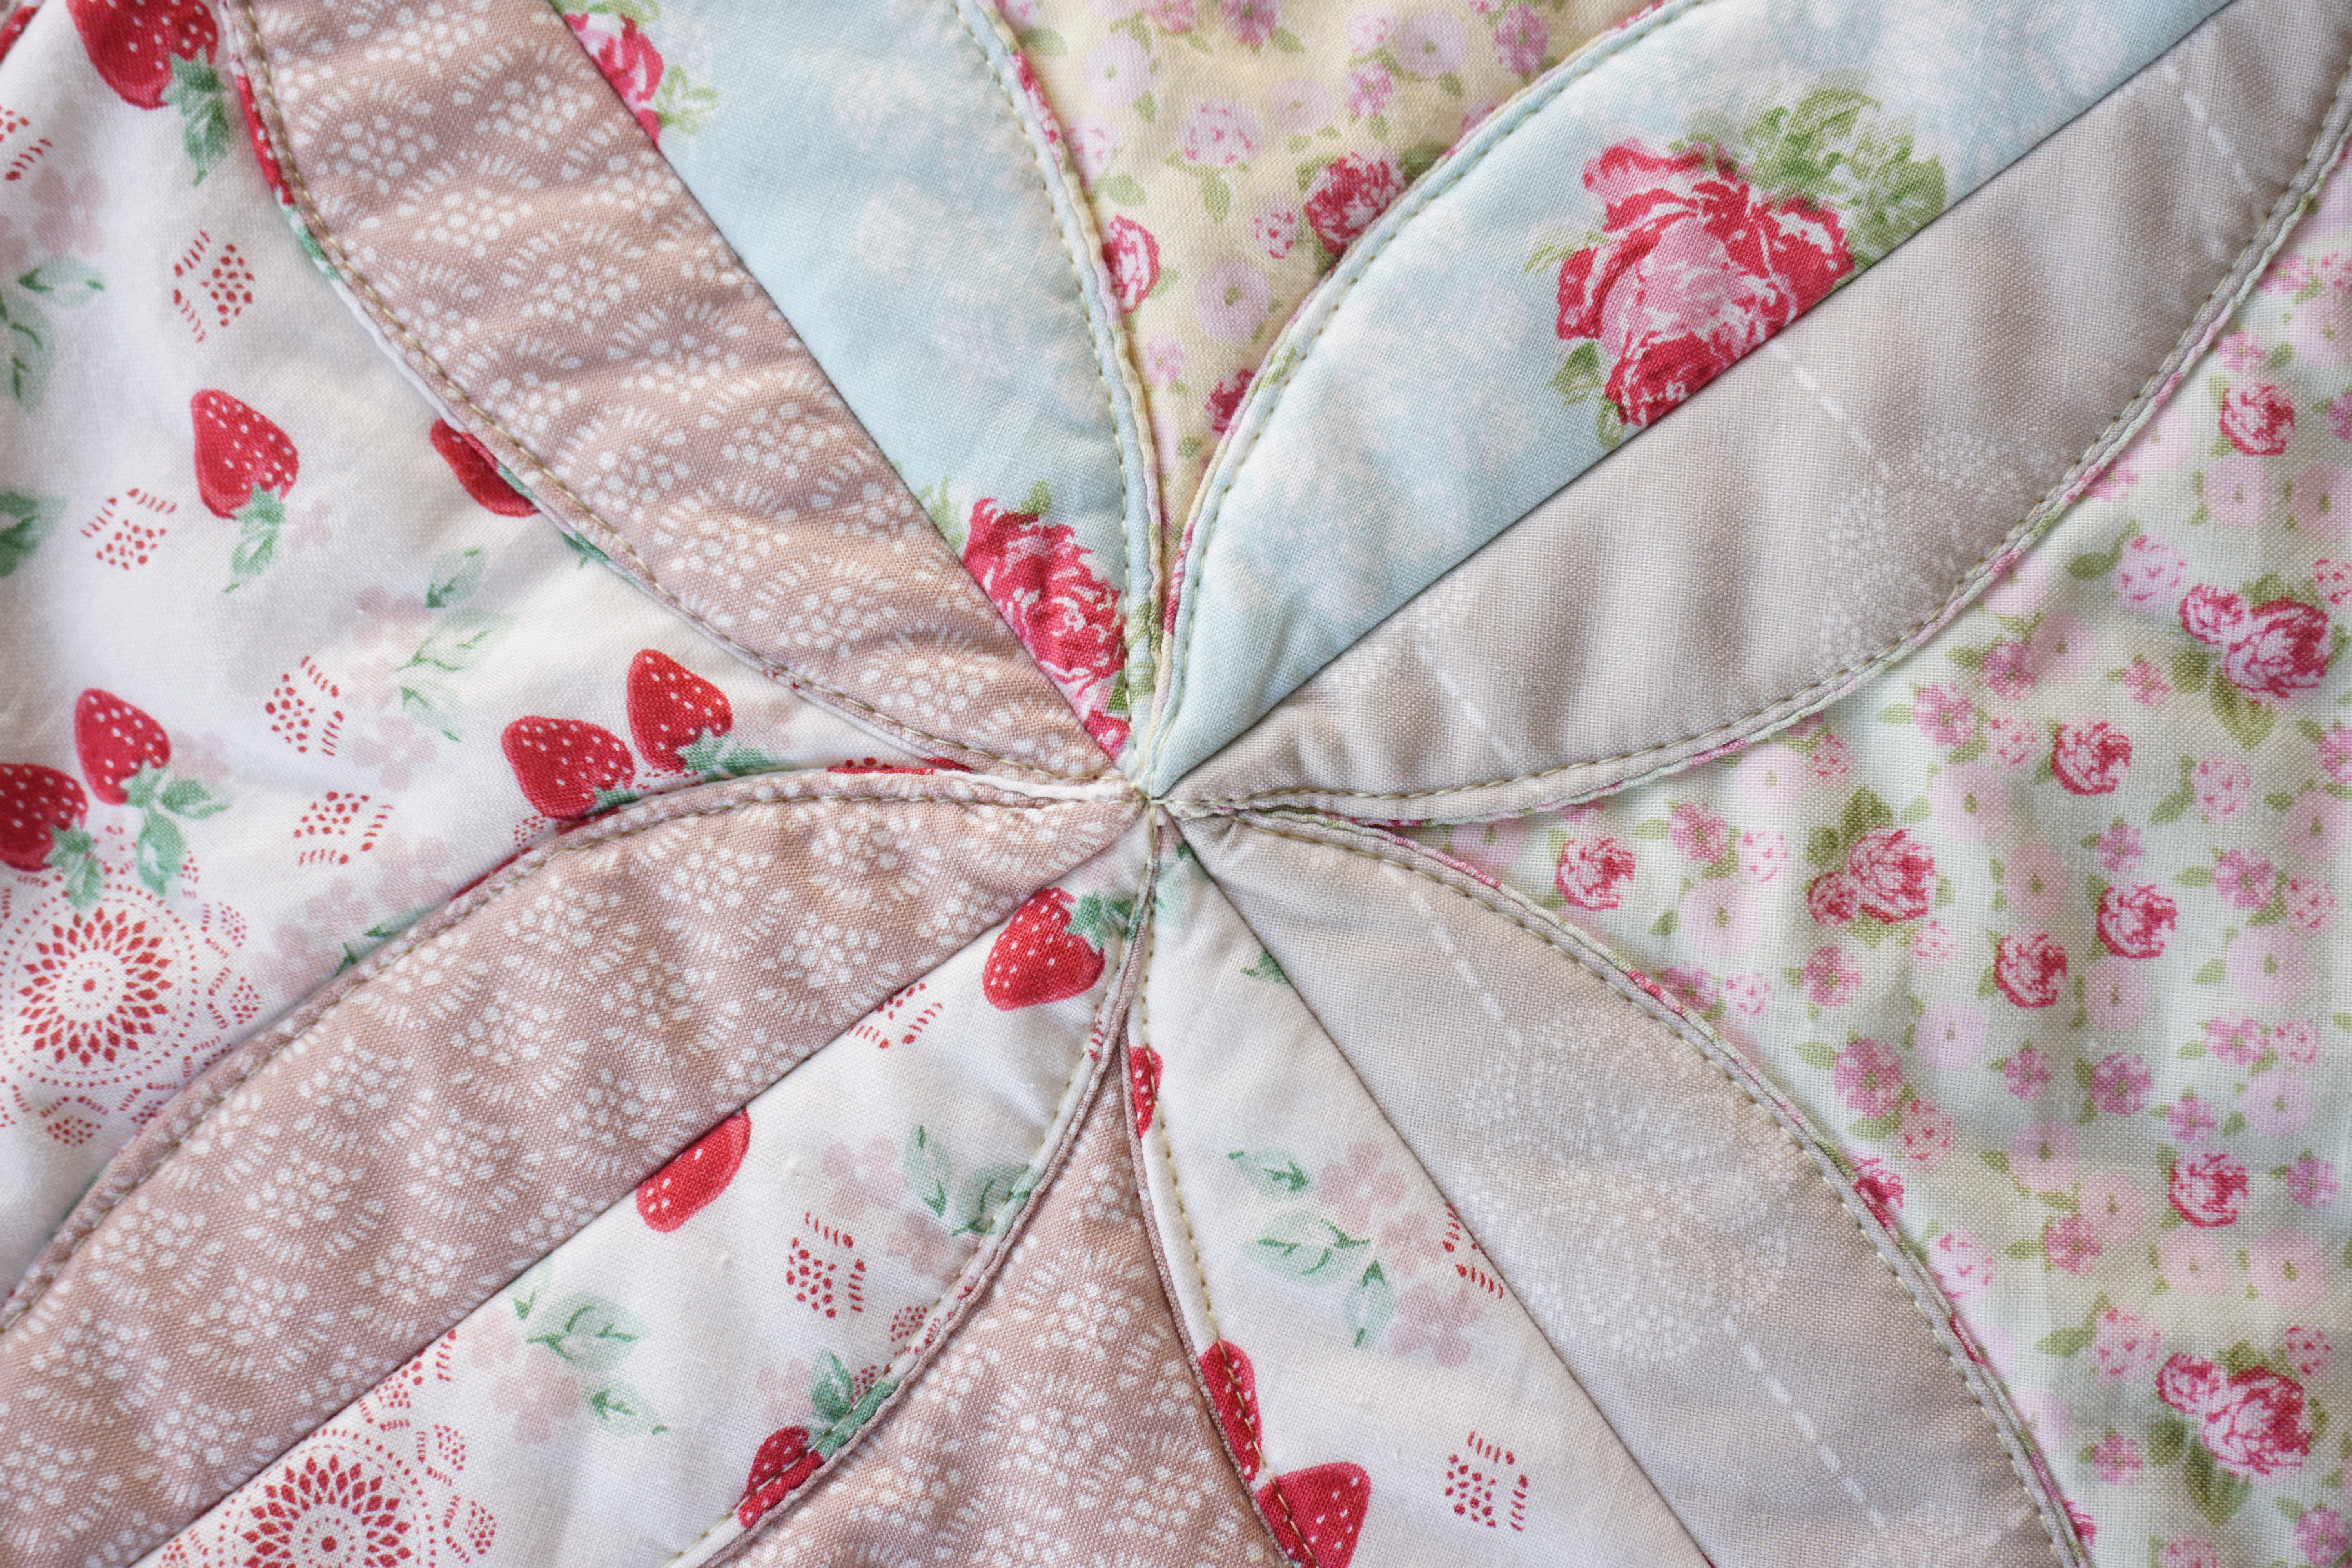
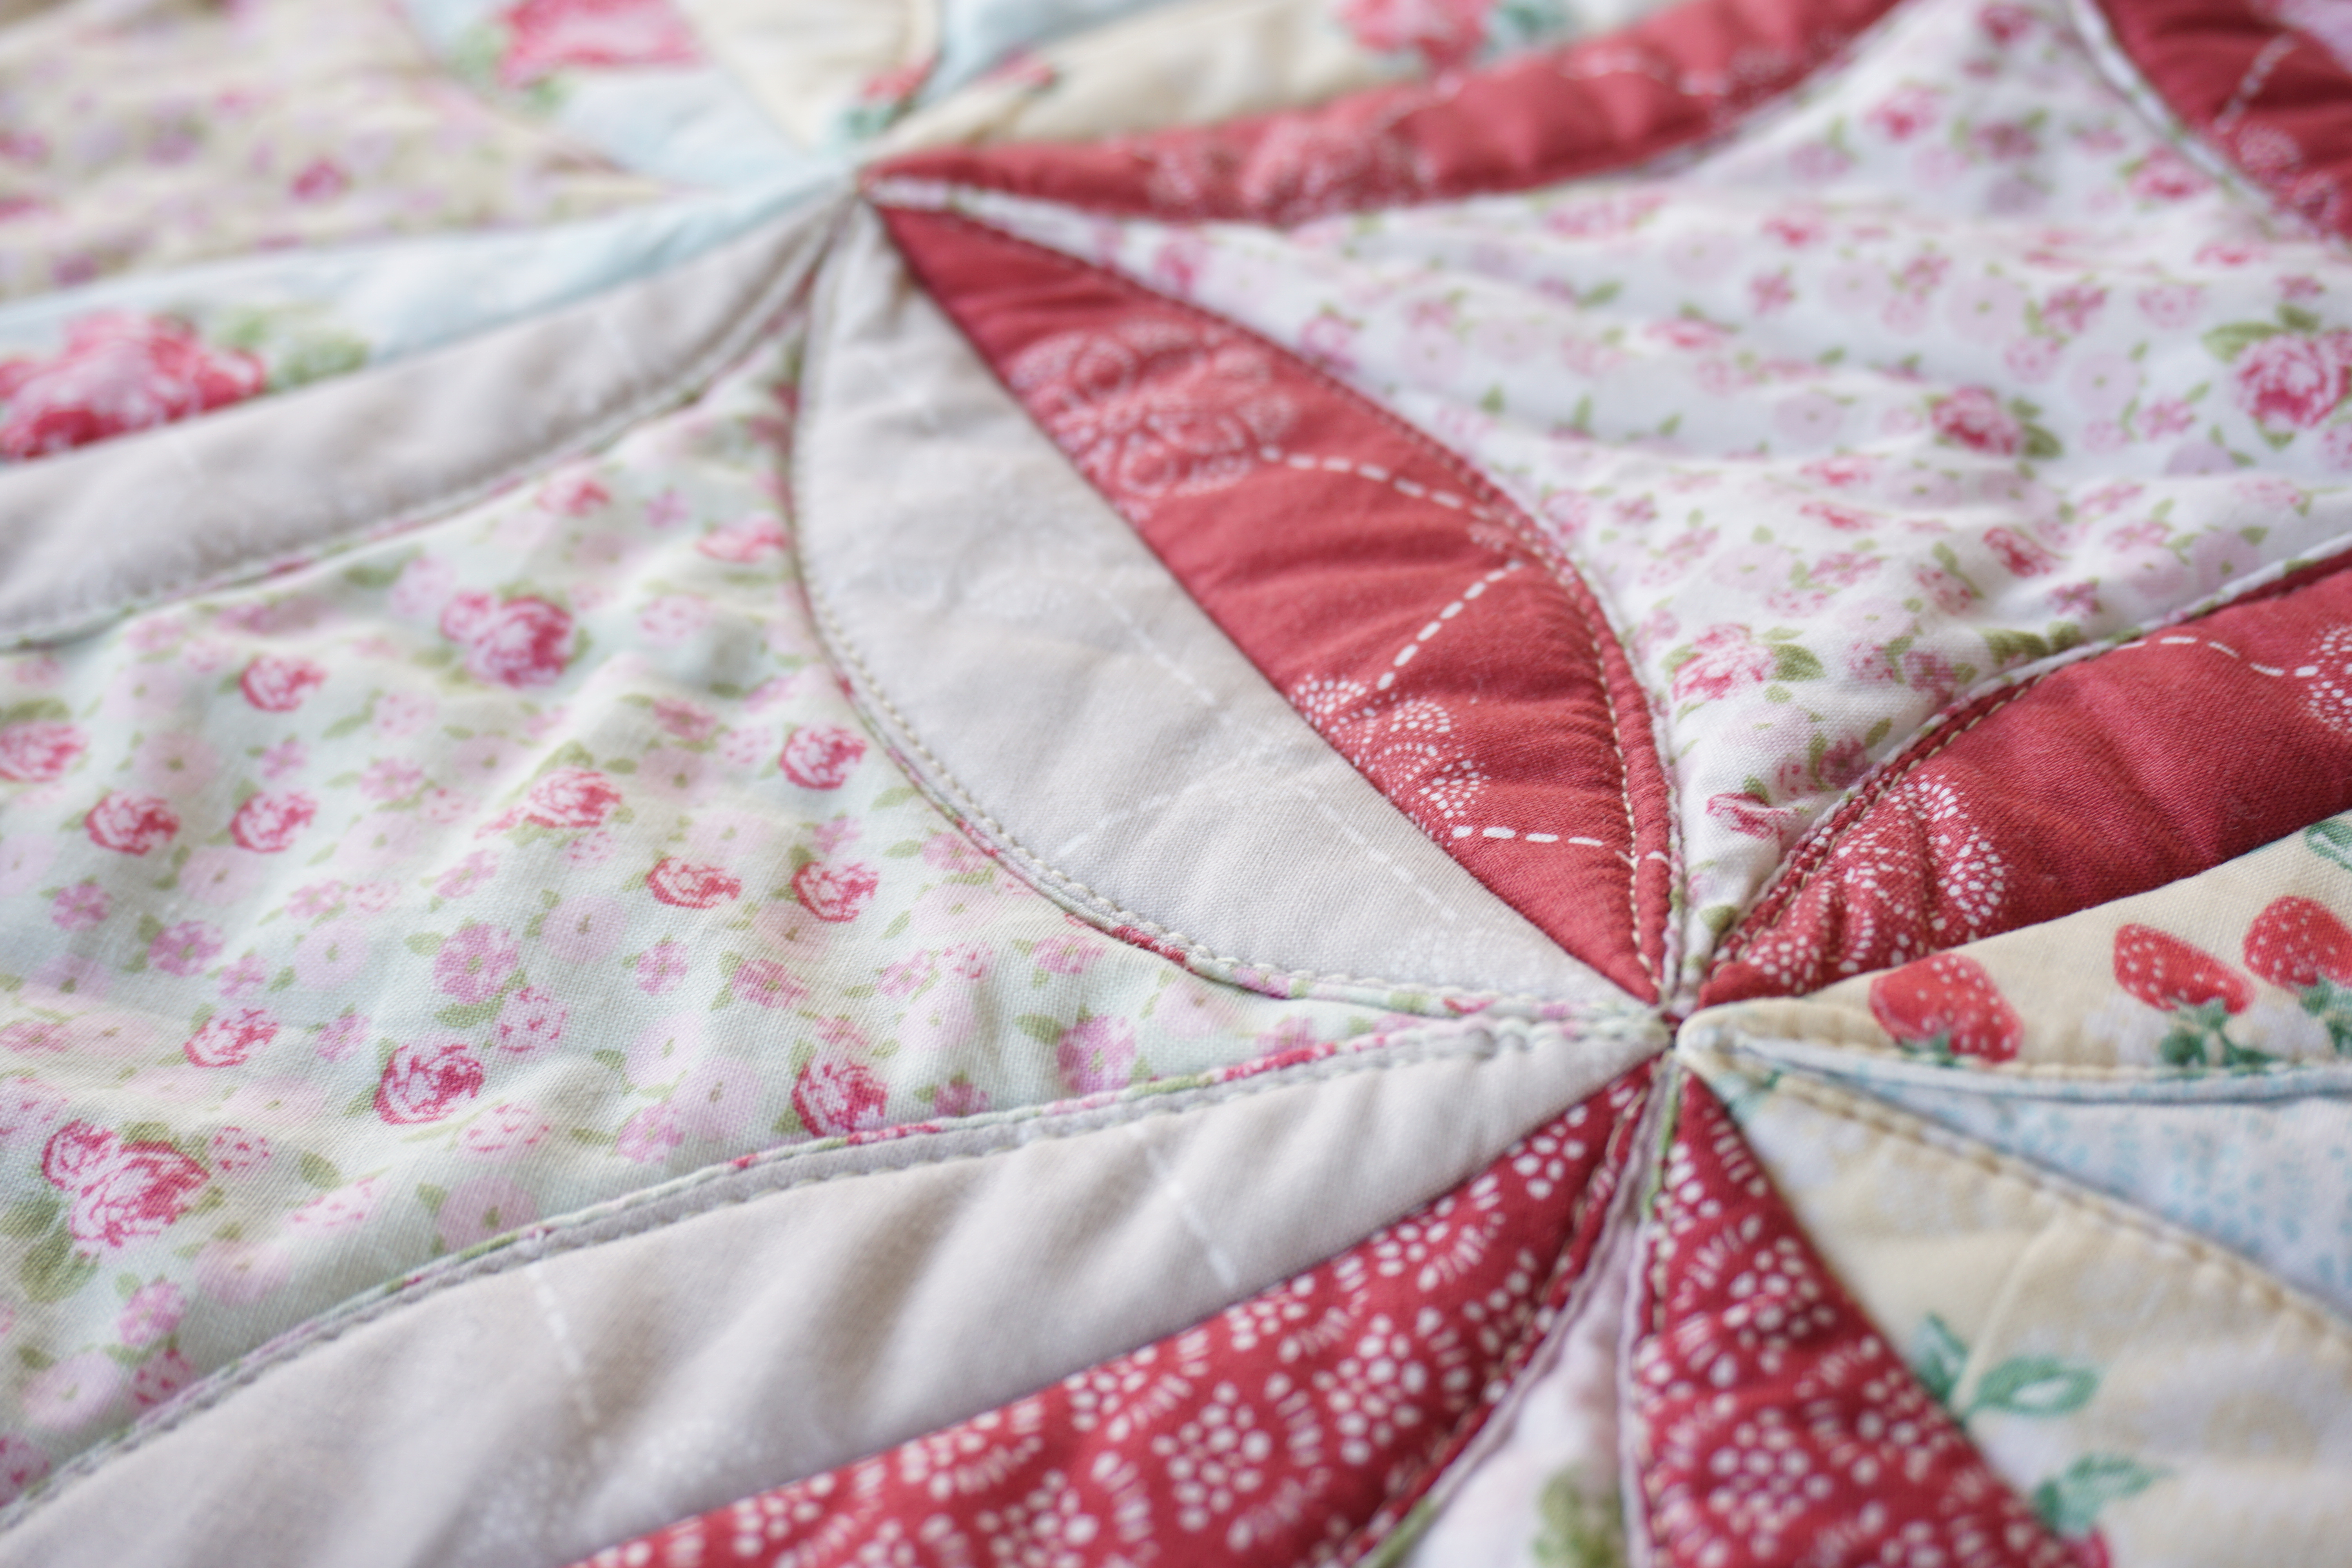
Here is how the back looks. I love the quilted petal pattern on the back that is easy to achieve by simply stitching the circle edges down on the front of the quilt. This is explained in the last step of my tutorial.
Materials for a 6×6 Quilt (measures approximately 37″x37″:
- Batting (use needle-punched batting by Warm Company): cut thirty-six (36) 10 inch batting squares
- 36 Fat Quarters (or Fat Eights) – Cut two 9″ circles from each (refer to my video in step 1)
- Coordinating thread, rotary cutter
- 9″ circle template (I used a paper plate)
Recommended, but optional:
- rotating cutting mat (refer to my video in step 1)
- Plastic gridded template by EZ Quilting (refer to my video in step 3)
Okay, let’s get started! I hope you enjoy my first ever video tutorial! 🙂
Step 1 – Cutting: cut thirty-six (36) 9″ batting circles, and seventy-two (72) 9″ fabric circles. Layer for quicker cutting. To quickly complete the cutting, I used a 9″ paper plate as a cutting template, a rotating cutting mat by Fiskars, and a 60mm rotary cutter. Watch my video to see how I did it!
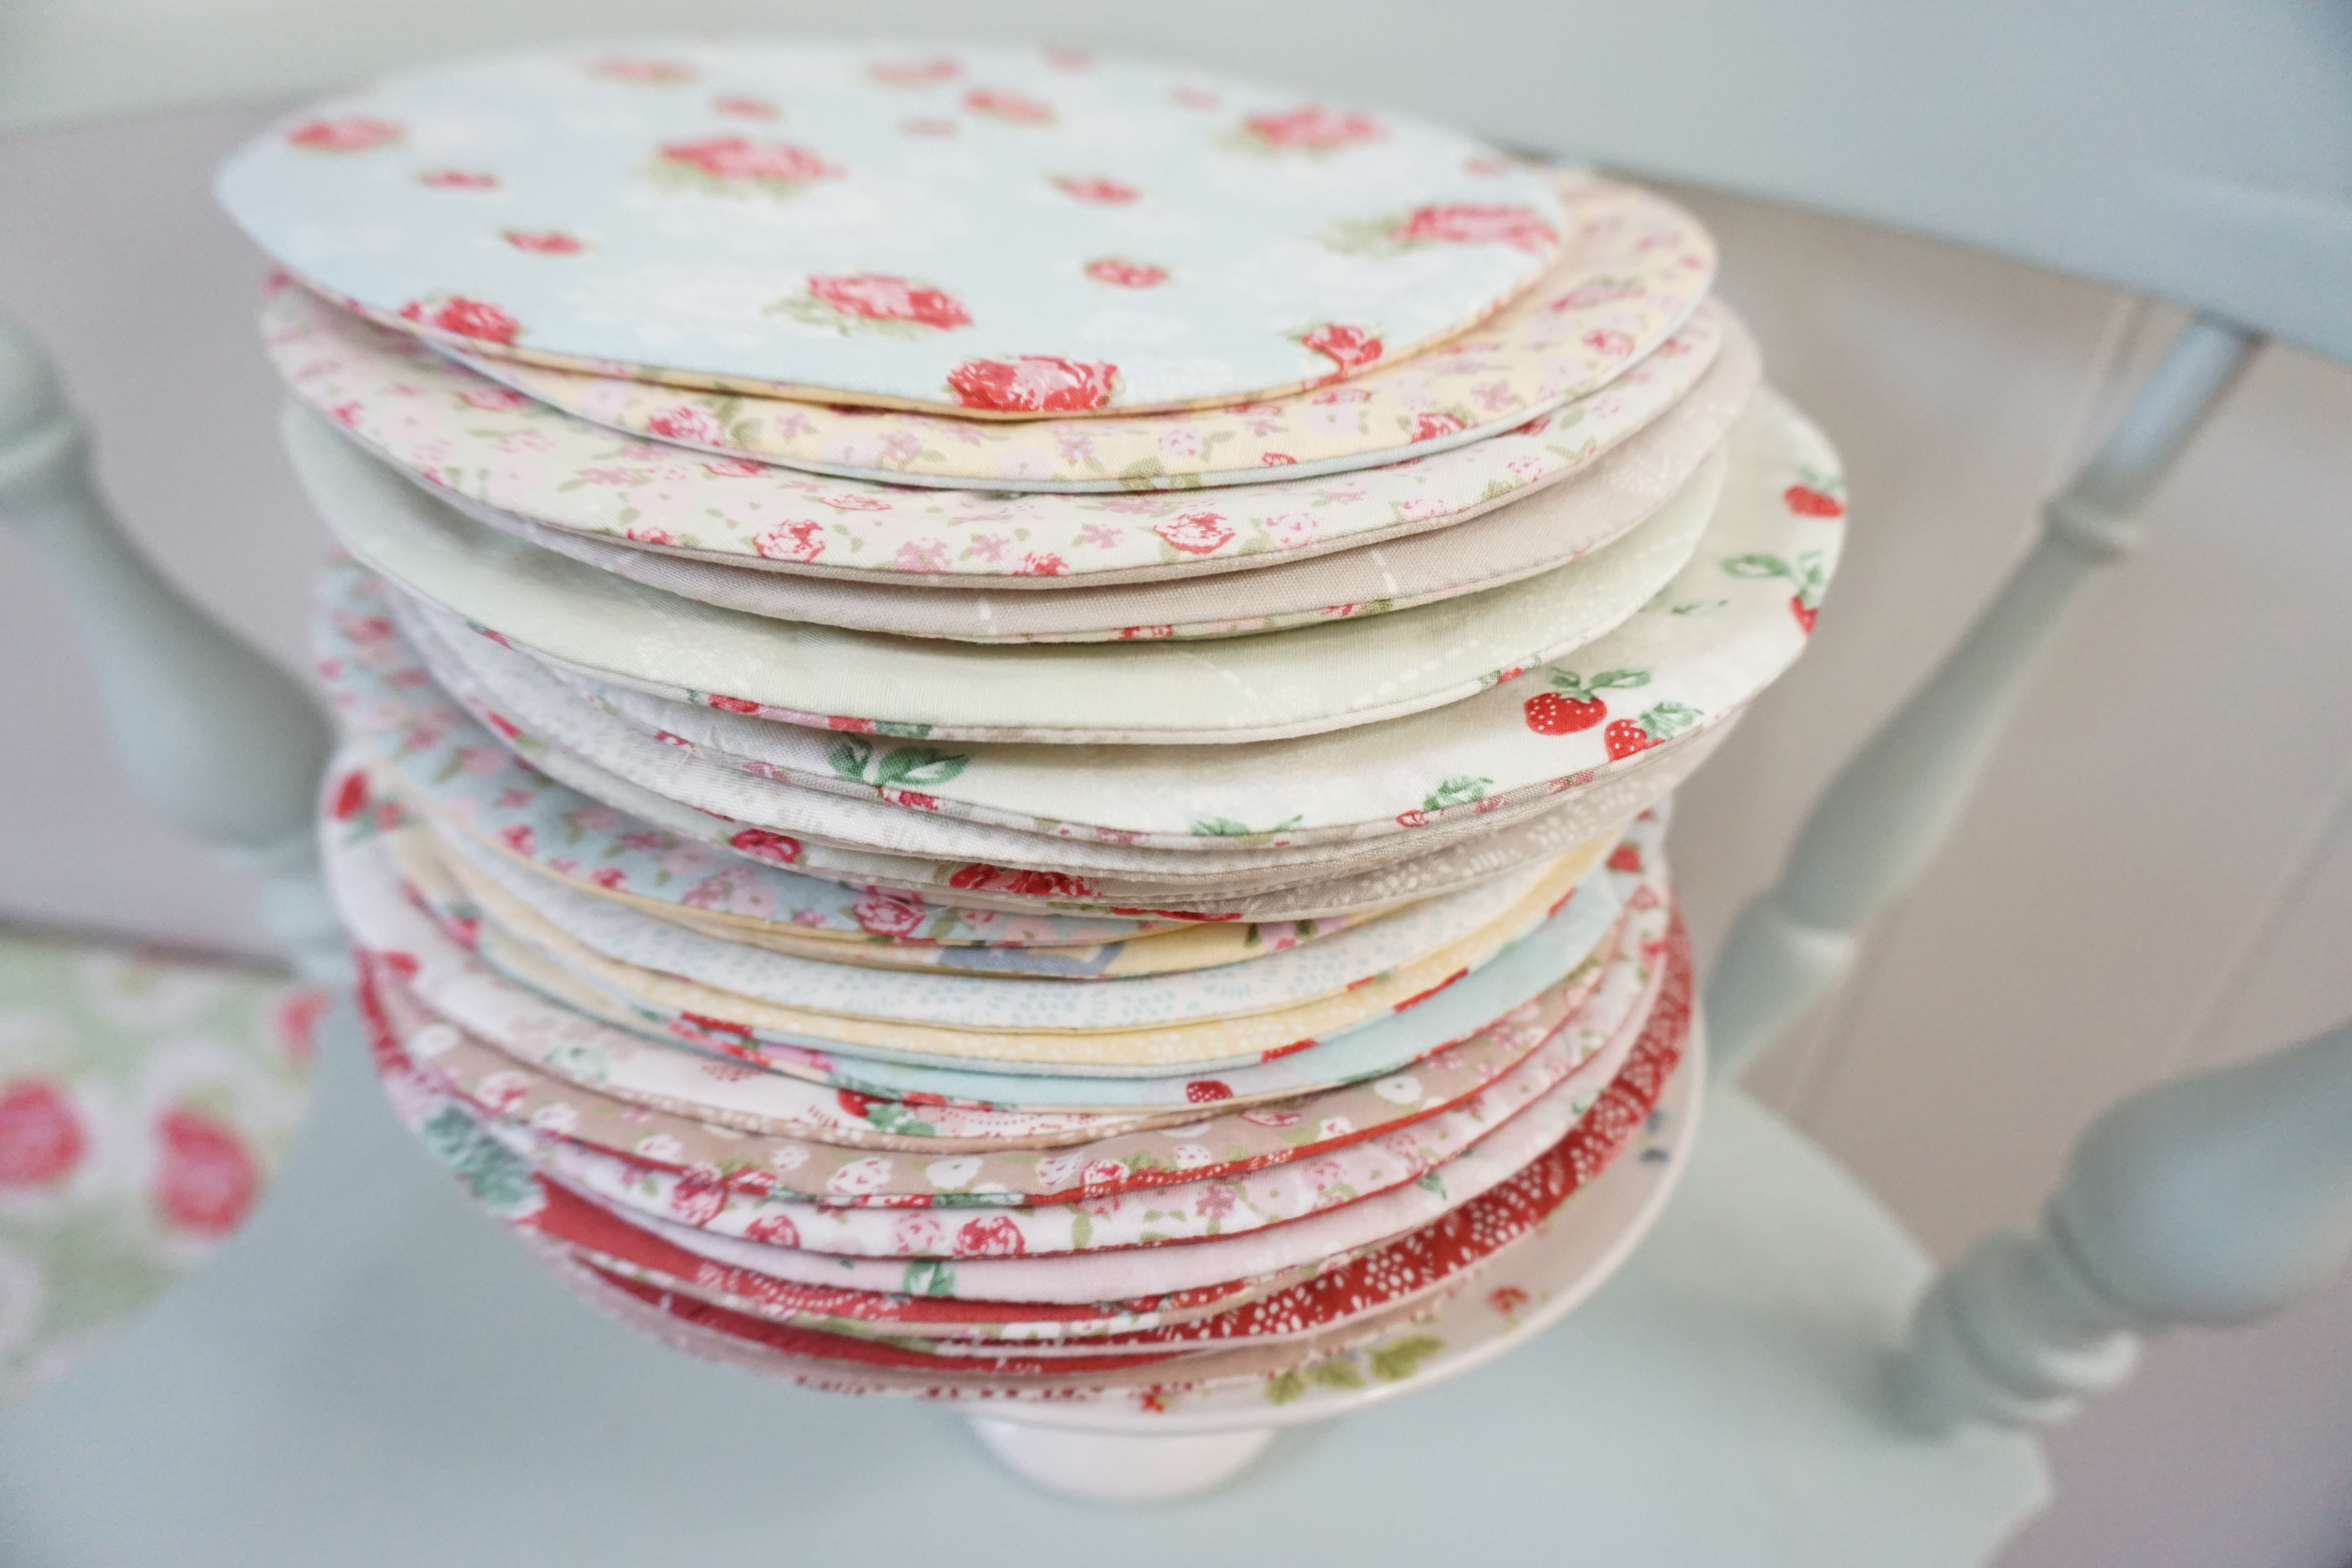
Step 2 – Sew the Circles: Next, sew thirty-six (36) padded circles, or “pancakes” as I like to call them =) Make sure to cut a hole in the front!
Beautiful stack of “pancakes”! =)
Step 3 – Make a Square Template: Sew all 36 of your circles (or pancakes) as shown in step 2, above. Then, prepare a 6″ square template for marking your circles. My video shows how to account for any seam allowance discrepancies, so be sure to watch.
Step 4 – Properly Mark your Circles: First, arrange all 36 circles on the floor in a 6×6 formation (6 rows with 6 circles in each row). Make sure the holes (where you turned the circles right-side-out) are facing up. Then, watch my video below on how to properly mark the circles using the square template.
To recap, here are Three things to remember from my video (above) when using the square template to mark your circles:
- Mark the side of the circle that has the hole.
- Only mark the sides where you will be sewing and folding the edges. Or in other words, do not mark on the outer edges of your quilt where binding would be if this were a traditional quilt. If this sounds confusing, please watch the video for a better explanation.
- Hide the holes! When marking, keep in mind where the hole is to make sure it eventually gets hidden.
Step 5 – Sew each circle within each row together: Watch my video on how to pin and sew your circles within each row together.
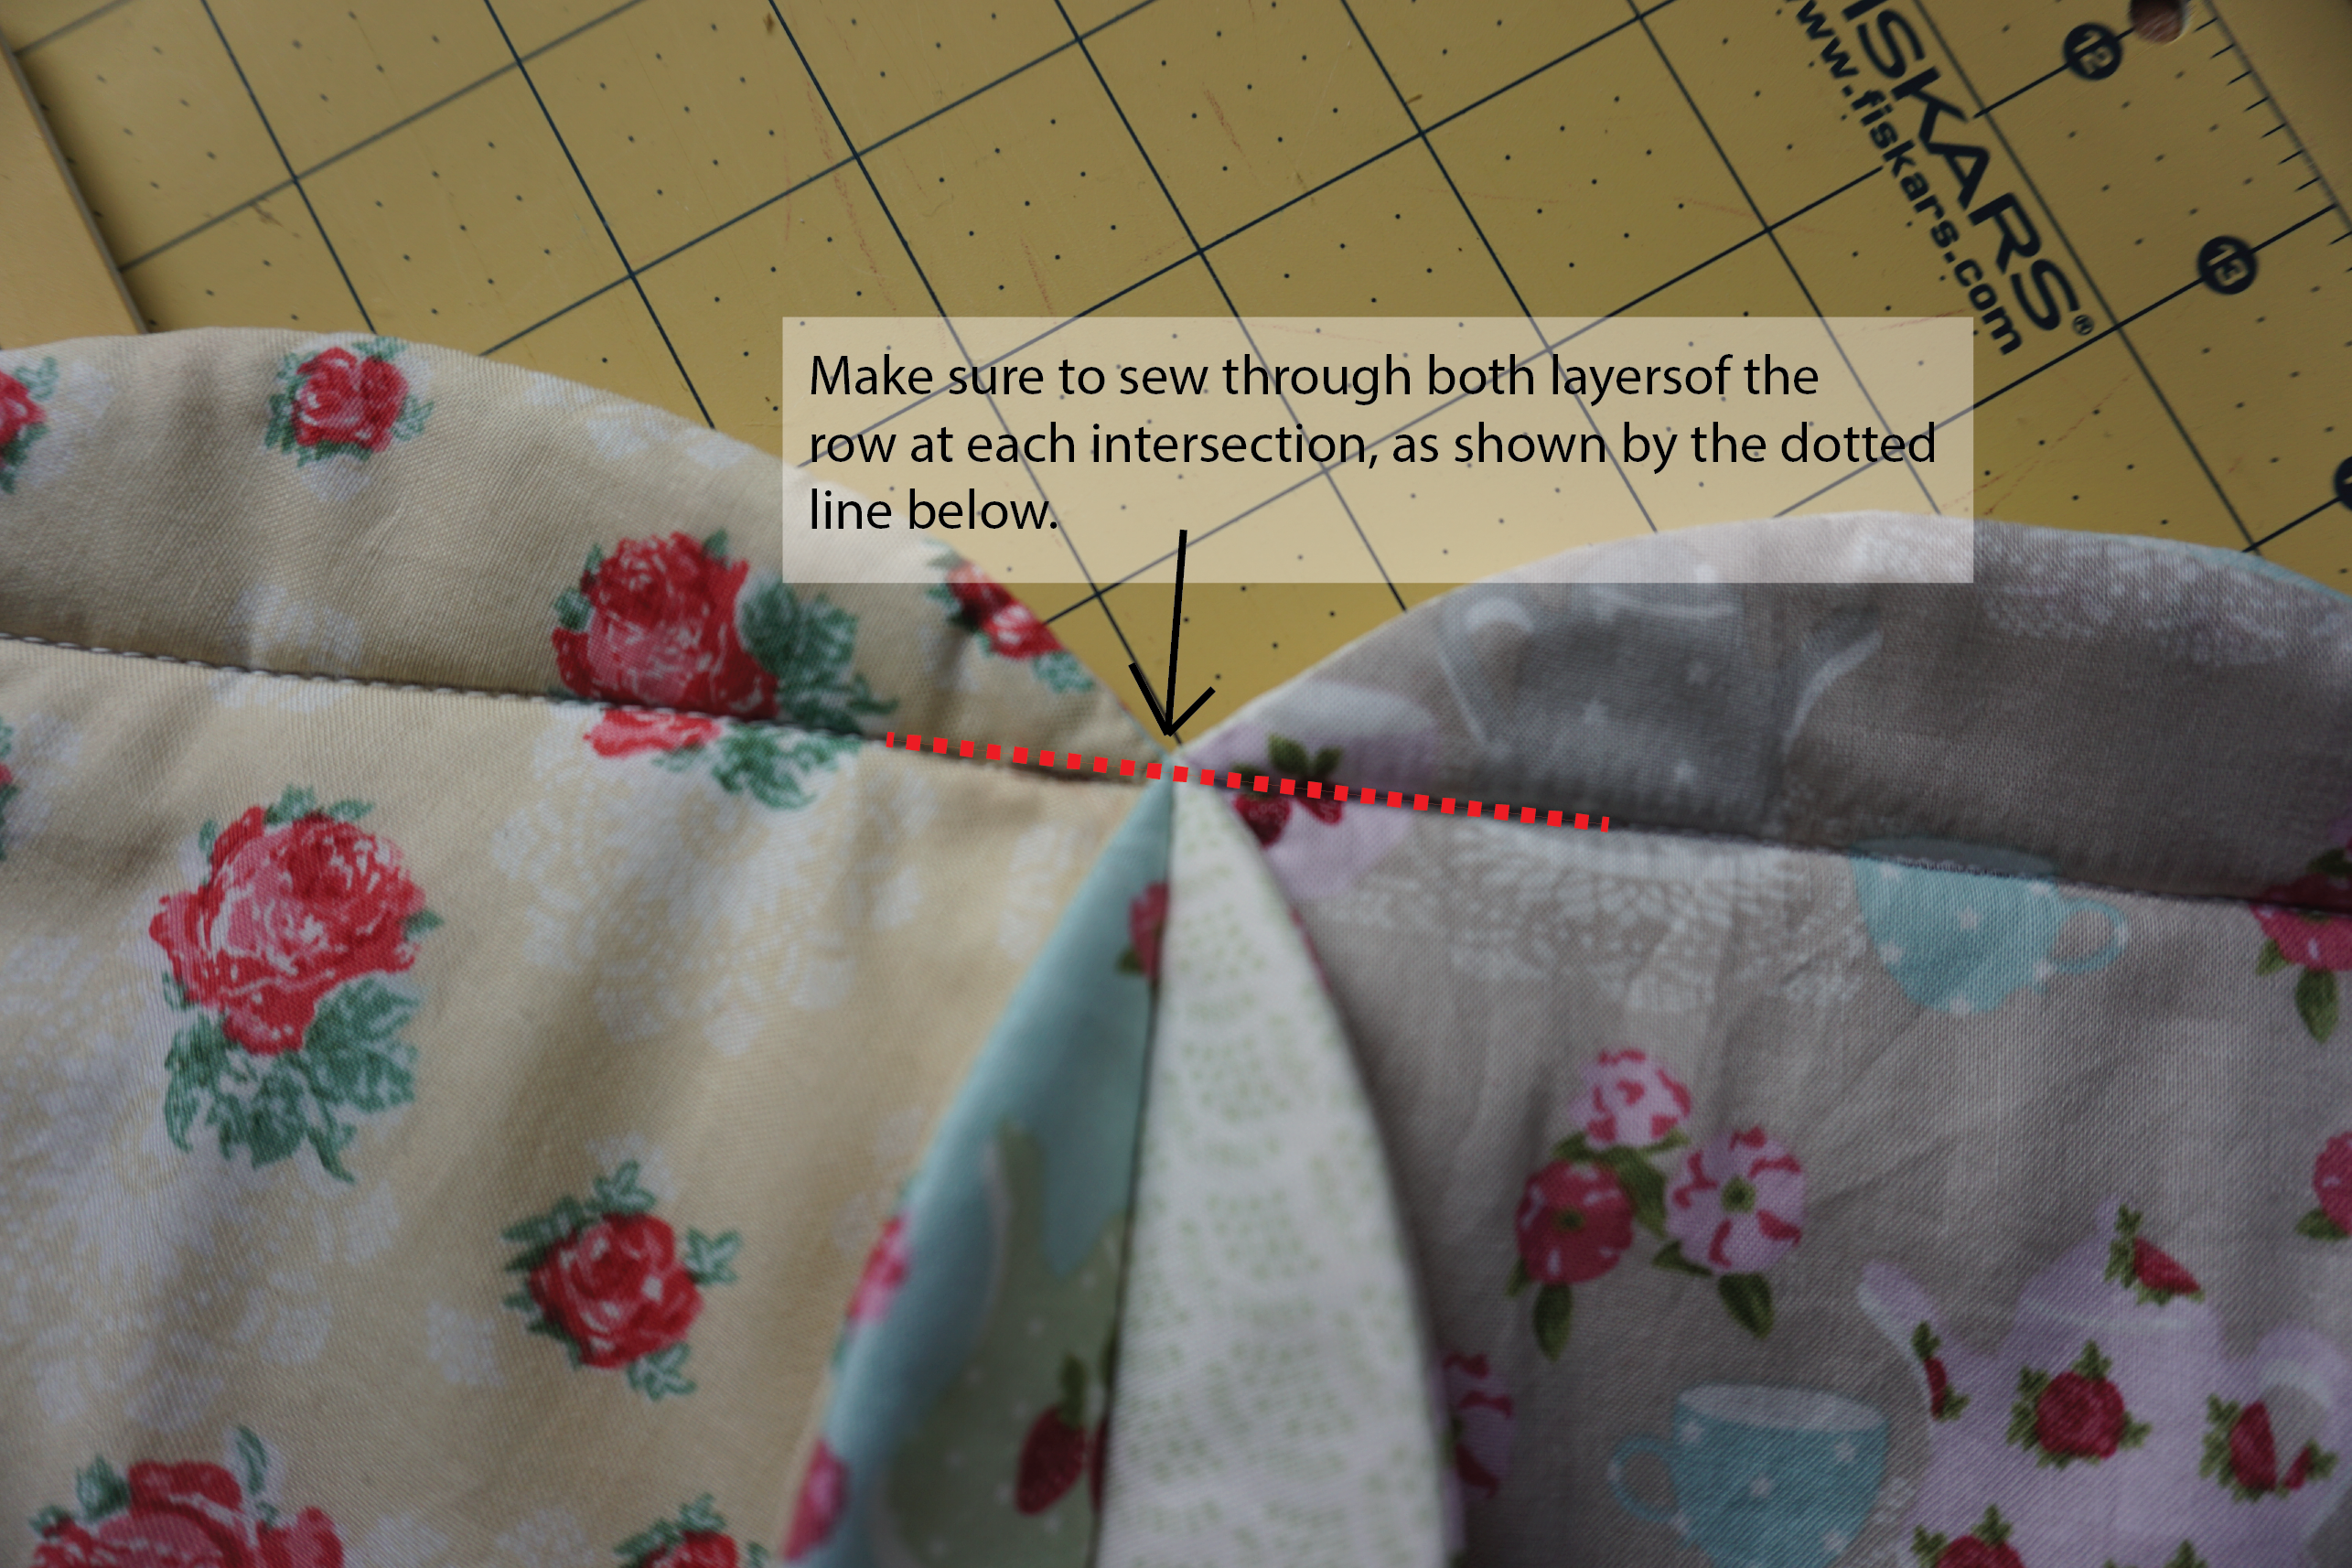
Step 6 – Sew the Rows Together: Watch my video on how to assemble the rows. Make sure the intersections are sewn down.
Clarification: in my video above I said to make sure to “sew through all 4 layers at each intersection,” and then drifted out of the frame when trying to show it up-close, lol.” This was (obviously) my first go at a video tutorial! ;-p What I meant to say is to make sure to sew through both layers of the row at each intersection. Please see my photo below for clarification. Sorry for any confusion!
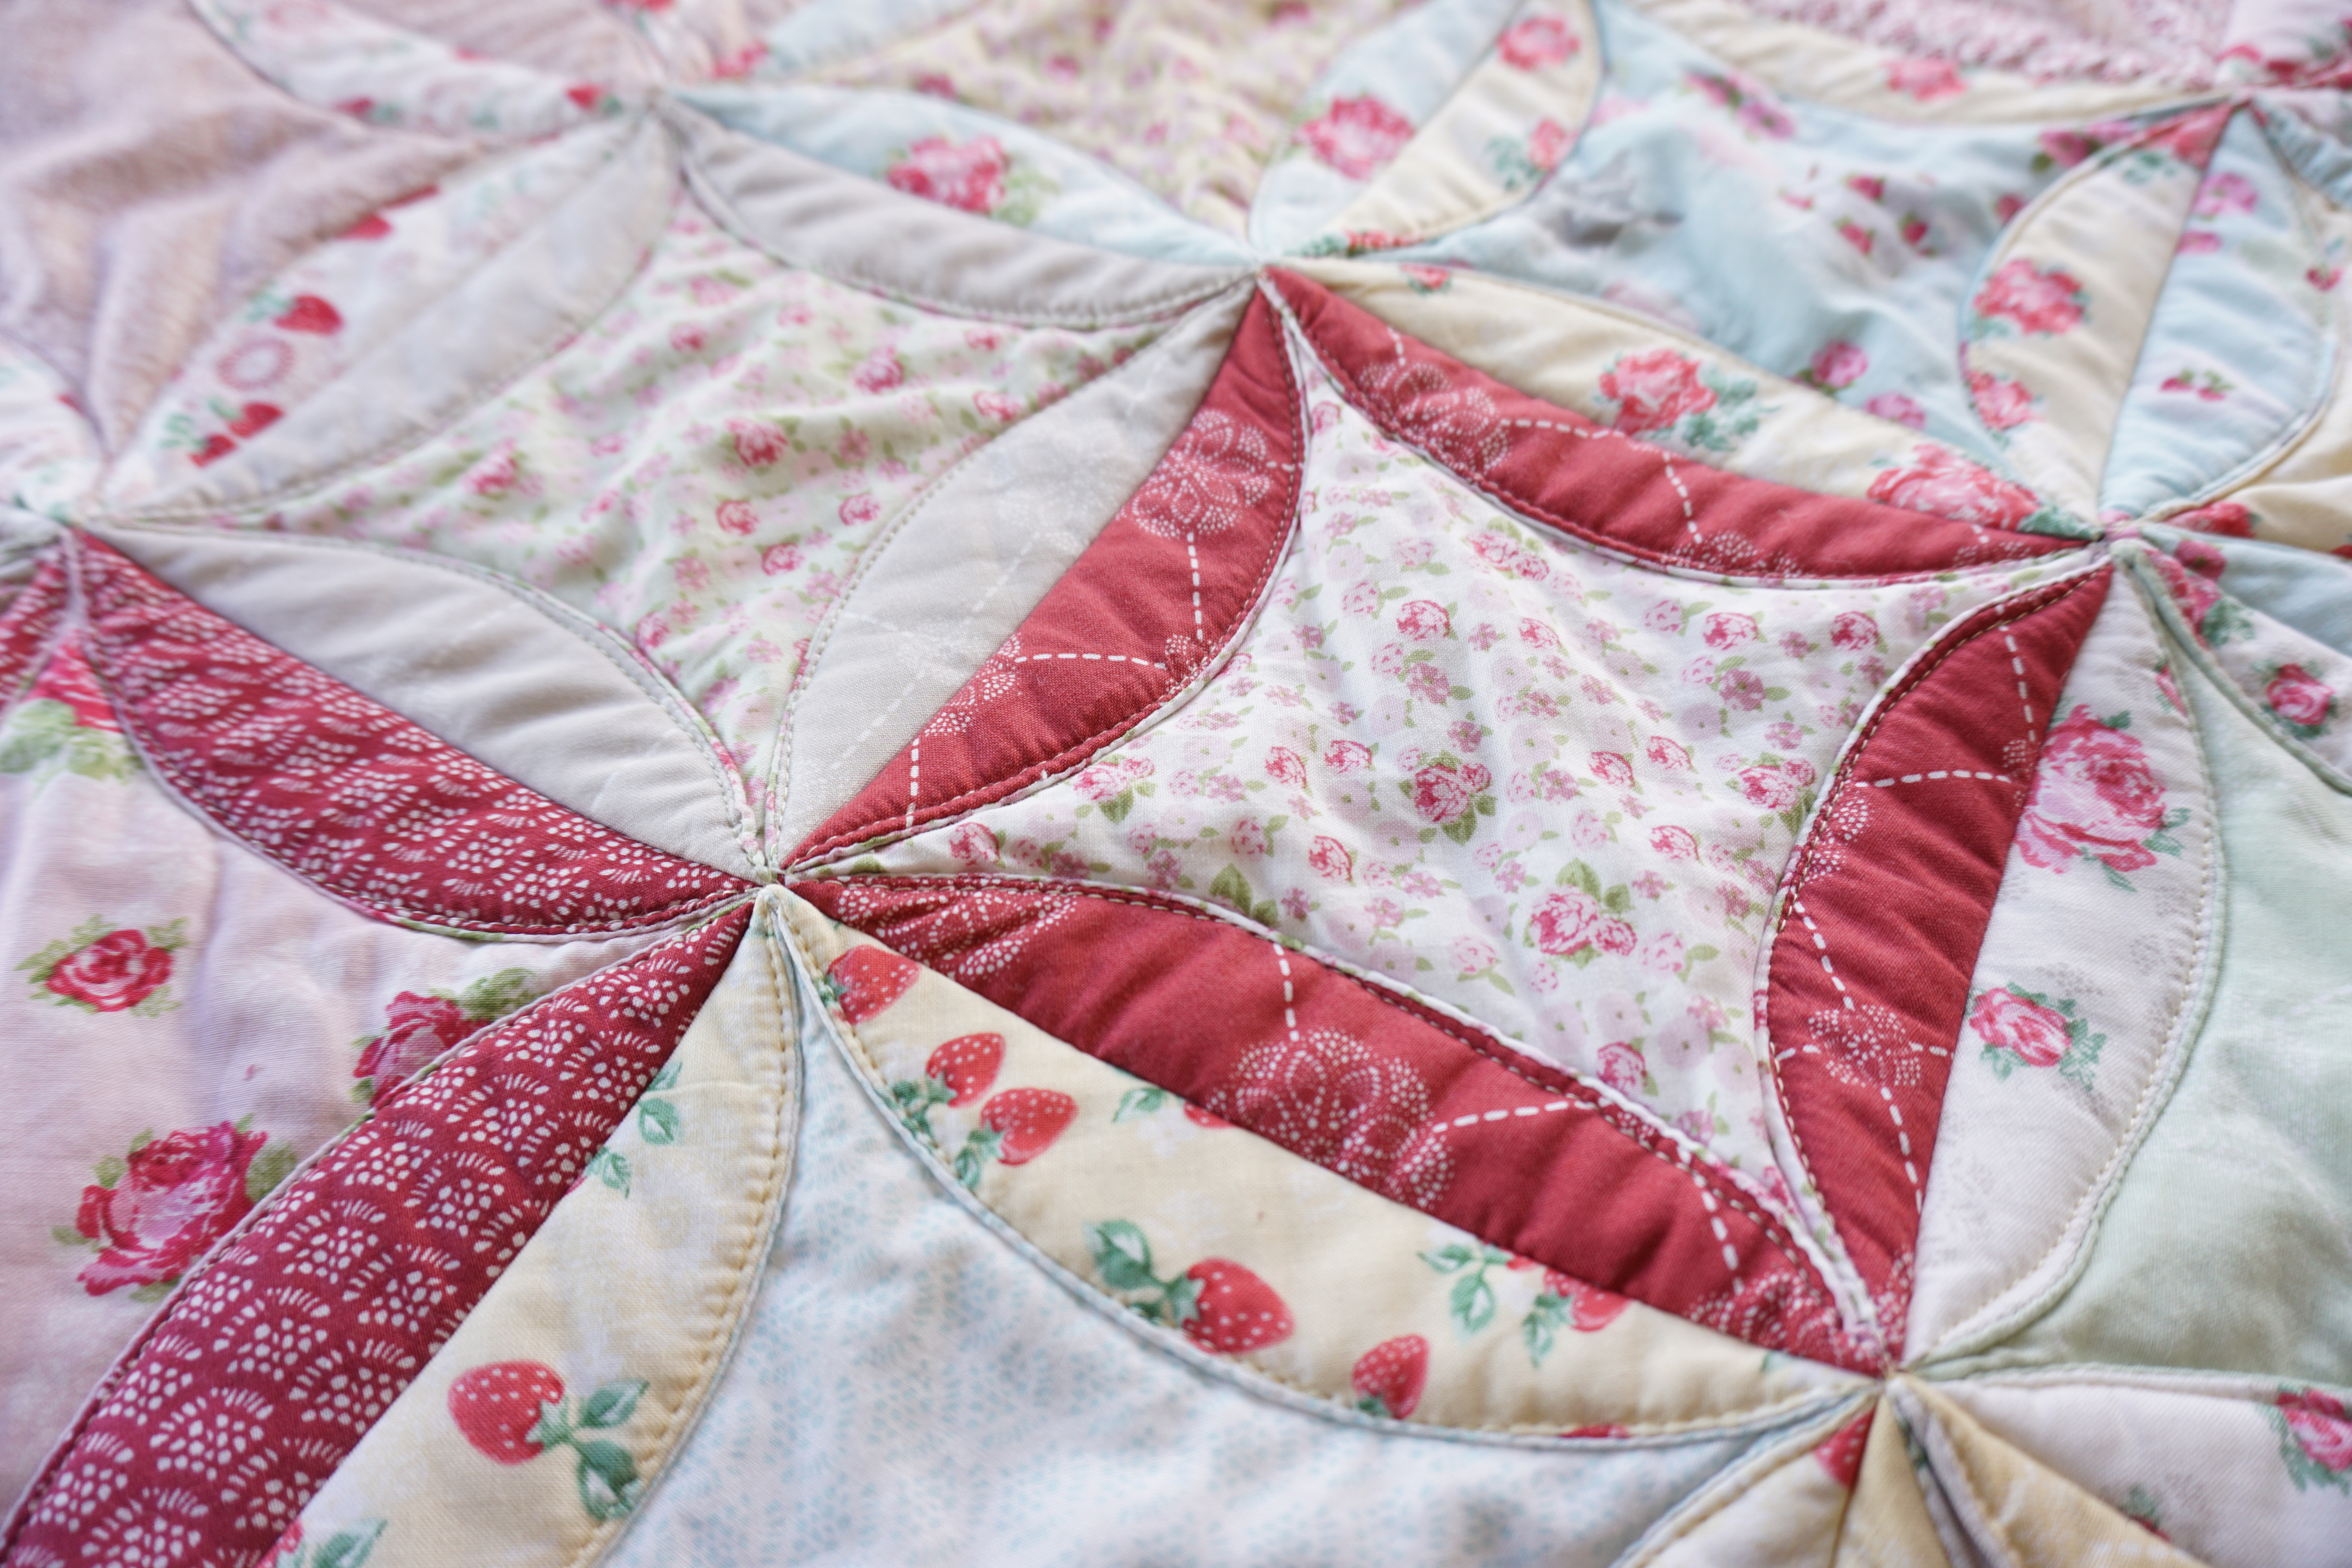
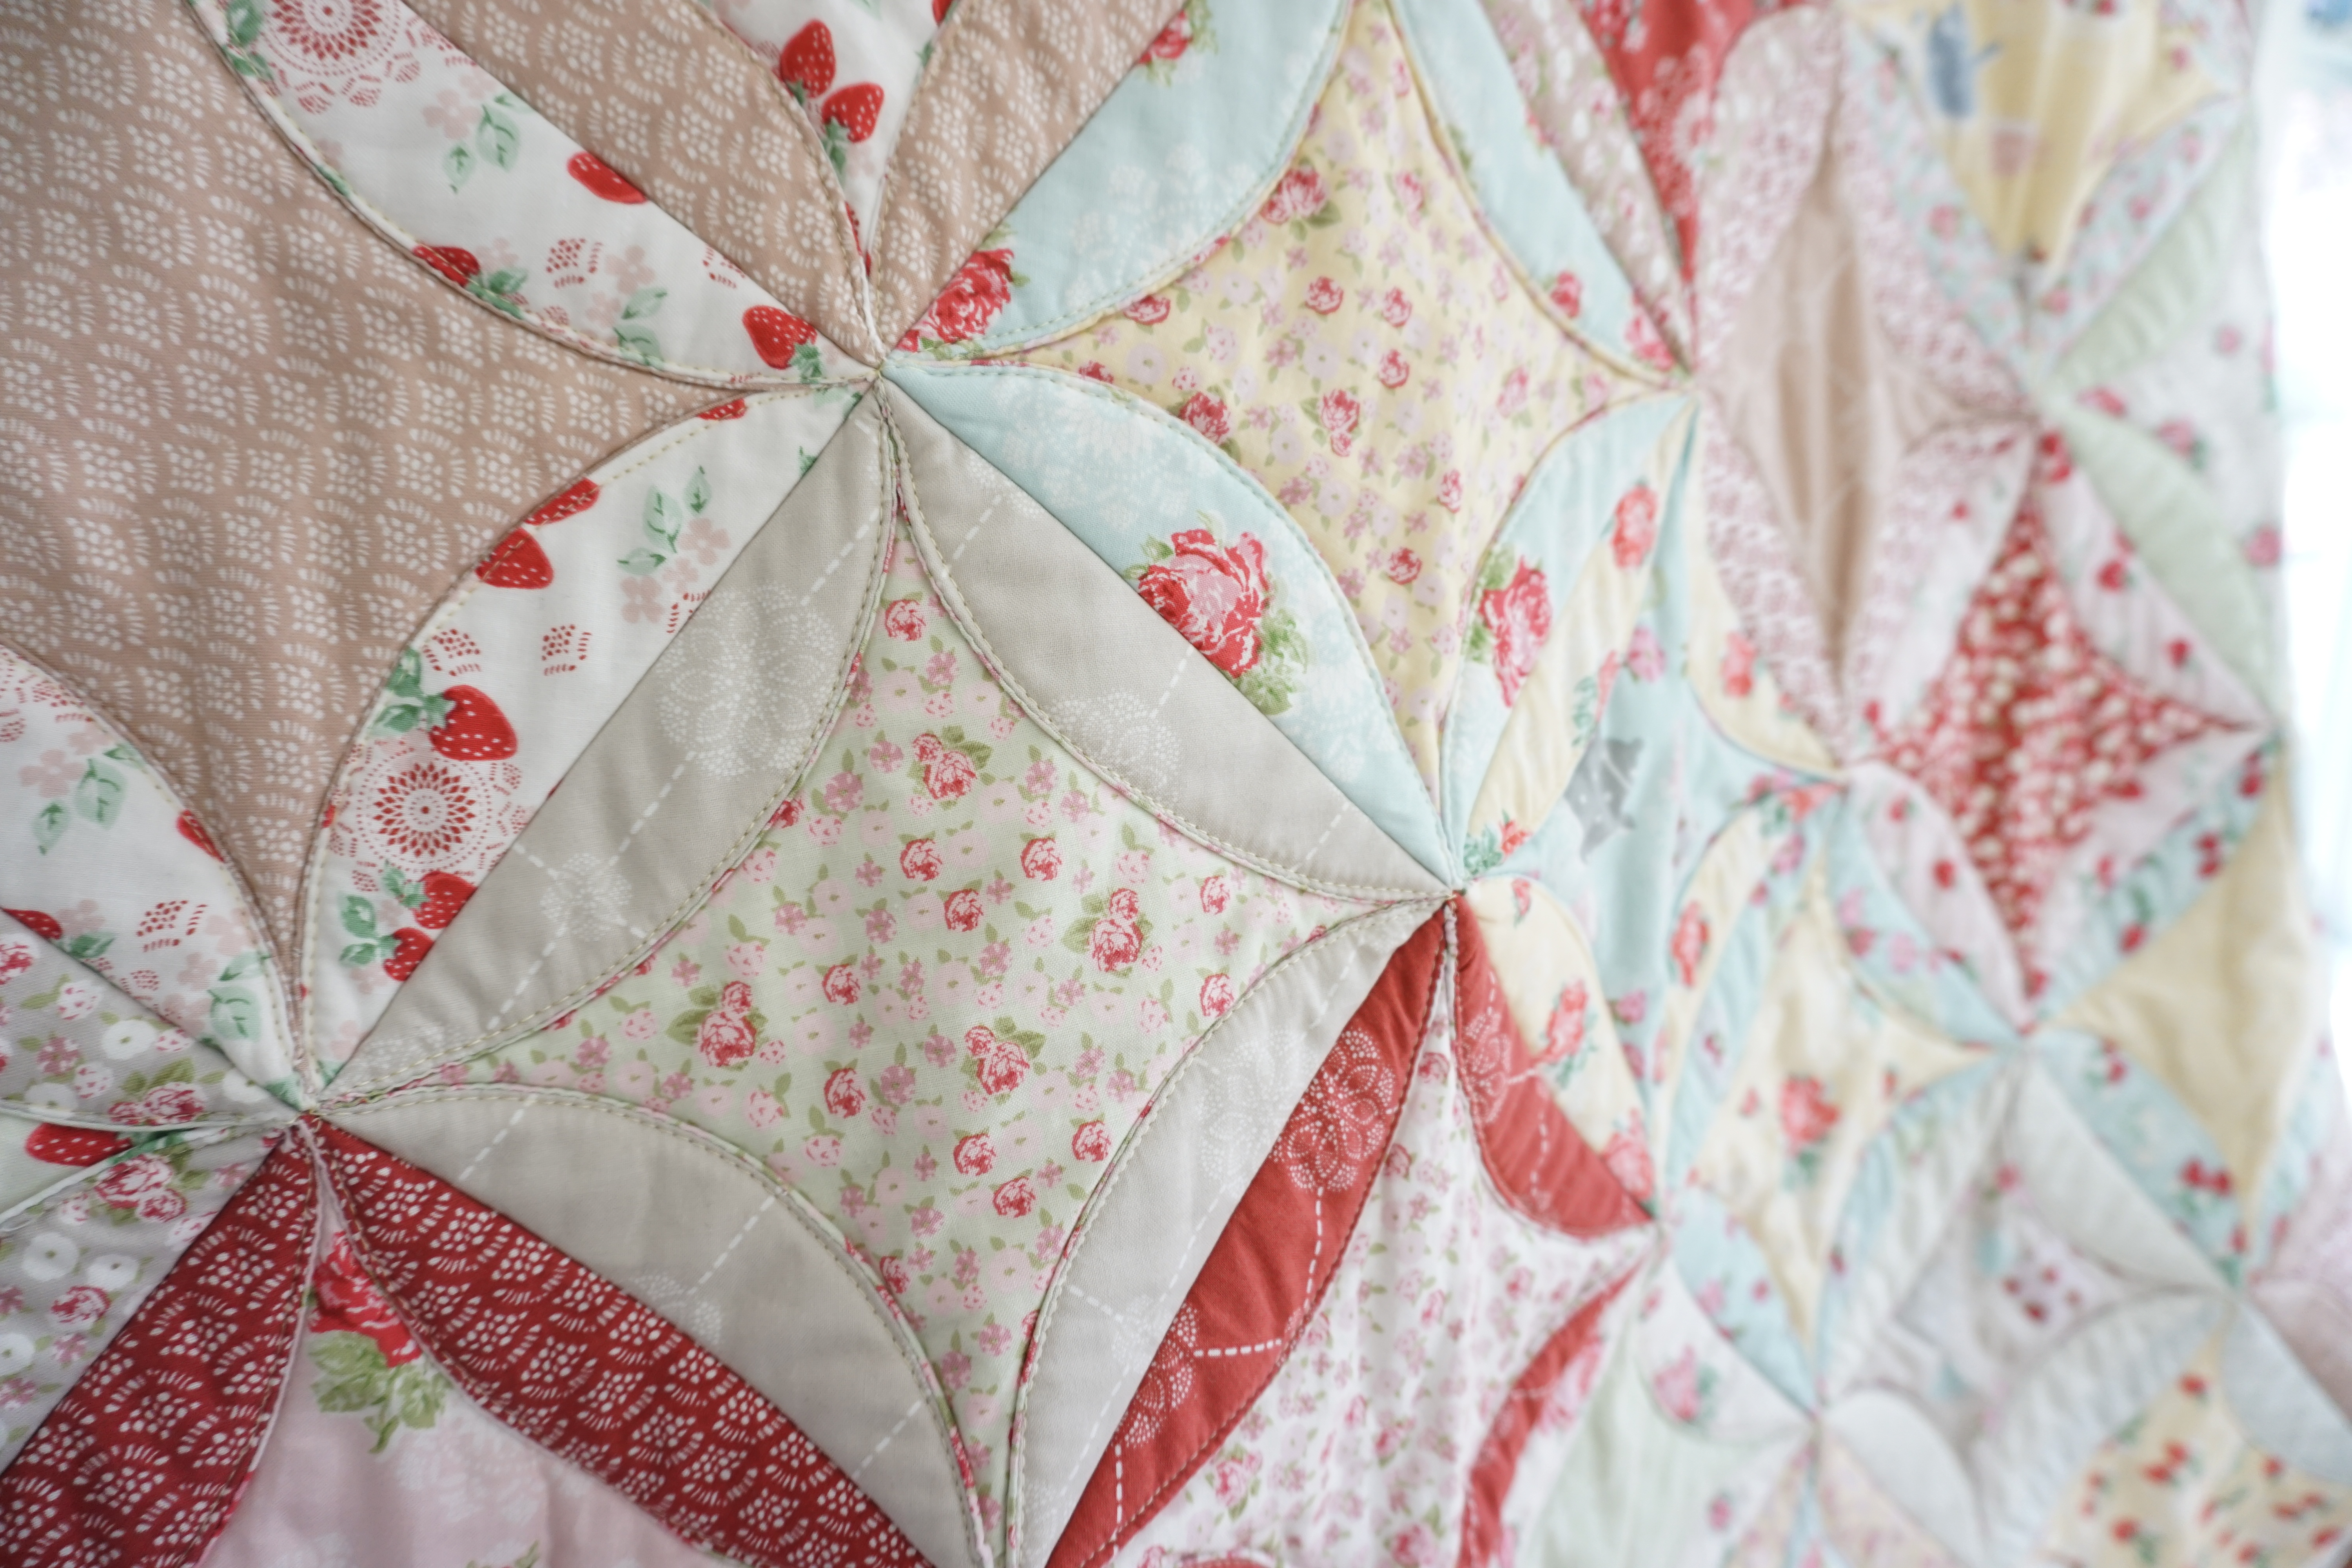
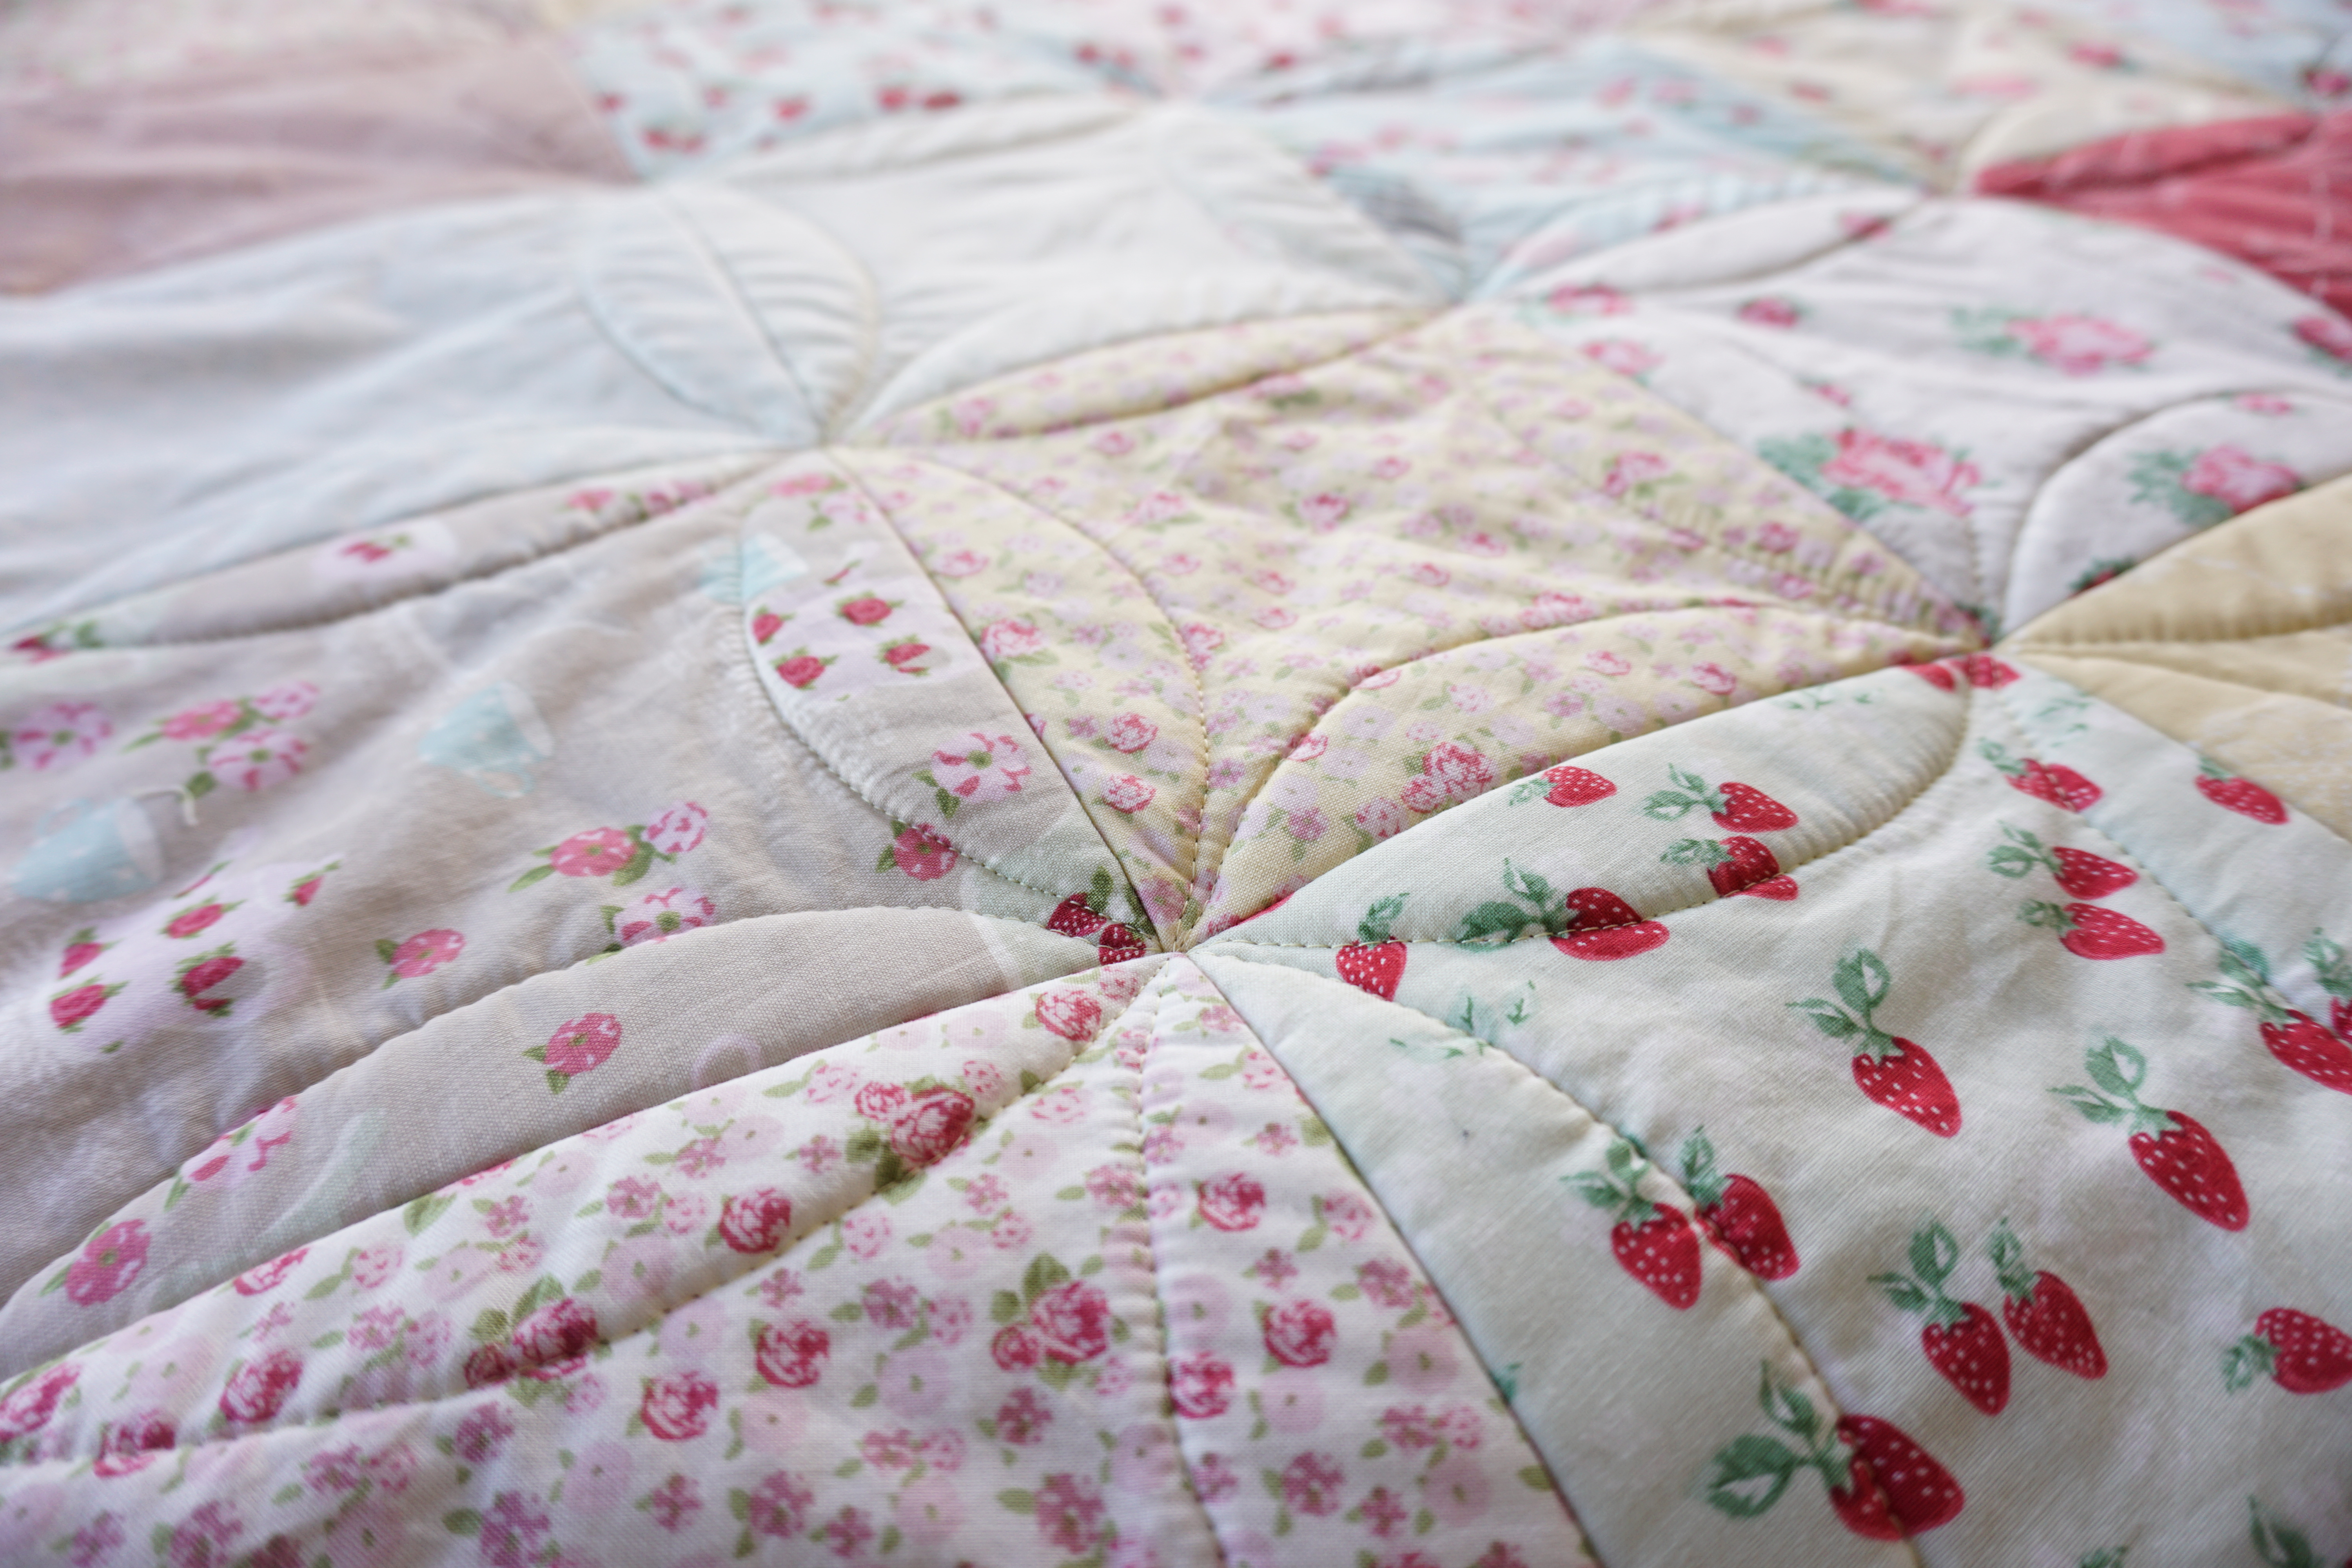
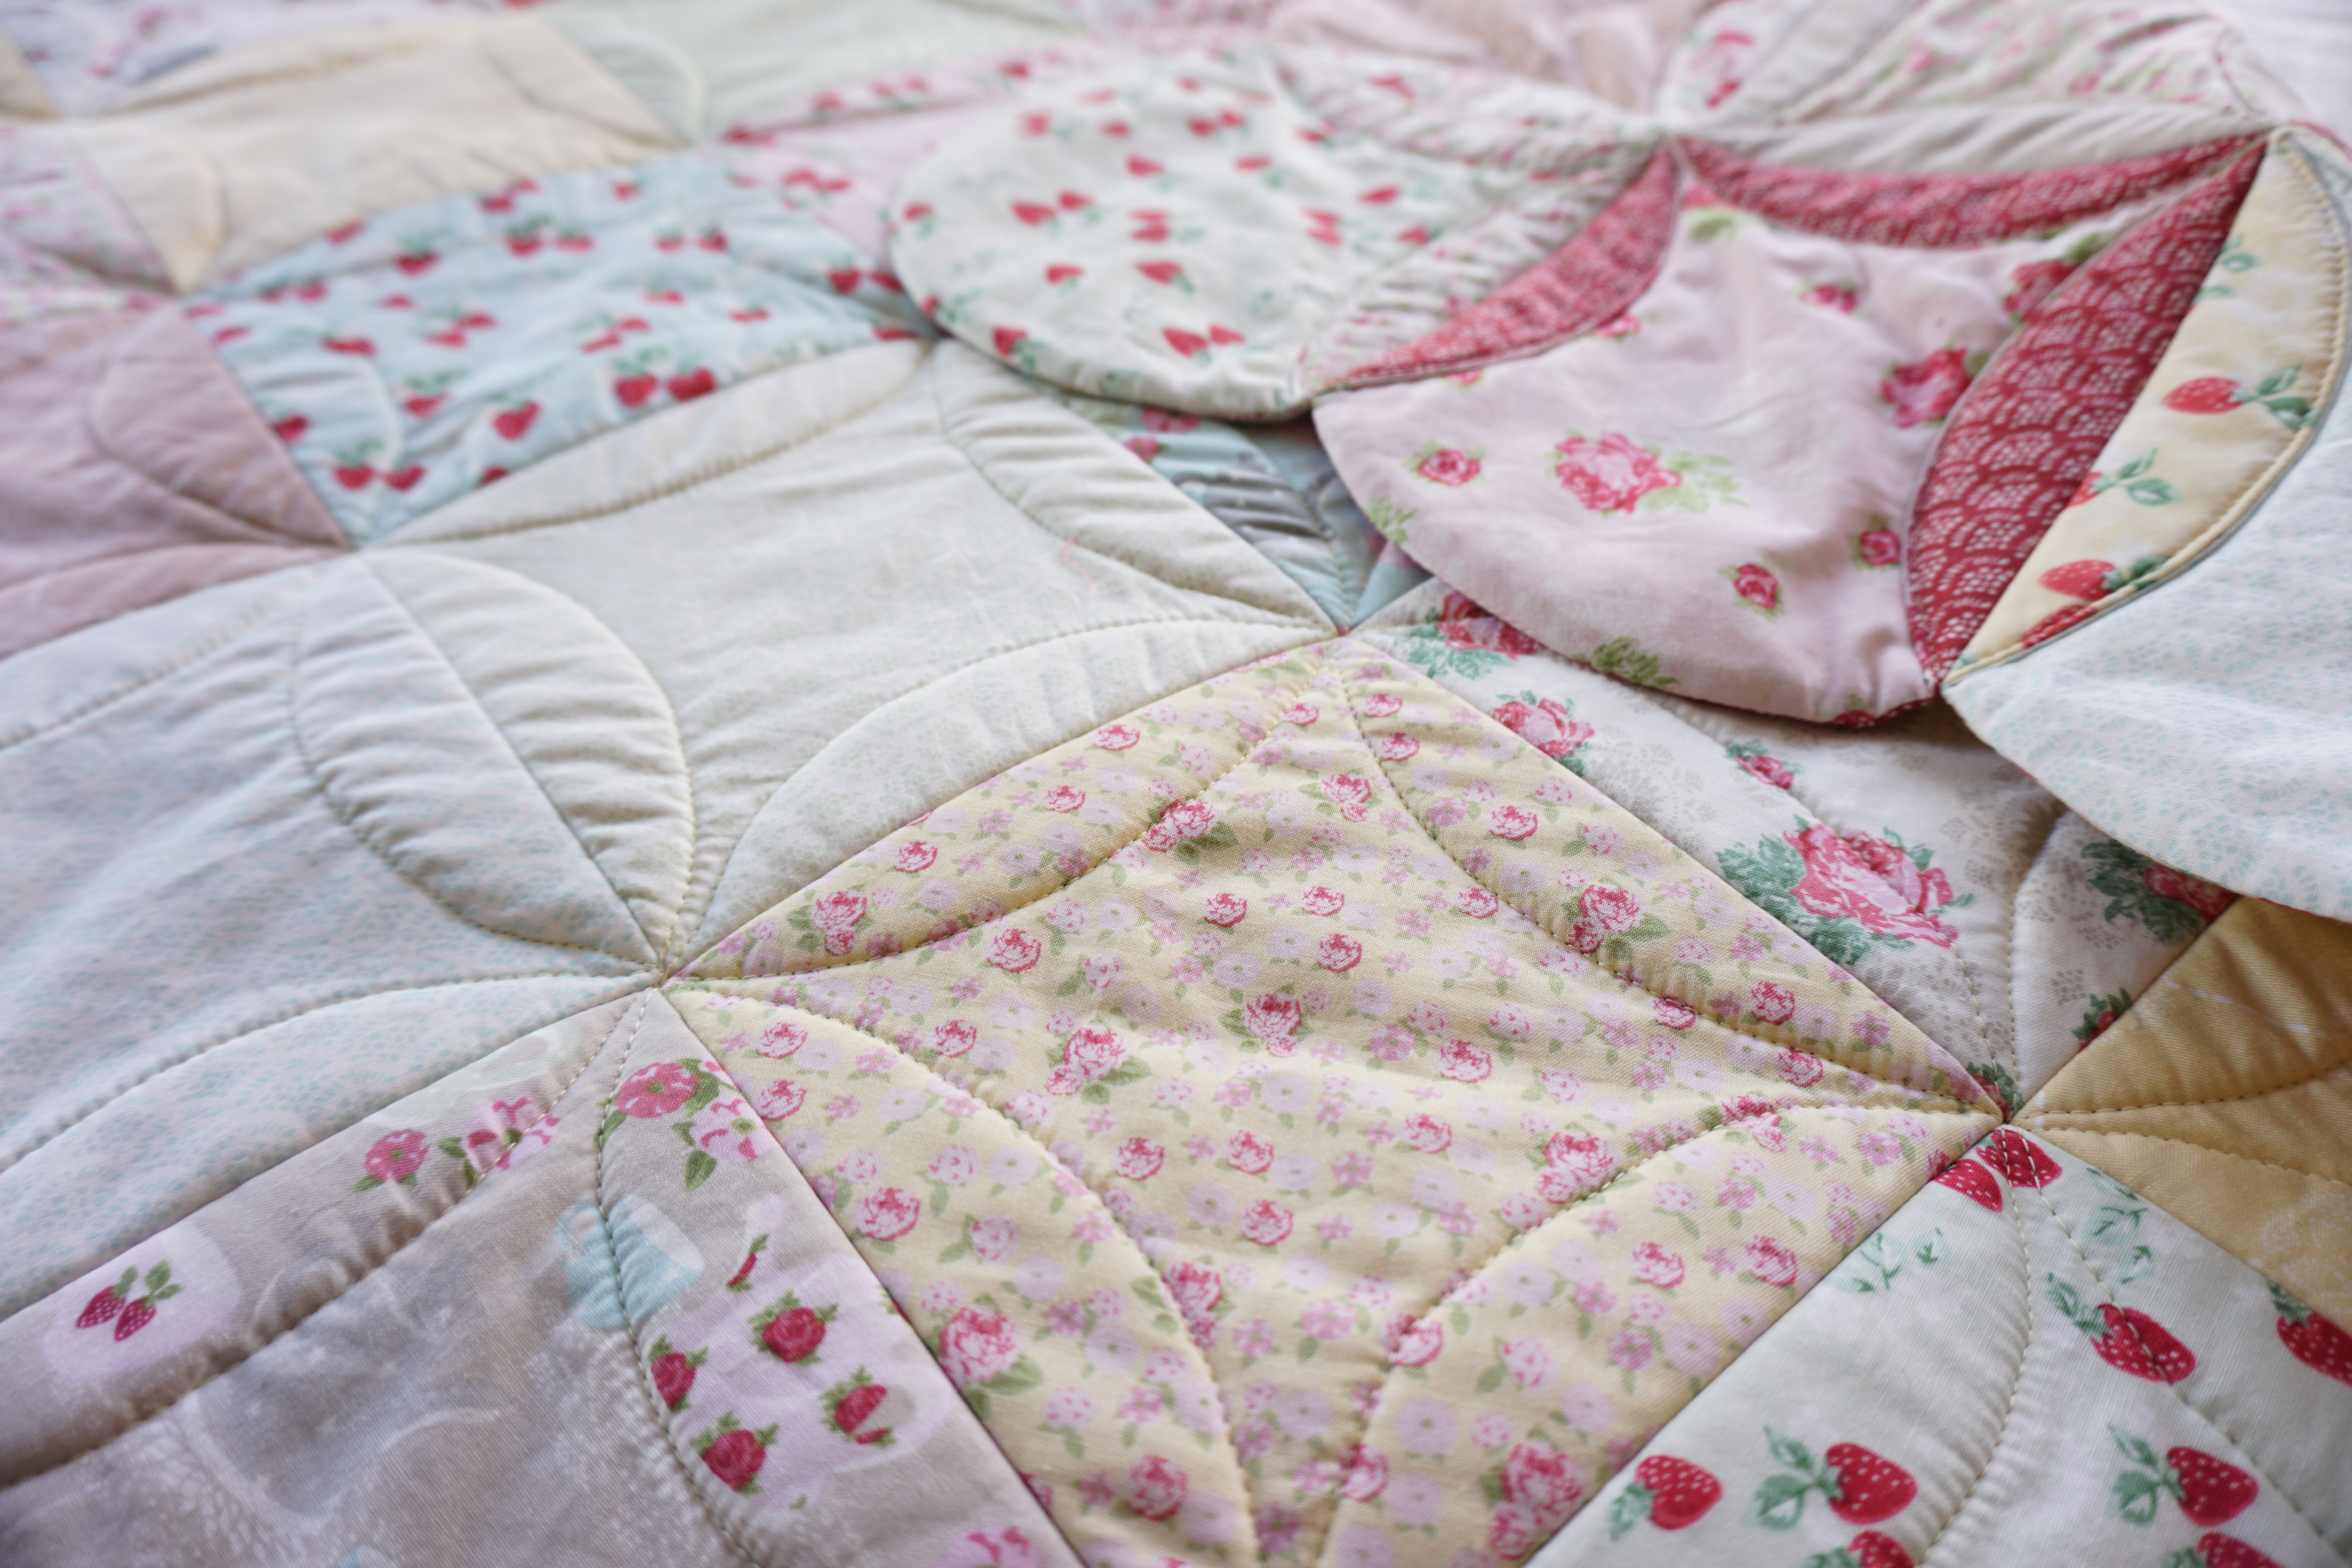
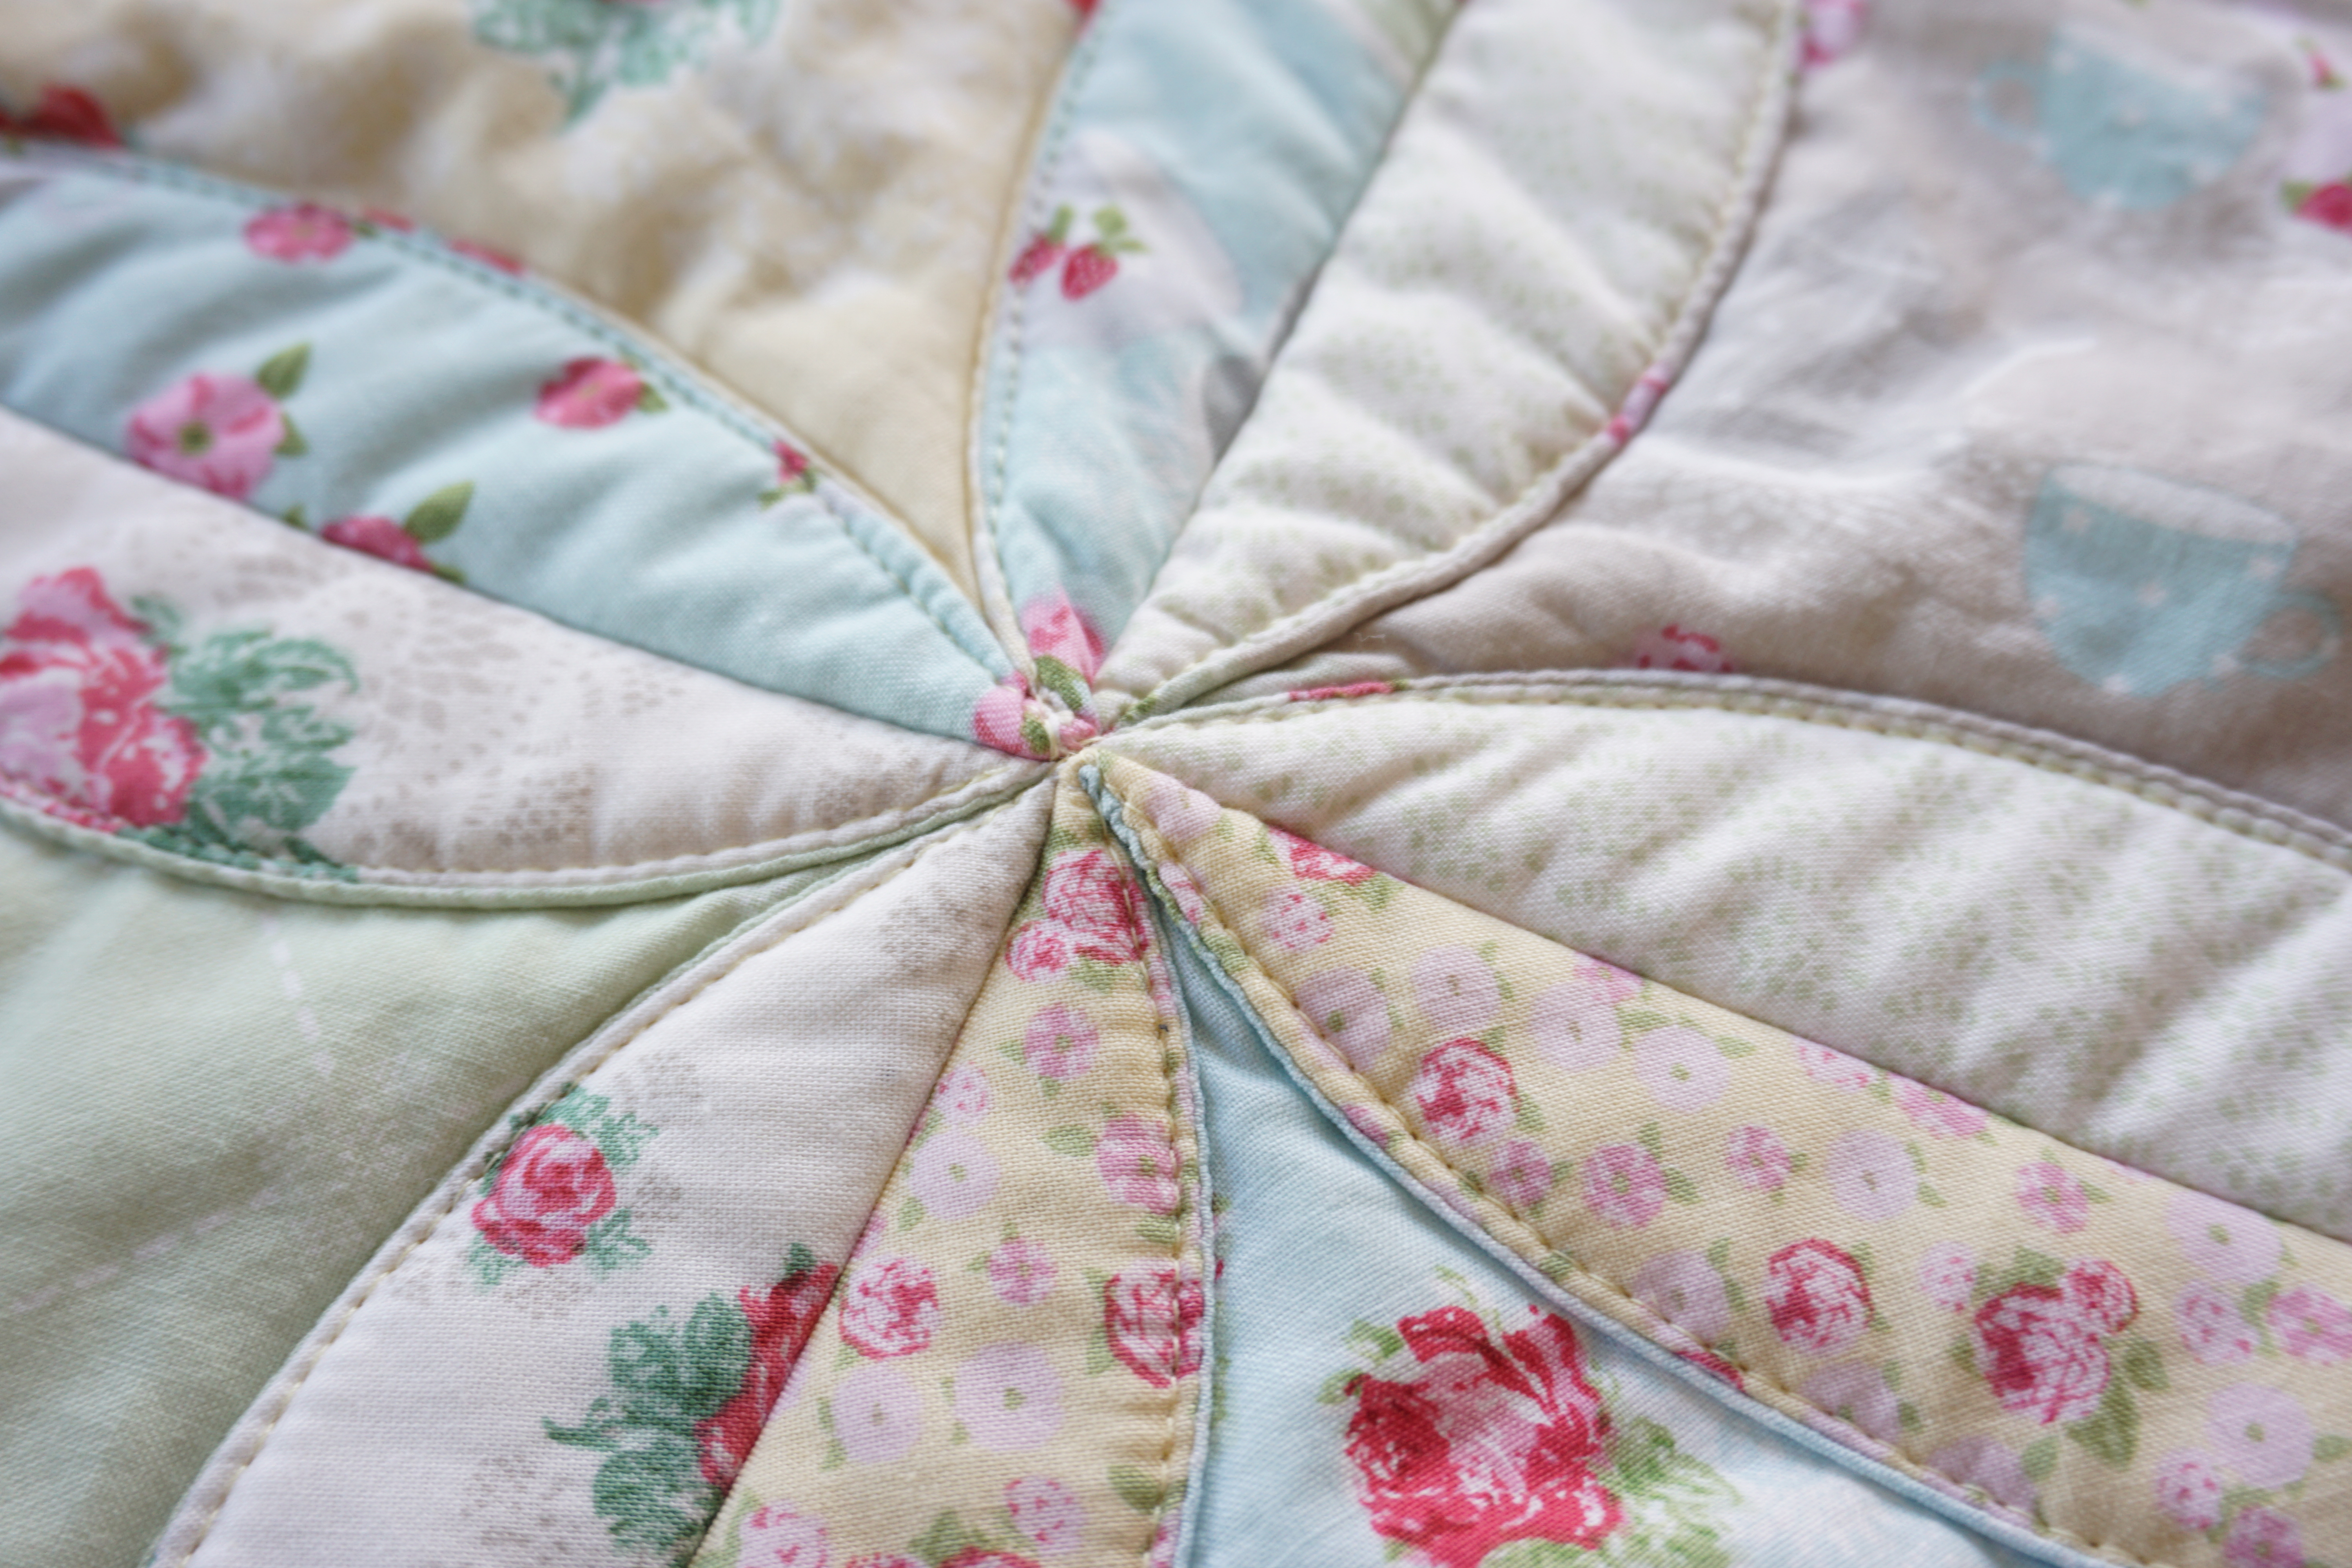
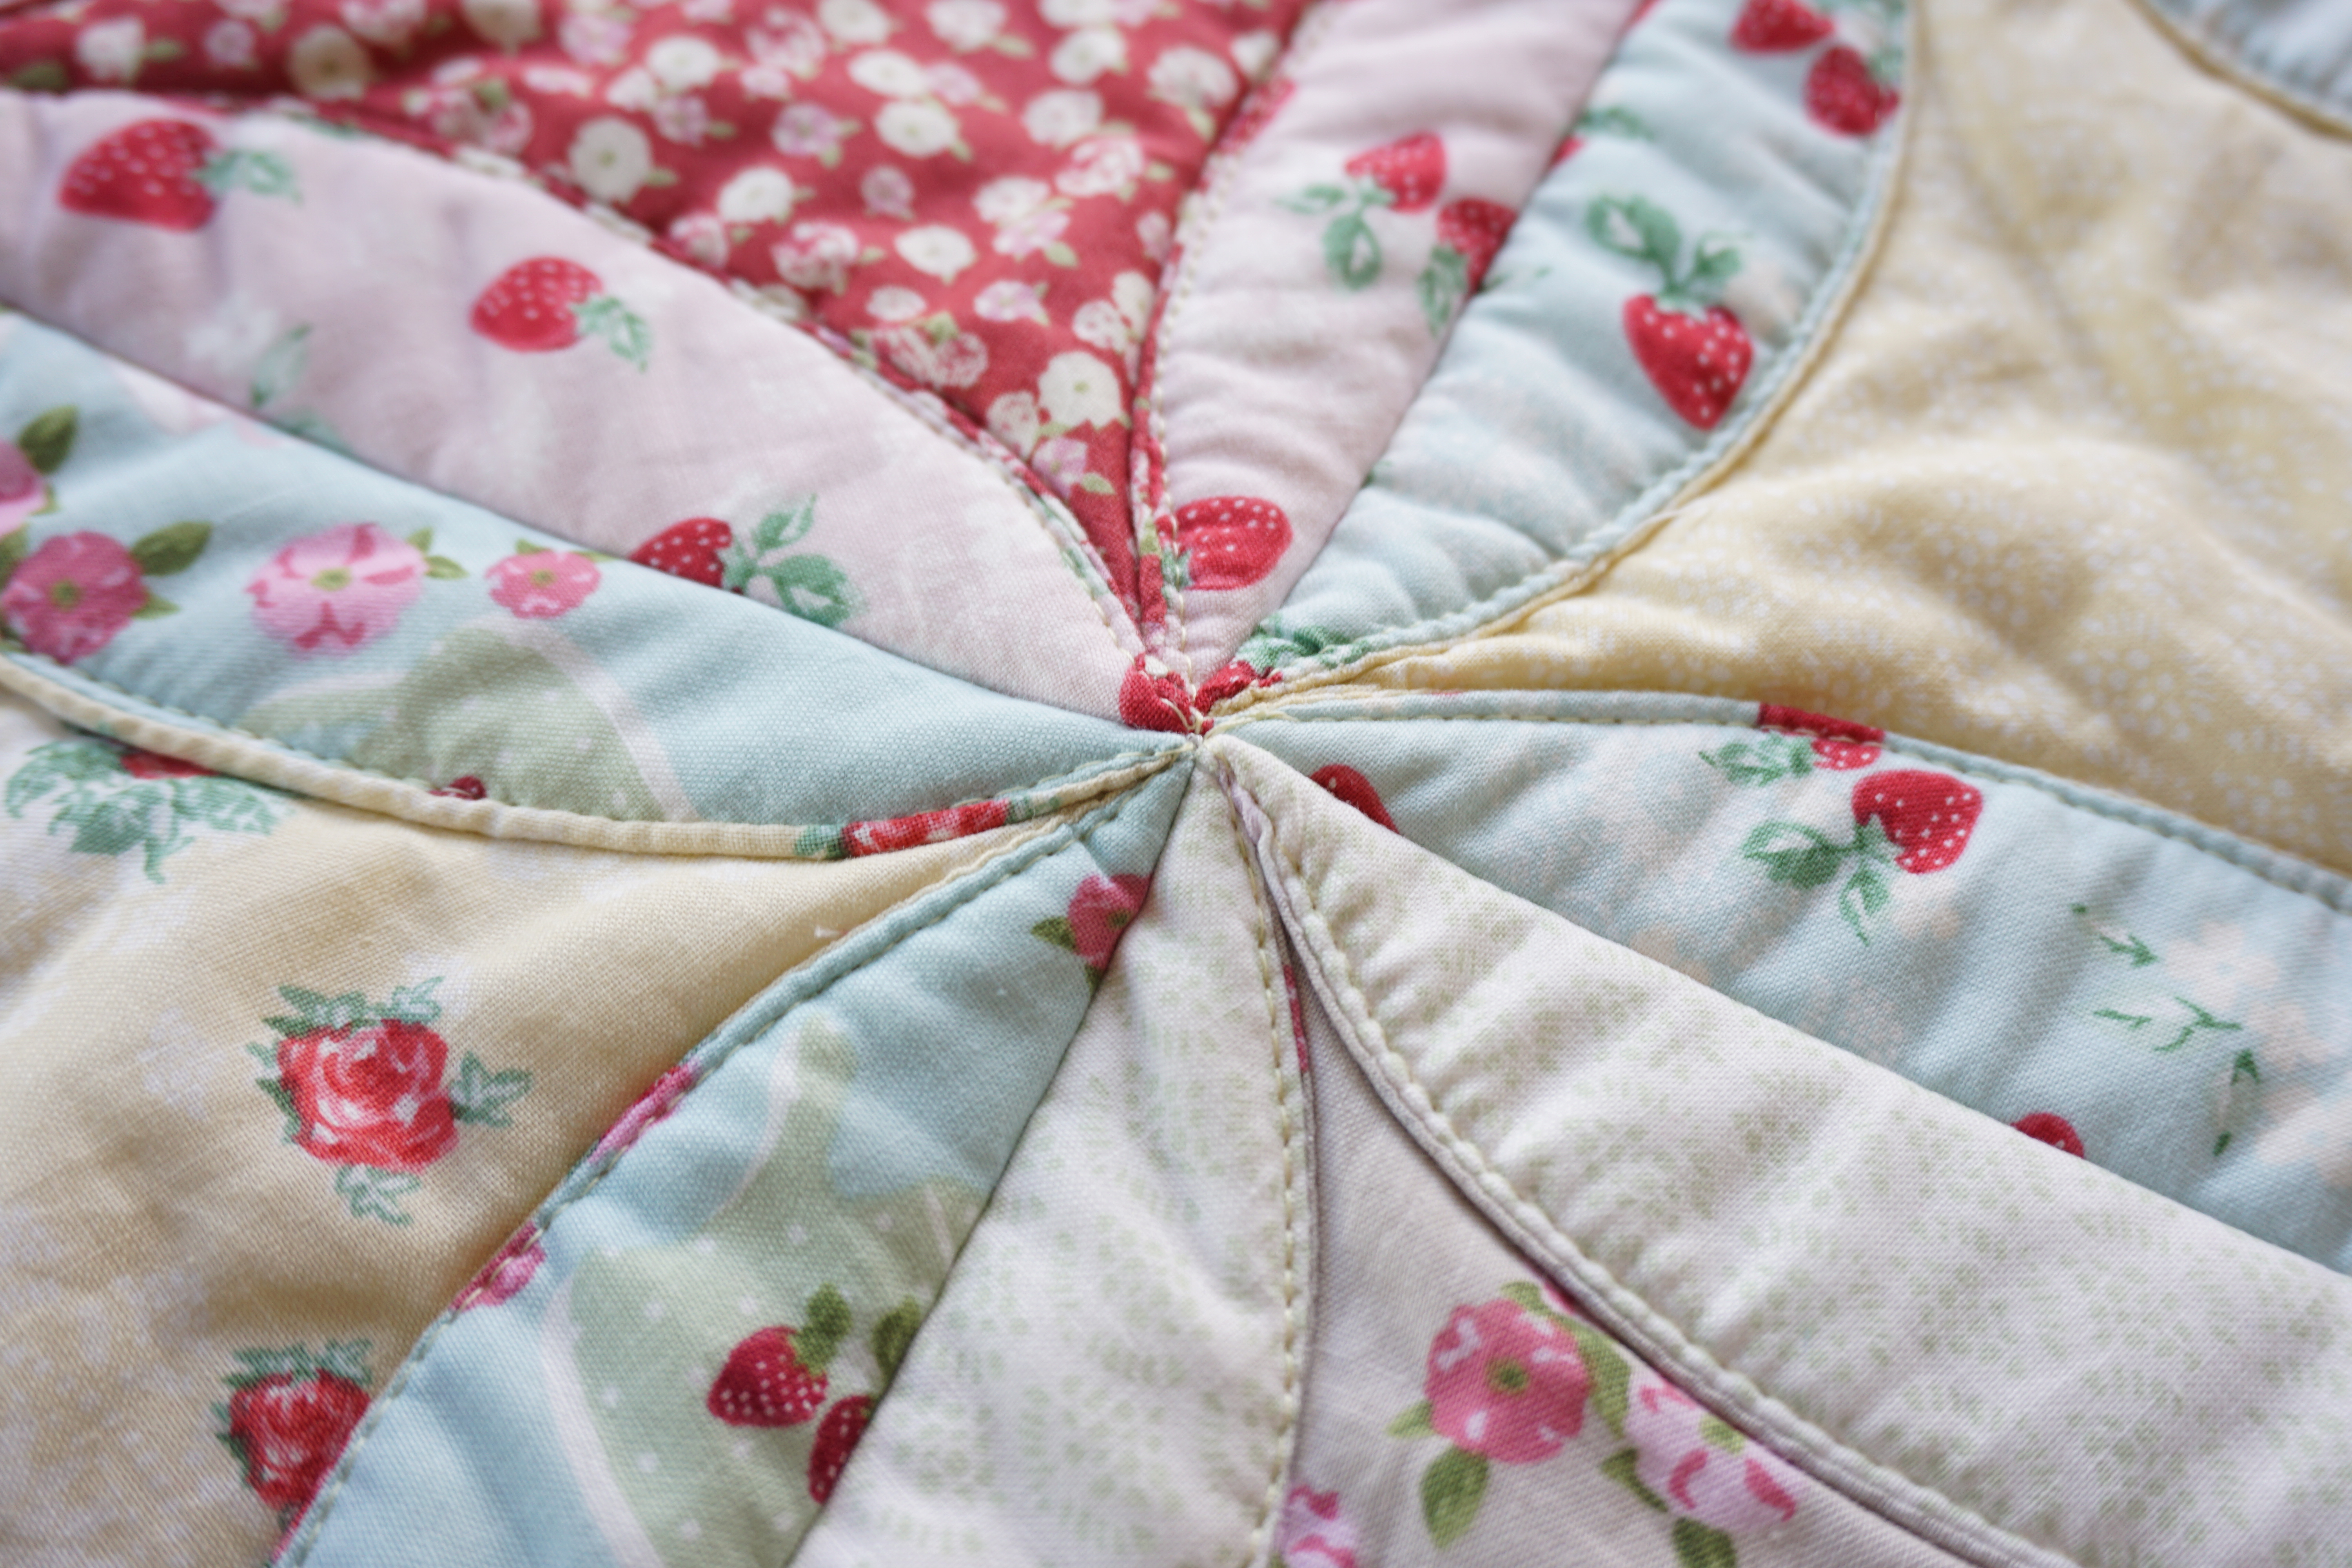
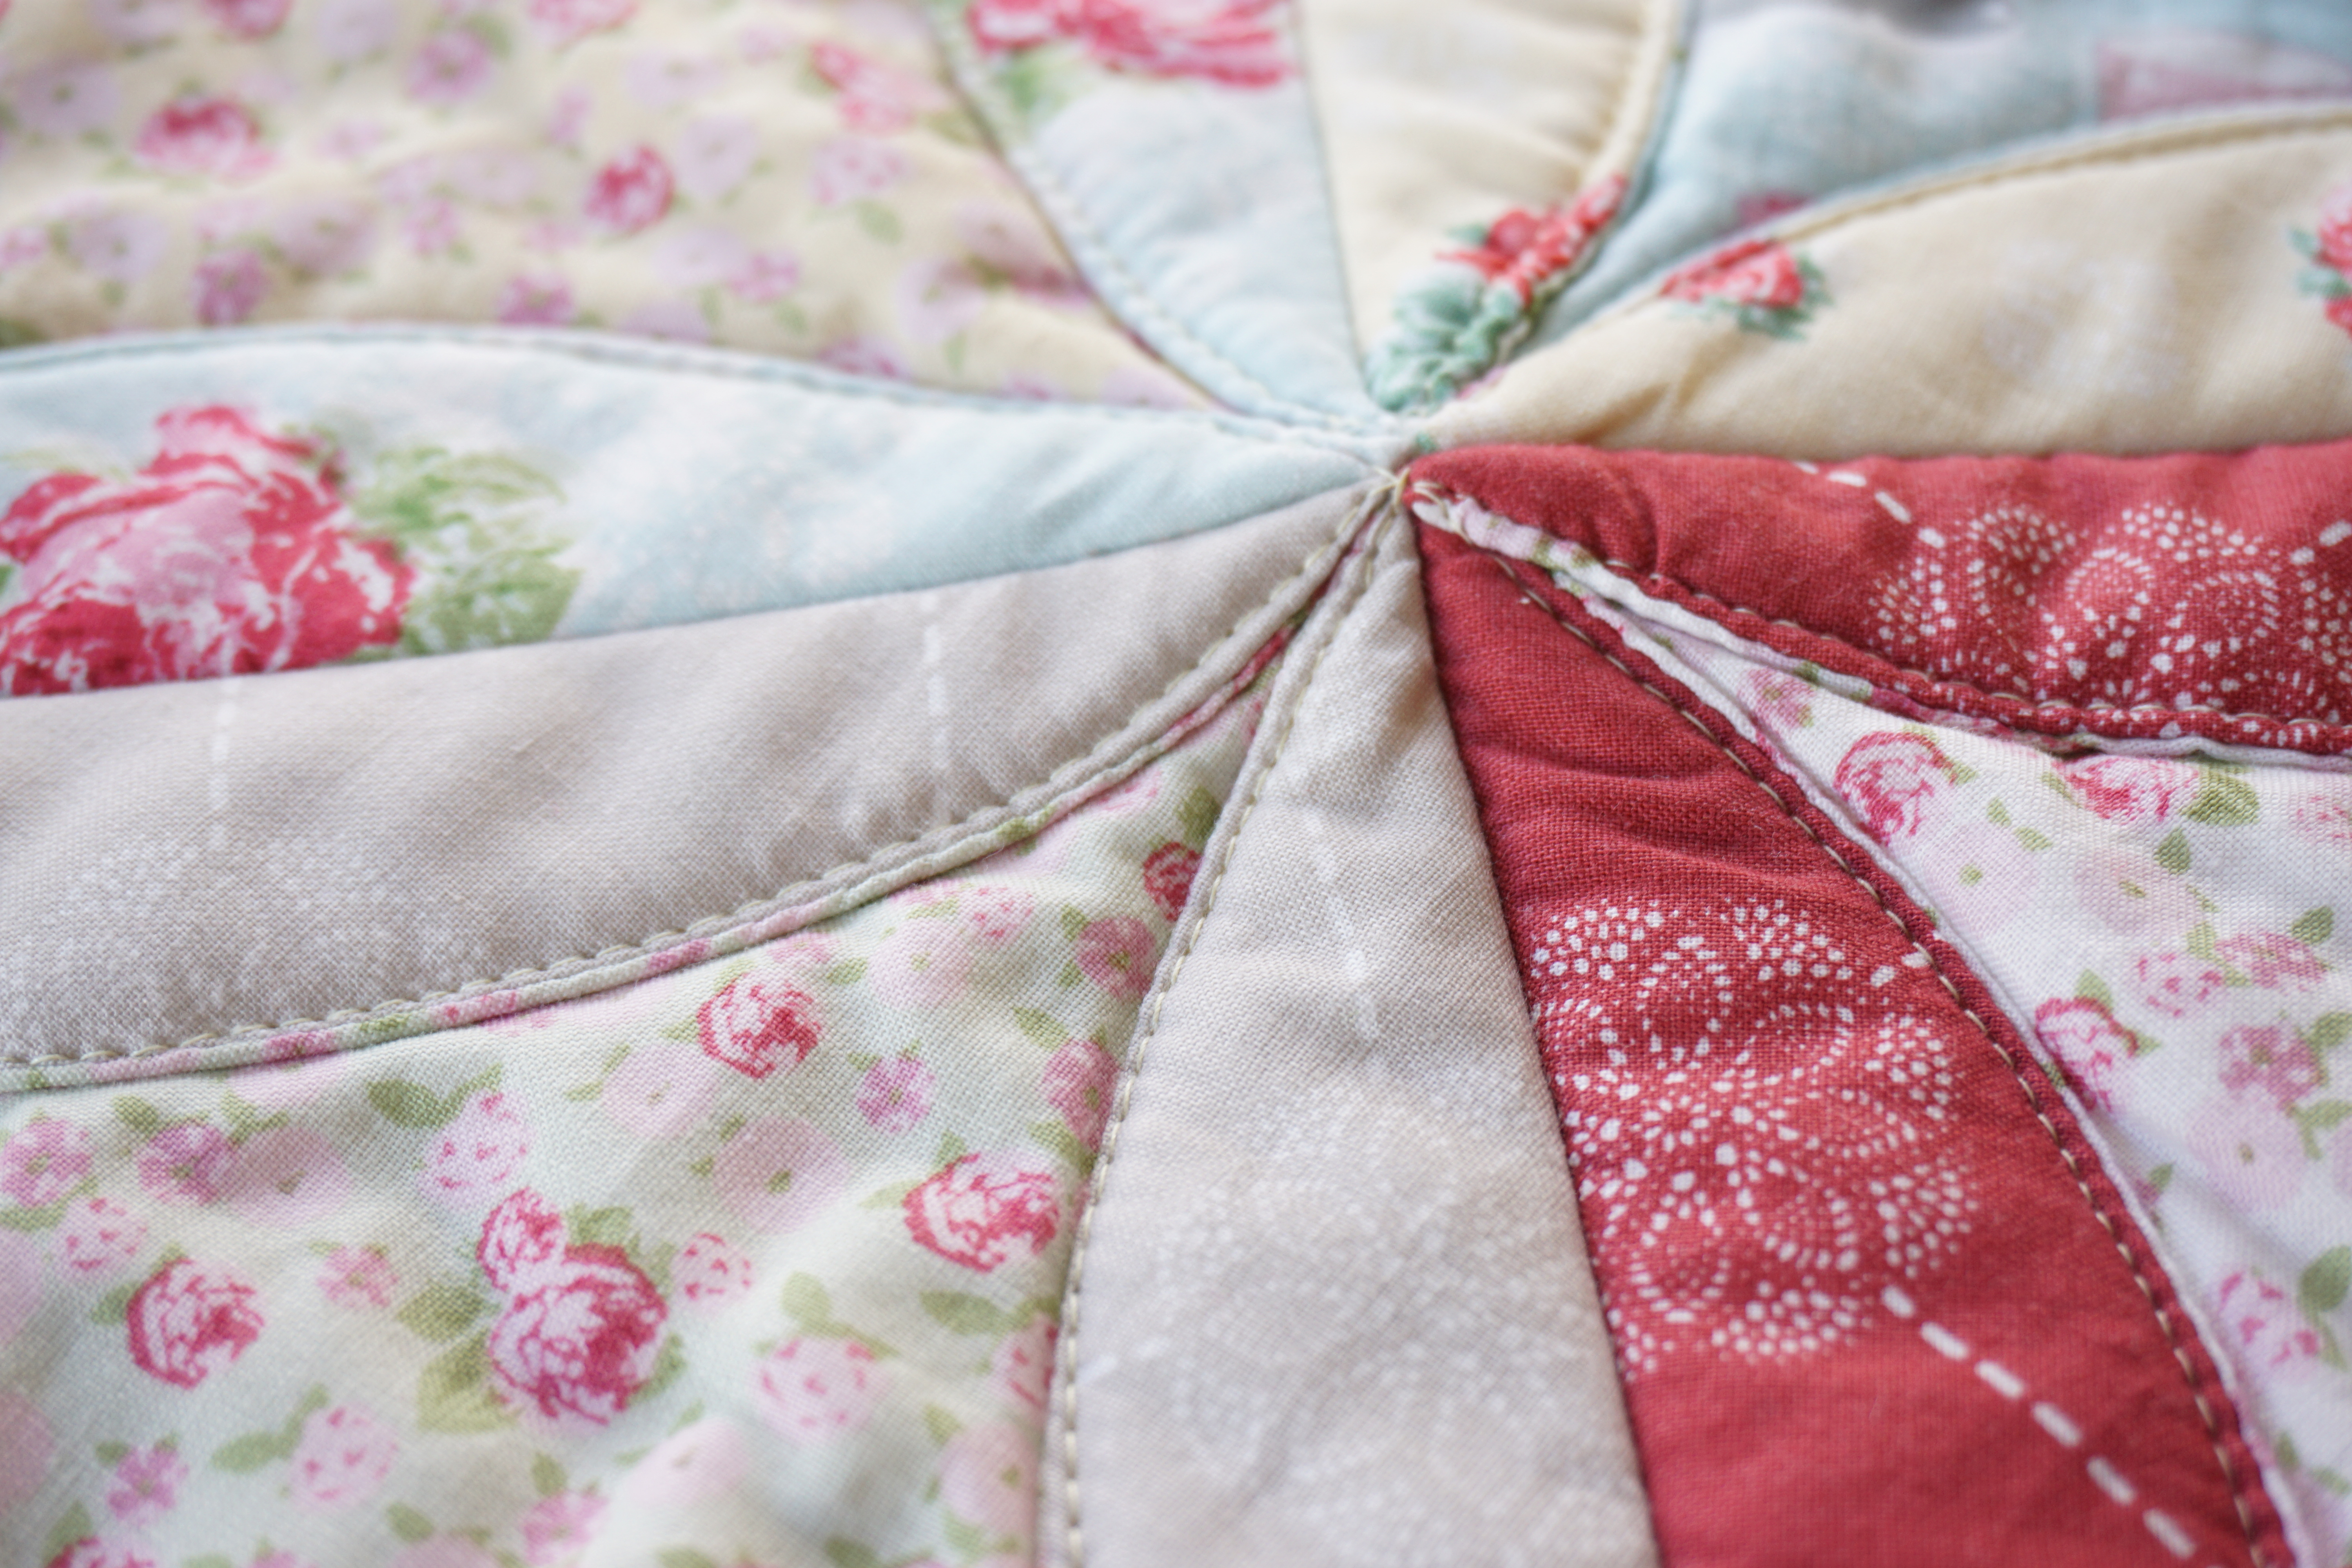
Step 7 – Top Stitch the Petals down: Iron the petals down so they are laying flat, then top stitch them down. I don’t have a video for this, but below are some up-close photos of how it looks after I stitched them down. I simply guided my walking foot along the edge of the petals to stitch them down, using a 3.5 stitch length. Depending on your sewing machine, you may want to use a walking foot for this part. Start and end your stitch with a back-stitch.
I started with a corner circle and stitched all the petals within that circle down, then made my way to the next circle. In most cases, I was able to do continuous quilting from one circle to the next without having to end a stitch and lift my presser foot. However, whenever I came to a point where I couldn’t continuously quilt into the next circle, I simply ended that stitch with 2 back-stitches, lifted my presser foot, then re-positioned the quilt so I could continue stitching down the petals within each circle.
Here’s how the back will look:

I hope you enjoyed my first video tutorial, and my first quilt that I made using my own fabrics! =) If you make this, don’t forget to tag me on instagram! Seeing your projects makes the time spent doing this tutorial all worth it!
Happy Quilting!
xo jera
Very detailed….Great Job! Thank You……
thank you so much!
If things could be explained without all the UMMMMS, would be easier to understand
Someone took time to teach you how to make something beautiful and that’s what you take from it…
Why even comment if you’re just going to be a troll?
Beautiful. I plan to make it. Thank you.j
This is absolutely gorgeous! I love your fabric selection. And what a great tutorial – that had to be a lot of work!
Thanks Jera, I am looking forward to the release of your beautiful fabric line.
Thank you for your kind words! happy quilting!
Oh, my, gosh!!! This is even more doable than I originally thought. The fabric line is gorgeous and I hope I have access to your fabric. You did an excellent job of communicating the necessary information for this quilt to be a success. Thanks so much!
i love cathedral windows quilts and have always wanted to make one. Thank you! I’m going to do it!
Wow! Love this so much , thanks for sharing and your new fabric line is dreamy
awwwe thank you so much for your kind words! happy quilting!
What a GREAT tutorial, I would not have guessed it was your first go at it. :o)
thank you!!
Excellent tutorial and your fabric line is gorgeous! Thanks for sharing.
you are very welcome – thanks for the kind comment =) happy quilting!
Nice job with the tutorial! Never would have guess it was your first. Can’t wait to try this design. Thank you.
thank you so much for your kind words =)
Great 1st vid tut! I like how you kept calm with the babe crying and your alarm going off, lol. I’m going to use this technique for a jean quilt, this way is neater looking than others that I have looked at. Great job1
lol, thank you! my baby boy woke up just in time 😉 happy quilting!
Such a pretty quilt in your fabric line, and so clever to also make it QAYG! Couldn’t be simpler, and self binding is an added bonus. I’m truly looking forward to making this project, thank you 🙂
thank you for your consistent kind words, means so much! happy quilting, friend! =)
Great tutorial and your very first video. I am impressed, you did a great job. Thank you for taking the time to show us how. So sweet to hear your baby waking up. I like your fabric line also, very pretty. I will have to look for it when it comes out. My kind of fabric. Thanks again Diane.
Awwe thanks – and yes, my sweet baby boy woke up just in time. =) Thank you for your kind comment – take care and happy quilting!
Love this , thank you so much for the detailed tutorial. I have made two throws from your book so far. Everything is so easy to understand. I can hardly wait to see the next one. When I make this I will link back to your blog.
that is wonderful to hear – thank you so much for your kind words! happy quilting!
Excellent! Cannot wait to try!
have fun – thanks!
This is a lovely quilt and your easy-to-follow tutorials are very well done! You sure inspired me: I can’t wait to try this out.
makes doing the tutorial all worth it – thank you!
What a nice informative tutorial, you would never think it was your first. I can’t wait to try making this quilt! I come from a long line of quilters who have made so many quilts, but never thought I could make the cathedral quilt, but thanks to you, I am going to give this one a try!
yay – enjoy! Thanks for the nice comment =)
Jera, I’m so excited for you about your new fabric line! I’ve loved following you for the last few years and you are one of the main reasons I started quilting. My very first quilting book was your ‘Quilt as you go made modern.’ I loved the video tutorials on this quilt…it’s lovely and I can’t wait to make one. Please think about doing some videos that illustrate your method of QAYG…I know I wouldn’t be the only one who’d love to see you demonstrate it. 🙂
p.s. I’m doing The Splendid Sampler and can’t wIt to see your block! 🙂
Thank you so much for the kind comment!! 🙂
loving th fabric and your tutorial is so clear will be revisiting it soon
Wonderful – thank you for your kind words!
thank you so much for your kind comment =) happy quilting!
fabric is gorgeous!
thank you!
I enjoy your tutorial and love the material line.
Great job!
Great Job! Very detailed “Simple Cathedral Windows Tutorial”. Saved and will revisit to make this as my next quilt. Love the material too! Thanks for sharing!
I love this and would like to make it with your new line. I will look for it this summer!
This is so beautiful. The tutorial is great!! What a big tease you are…that we have to wait until August to get your beautiful fabric. That’s not fair!!!
WOW… can’t wait to give this a try. i’ve done cathedral windows the “traditional” way and this seems so much funner… AND easier. the bonus is the fact that it’s not only a quilt as you go but you also don’t have any binding to do at the end. a HUGE win-win. thnx so much for sharing!!
PS – LOVE your fabric lines too 🙂
Thank you so much for sharing this. I’ve always loved Cathedral Windows but have been discouraged by the hand work doing it the traditional way. Your way looks so much easier!!
I would love to make this quilt. I have always wanted to. I think I would just make the circles a little smaller–do you think it would work out with smaller circles? Have you made smaller ones?
I can’t wait to make this quilt!
Your instructions were absolutely the best I have ever seen!
Thank you…
Nicely done. Looking forward to your next video.
Good job! Very clearly explained with good photos and video. I’ve been thinking about making a quilt using this technique for some time, but now my brain is spinning with possibilities for fabric combinations. Dang . . . I don’t need another UFO. LOL
I cut you some slack this being your first video tutorial, but in the future, try not to repeat yourself by saying the same thing over and over just to take up time. We are not in kindergarten 😉
No need to belittle her- give her a break for great for great videos and tutorial.
I really liked the tutorial. Some people need things repeated to really get it!!! If you don’t need extra repeats, just skip through it and folks who need repeats aren’t left behind. I’m going to make one very soon–as soon as my machine returns from the repair man because I caught my left pointer finger in the bobbin mechanism of a Bernina 880 and messed up the bobbin someway!! Who knew your finger could get caught when the bobbin started flipping to the back when it shouldn’t have?
suzieseamstress—-how rude, if yournit liken what you hear or see, GET OFF THE SIGHT n GO SOME WHERE ELSE, where its faster for you….I MAYBE RUDE RIGHT NOW but TAKEN UP FOR SOMEONE ELSE…GET REAL….*****BE NICE*****
If you don’t like the comment, then don’t read it! denise prince YOU can go somewhere else.
AMEN Suzie!!!!!!!!!!!!! The Ummmmms drove me past this whole video. repeat, repeat
Very nice explanation! Thank you! This makes a nice, pretty, cozy quilt and easy.
Just an inspiring tutorial! Loving the High Tea fabric, will be ordering that for sure. This is a refreshing change, I am for sure making this! No special rulers either! Great job!
What a beautiful quilt! The videos were very clear & I enjoyed them. This will be my next baby quilt. If I feel brave I might even try a larger one!
I absolutely love this quilt! I’ve been wanting to try a quilt as you go project and this is it! Your tutorials were great. I like them in segments….and I have to get some of that beautiful fabric!
I too have a love for the rose tea prints i now need to find your fabric collection!
Loved your tutorial! Your fabric of tea prints is on my “wish list.” Thanks for sharing.
Love the fabric – have always thought cathedral window too hard – but you have made it so easy – this is my next project to try. Thank you
Excellent tutorial; Beautiful fabric line. Please do not change your presentation in any way. To Susie: In school classrooms, repeating is absolutely necessary in order for all of the students to understand. Also, repetition is so prevalent in the Bible; therefore, I think it sets the standard.
I really have to say that High Tea is the most beautiful line of fabrics, I just love it! I want to make a crocheted quilt, as I love both crochet and quilting, and think it really looks gorgeous together with the delicate joining stitches, pretty. Love the line and would love to get some yardage and precuts when available. Thanks my email is Tlmiam1@yahoo.com. Sincerely, Tracy.
I’m so excited to get started! Do you wash your material first before cutting?
I have the perfect fabric collection for this quilt. Think I may use a variegated thread for all the stitching that will show!! I have your book and really love it!
Jera, what a wonderful (and patient) teacher you are. Like everyone else, I love your fabric line — it is perfect for this quilt. You made this look so easy to do and I can’t wait to give it a try. I look forward to anything you might do in the future. You are just “a delight”. Thank you so very much !!
Loved the tutorial. Great work and beautiful quilt.
Jera, This is gelightful, thank you millions!! Really anxious to make this & locate your fabric line.
Best wishes in your endeavors ?
I wish you had not called this a cathedral window. If you had ever seen one beautifully done, you would call this something else. Your quilt is beautiful, but it is not a patch on a real cathedral window quilt. I have been working on one fro a while. Completely by hand. Please call it a cathedral window look alike.
Thanks
I have sewed one by hand too, it too me a long time because I couldn’t make the time to finish it in between multiple moves and such. I am sure the hand sewed ones are prettier and better, but for people who just don’t have the time to do it by hand, this is a good substitute.
This is great for a slow stitching project. Take on the road quilt. I love the style. Thanks for your detailed tutorial. Mw
Well done! You gave excellent instruction. I hope to make this quilt soon!
LOVE IT! So beautiful using your High Tea Collection and you did very well on your first tutorial. Can’t wait to get mine made! Happy Quilting!
I love your cathedral window quilt and your tutorial was great. One question. How do you think it would look to do an additional semi circle stitch to finish the edges so that the design on the back is complete. Or do you think it would make the front look weird?
For a first video tut you did a grand job. As a newby quilter I thought it was very detailed & well-explained – thank you!!
Thanks for the tutorial! Can’t wait to try this cathedral window QAYG. I’ve already worked through two quilts in your book and it’s great fun!
I love this quilt. Thank you for the tutorial!
Great tutorial. Love your fabrics too. Thanks. Hope you do more of these.
I am an older well seasoned quilter. This is the BEST tutorial I have ever watched. I especially liked it because you did not have any background music and your instructions were clear and concise and not filled with needless jabbering. Thank you so much for sharing your lovely work and skills.
thank you so much for your kind comment! Means a lot! 🙂
big hug,
jera 🙂
I just discovered your tutorials and I think you are a great teacher! I’m planning to make this quilt and lots more from your blog. I have ordered some of your fabric and am getting your book. I can’t wait until Sept. for your new book to come out!!! Thank you!!!
I have had a troubled and disappointing experience with this quilt, sad to say. If I ever did it again (not) I would use flannel for the center fill. I would also draw circles on fabric and then sew, as my circles were not all the same. Quilting it was also very difficult and I am quite experienced. My beautiful fabrics now wasted, oh dear.
Hi Kathie,
I found a website that sells the circle template, the “grid” template and it shows to sew on the circle line wants you’ve traced it. Here is the link. This will help you with them coming out the same sizes.http://www.shopfonsandporter.com/product/Fons-and-Porter-Peek-a-boo-Templates/fabric-and-notions?utm_source=FPSM150209&utm_medium=YT&utm_campaign=PeekaBooTemp
I am in my 60’s and love quirky, different quilts. This quilt is quite beautiful and your tutorial is excellent. Thank you for prefacing your instructions/steps. It sure makes it easier for those of us who have trouble remembering some of the little details. Great job and I look forward to seeing more of your video tutorials. BTW I have purchased both of your books. (one will arrive in Sept). I have made two quilts from your first book. I really love the QAYG technique.
Thanks again!
How cool is that! Thank you for showingt! Love it!!
Wow…love this….this just might get me back into the quilting mode…but how do we figure how much fabric we need?
The first task is to decide how big you want it. I like the idea of a 10 inch stacker because then you get every piece in the line (make sure it says one from each piece in the line) when you order or buy it. If not take a piece of any yardage you have and figure out how many circles you get per yard (remembering there is a back too) Then estimate that plus a half yard. Never find yourself short! 🙂 Now I would not use one piece as I like variety, so figure how much you need for each circle and figure how many circles you want front ( and back ) from each fabric. Then decide. It depends on what you want! I think that is why she didn’t say! (I like the 10 inch stacker idea) .
Hope that help!
Jill Moen
Very Nice quilting tutorial! I like things repeated a lot, so maybe suzy doesn’t need a tutorial. You are very sweet! Love seeing pictures of your kids and dog! I have your book, and until I can get your fabric I will make your Cathedral Window from a Christmas layer cake. I too have made one by hand, very time consuming, ended up with a wall hanging. This looks fun and simple with your tutorial! You are one of the emails I never delete without taking a look see!!
Keep inspiring us with your ideas!
Jill Moen
is there anyone that can send me the tutorial? because it keeps telling me I can’t watch it…
here is my email but would like for you to send it to my facebook, but PLEASE SEND IT TO BOTH
f/b- Denise Prince
email- denise_prince42566@yahoo.com
I live in Campbellsville, Kentucky
thanks to anyone that will help me…
Thank you so very much for this wonderful tutorial!! I have had a “quilter’s block” for a couple of
months and just couldn’t get motivated to make anything. (weird, I know ). Anyway, I watched this
tutorial and I am almost done with my cathedral window table runner. I started it right after viewing your
tutorial. 🙂 This was just what I needed to get me going again….it is sooo cute, different and you make it look so easy & fun to do. I, also, really love your fabric and will be looking for it and read you have a couple of books out, too. This opened up a whole new world for me.
A huge thank you and hope you do more tutorials……you have a great style, Jera.
Thank you so much for your kind message! 🙂 Take care!
-jera
Is it difficult to manipulate the entire quilt in the machine when doing the top quilting? I was thinking to make it a bit bigger and I don’t want to run into any trouble moving the fabric in the machine. Thanks for the tutorial!!!
Hey, my intersections are very thick. Should I cut the threads between the fabrics on the horizontal axis?or will they become less bulky as I sew the petals down?? Thank you!
This is a pattern I really wanted to make but it looked too hard. Now after watching your video I think this is possible for me to do. Thank you so much for clearly explaining this technique. I am also impressed with how clean your sewing area is. I need to go clean my room and get started. Fortunately I acquired some batting circles several years ago and held on to them because I knew they would be good for something. I was thinking placemats, but cathedral windows here I come! Again great, clear video.
I just finished making my own quilt with this tutorial. You did a great job. My quilt isn’t quite as precise as yours, but it’s super cool. Thank you so much!
I have had the circles for one of these quilts all cut and sewed but did not sew the circles together in rows because it scared me! I’ve watched your video and think I am now ready to tackle putting it together. You make it seem doable. On another note I have made your high tea quilt and it is just beautiful. My favorite quilt I have ever made but without your video I would never have been able to make it so thank you so much!
LOVE this! What are the dimensions of the finished quilt? Your quits are lovely. Thank you for taking the time to make the tutorial!
What a great tutorial and such an awesome idea to do it like this!! I just started last night to make a cathedral window quilt by hand but after one circle I really started asking myself if I would continue with it because it’s not the most fun project to do, LoL.
And now a friend of mine found your tutorial…. thanks a lot!!!!
I love your tutorial, plan to start that pattern today!!? thank yoy
I had made this quilt years ago and was looking for the pattern since I used up the last quilt. Thanks for making it available. It was so easy to put together and looks wonderful!
Thank you so very much for an excellent lesson and video. It was so well done and easy to follow. I have wanted to make a quilt like this for a very long time but every method was so very tedious and difficult to follow. E.G. take a 6 inch square (very much a waste of fabric as it is either 10 or 5 inches – then with the larger square fold it over to make a triangle pin a second half square triangle and sew one eigth of an inch from the edge to join both half triangles together, then fold the edge over again and sew one quarter of an inch
And you wonder maybe why I was so confused lol!!!!
So I am going to make my quilt tomorrow and I won’t stop until it Is finished then I will throw away all those very bad half half squares I spent weeks making.
Bless you and I have all your book now I need your new one.
Thank you for the tutorial. Great job, you made it seem very easy and doable. Great job!
I loved your tutorial. I have seen those quilts with rounded edges and wondered how they were done. Now I know. I’ve made a couple of traditional Cathedral Window quilts, all handsewn, but am anxious to try this one. My only question is how do you determine how much material to purchase. Thank you for your guidance and tutorial.
Great method! Thank you for putting all this together. I look forward to making my own. Keep safe in 2020!
You are an excellent teacher and I greatly appreciate your thorough explanation of the quilting. Many, many thanks!!
Thanks for putting this together. The directions were very clear. I especially love your combination of the colors of the vintage fabrics. They must be from the time when I was learning to sew. I ordered my fabrics. now to the cutting and sewing. Can’t wait to see it done. Im thinking I’ll do some embroidered centers here and there. I’ll have to do that embroidery first before cutting, so I’m in create mode right now. Thanks again. You have inspired me and I see lots of possibilities for this method.
Thank you for this tutorial! I made my “pancakes” a year ago and then set it aside. Finally dug in and finished today (New Year’s resolution to finish all the undone projects!) Added an extra row to extend the size a bit. So happy with the results!
It’s called “orange peel”.
Your verbal explanation and video made me realize that I could make a lovely quilt like your’s! Thank you for taking the time to provide the instructions.