 If basting and binding a quilt isn’t really your thing, and if you don’t particularly like quilting large quilt tops, then a rag quilt is the perfect quilt project for you. 🙂 With a rag quilt, you create smaller (therefore easier to handle) quilt sandwiches, quilt them while they’re still small, and then piece them together to form your quilt. If that sounds confusing, check out my 8-step rag quilt tutorial below.
(Click picture to enlarge)
 |
 |
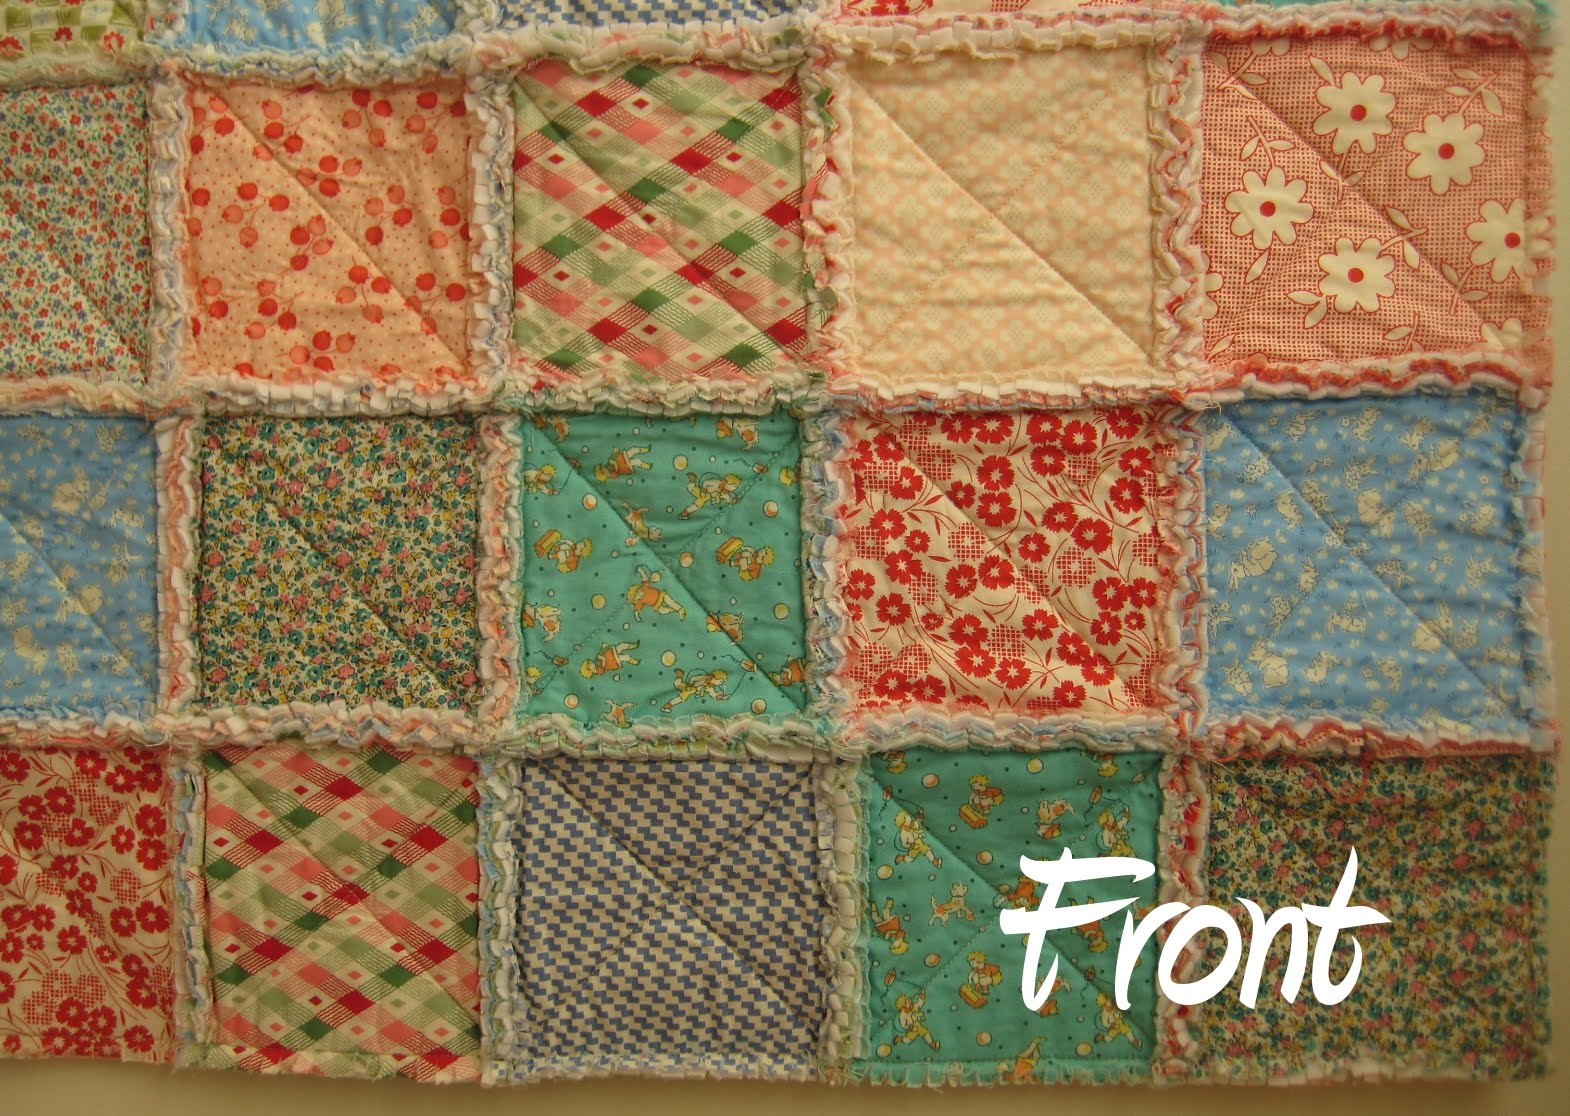
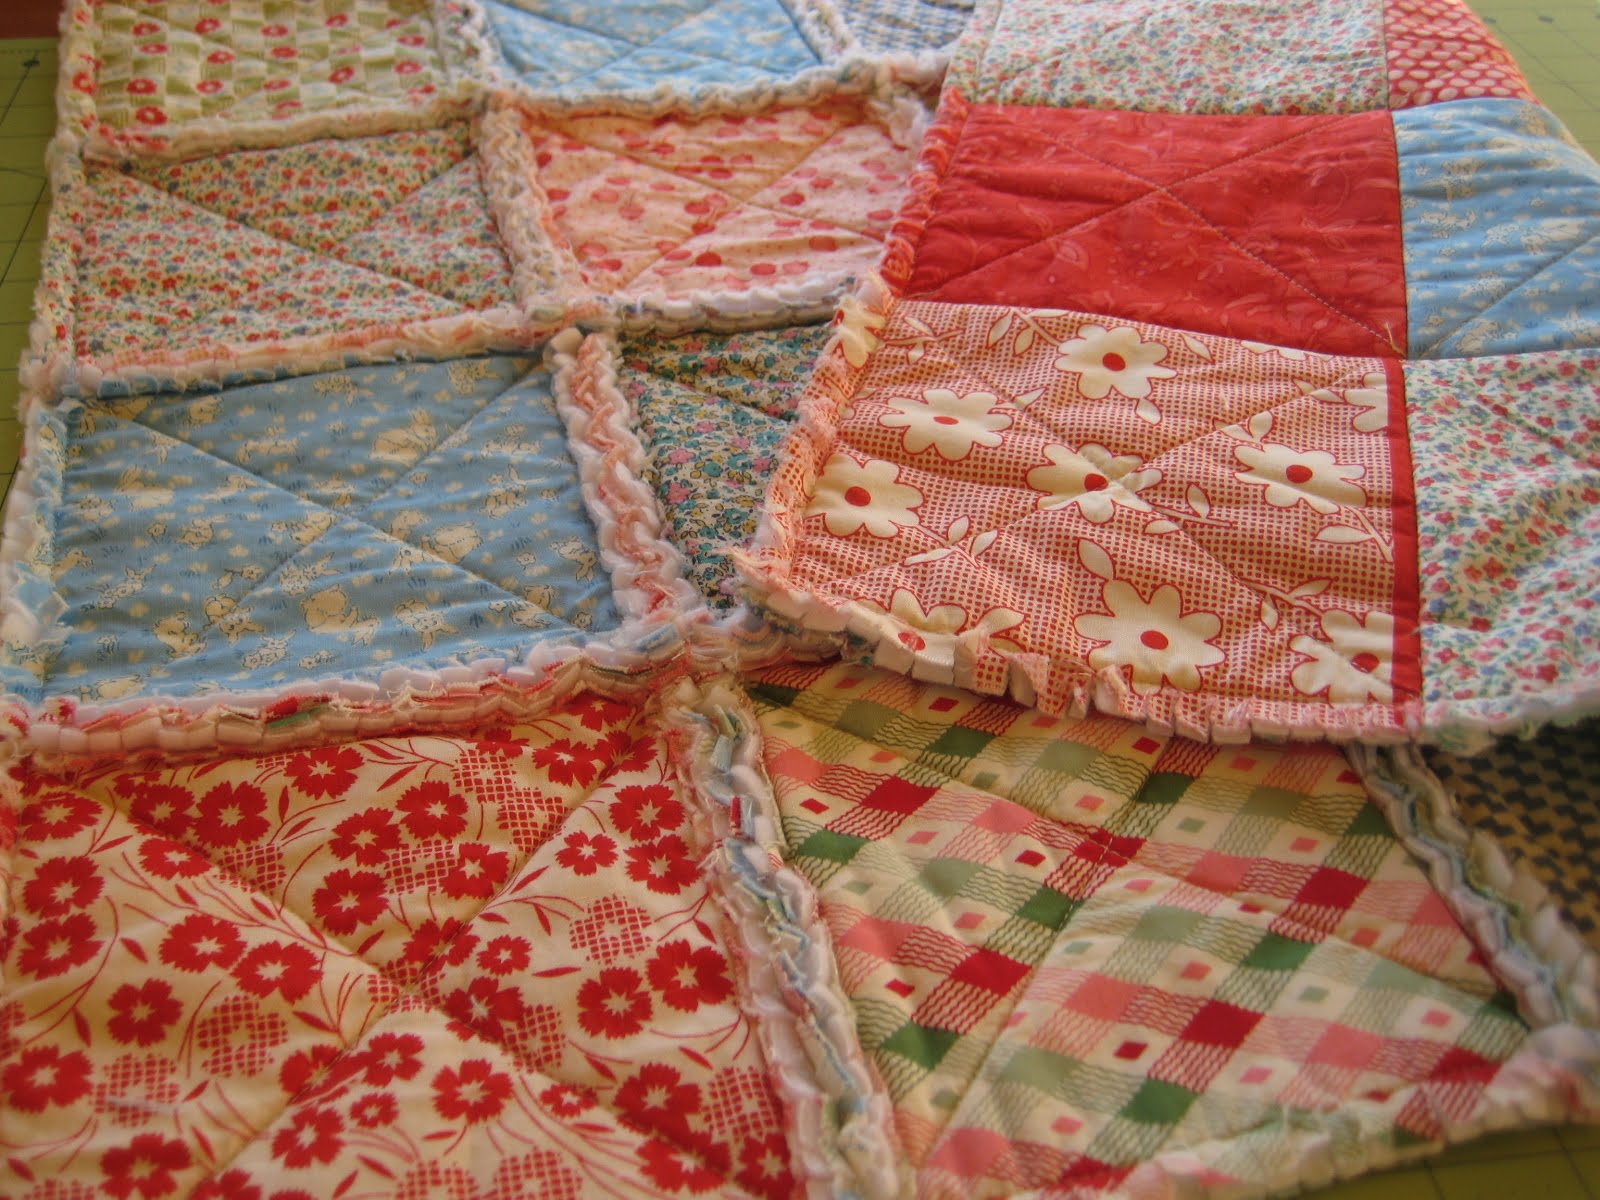
This quilt measures 23″ x 23″ which works perfectly for throwing in a stroller, or as a wall hanging quilt. Speaking of strollers, rag quilts are great for little ones as they offer a textured material for them to touch and explore.
I have a similar tutorial called Frayed Seams Quilt which uses fleece material as the entire quilt backing. You can check it out for an alternate rag quilt design.
Materials for a 23″x23″ rag quilt:
- 10 quarter yards of varying prints
- 1 yard of fleece (or batting, see note in step 1).
- Coordinating thread
Step 1 – Cut fifty 6.5″ squares from your quarter yard cuts (note: 1 quarter yard = six 6.5″ squares). From your 1 yard of fleece, cut twenty-five 6.5″ squares*.
 *If you prefer to not have the fleece show at the seams as it does in this tutorial (see step 4), or if you prefer to use batting instead of fleece, cut twenty-five 5.5″ squares instead. Then, when you make your mini quilt sandwich as described in step 2 (below), make sure the fleece/batting is centered in between the fabric pieces.
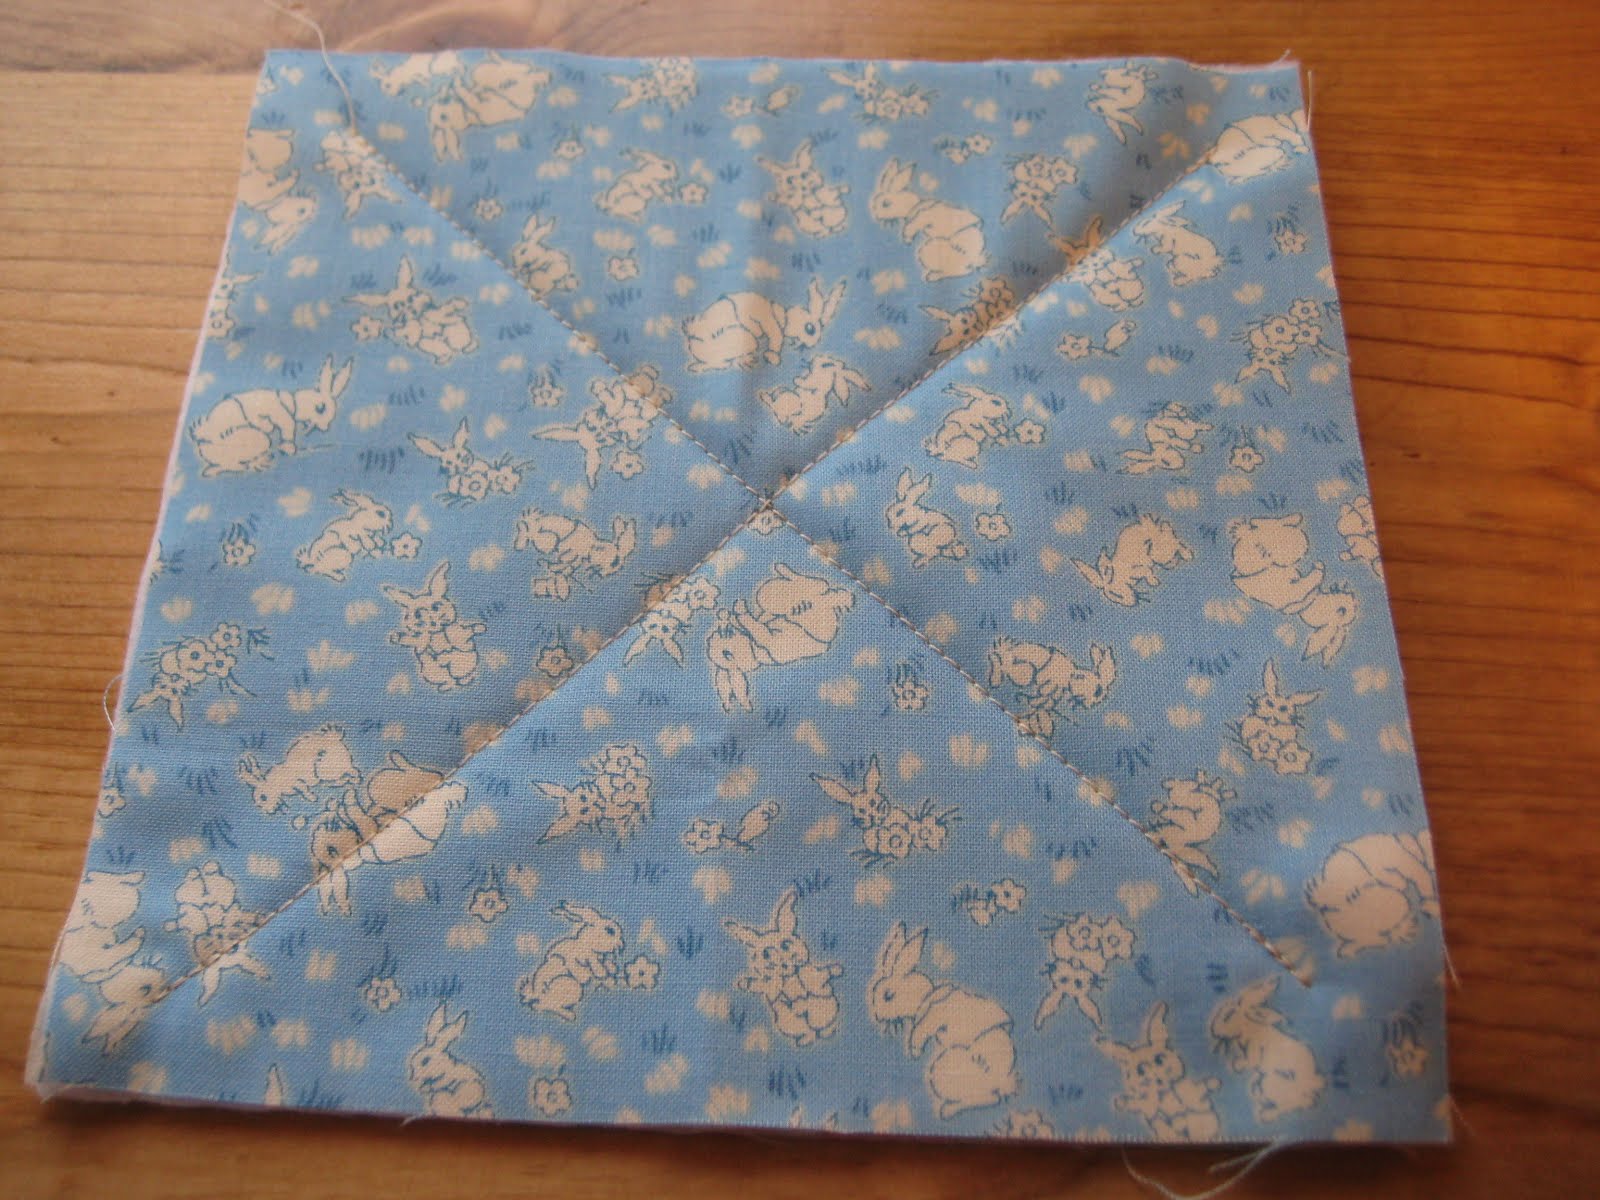
Step 2 – Make a mini quilt sandwich: take one fleece square and sandwich it in between two fabric squares. The wrong sides of the fabric should be facing the fleece. Repeat until you have 25 mini quilt sandwiches. When putting these together, plan for how the front and back of your quilt will look.

Step 3 – Quilt all 25 of the mini quilt sandwiches you made from the previous step. For this quilt, I quilted a simple X. Start and end your stitch with a back stitch.
 Note: For Steps 4 through 6, use a walking foot if possible (to prevent puckering).
Step 4 – Sew the quilt sandwiches together: Sew 5 rows of 5 quilt sandwiches each, using a 1/2″ seam allowance. The front of your quilt will have the 1/2″ seam, as shown below.
 The back will look like this:
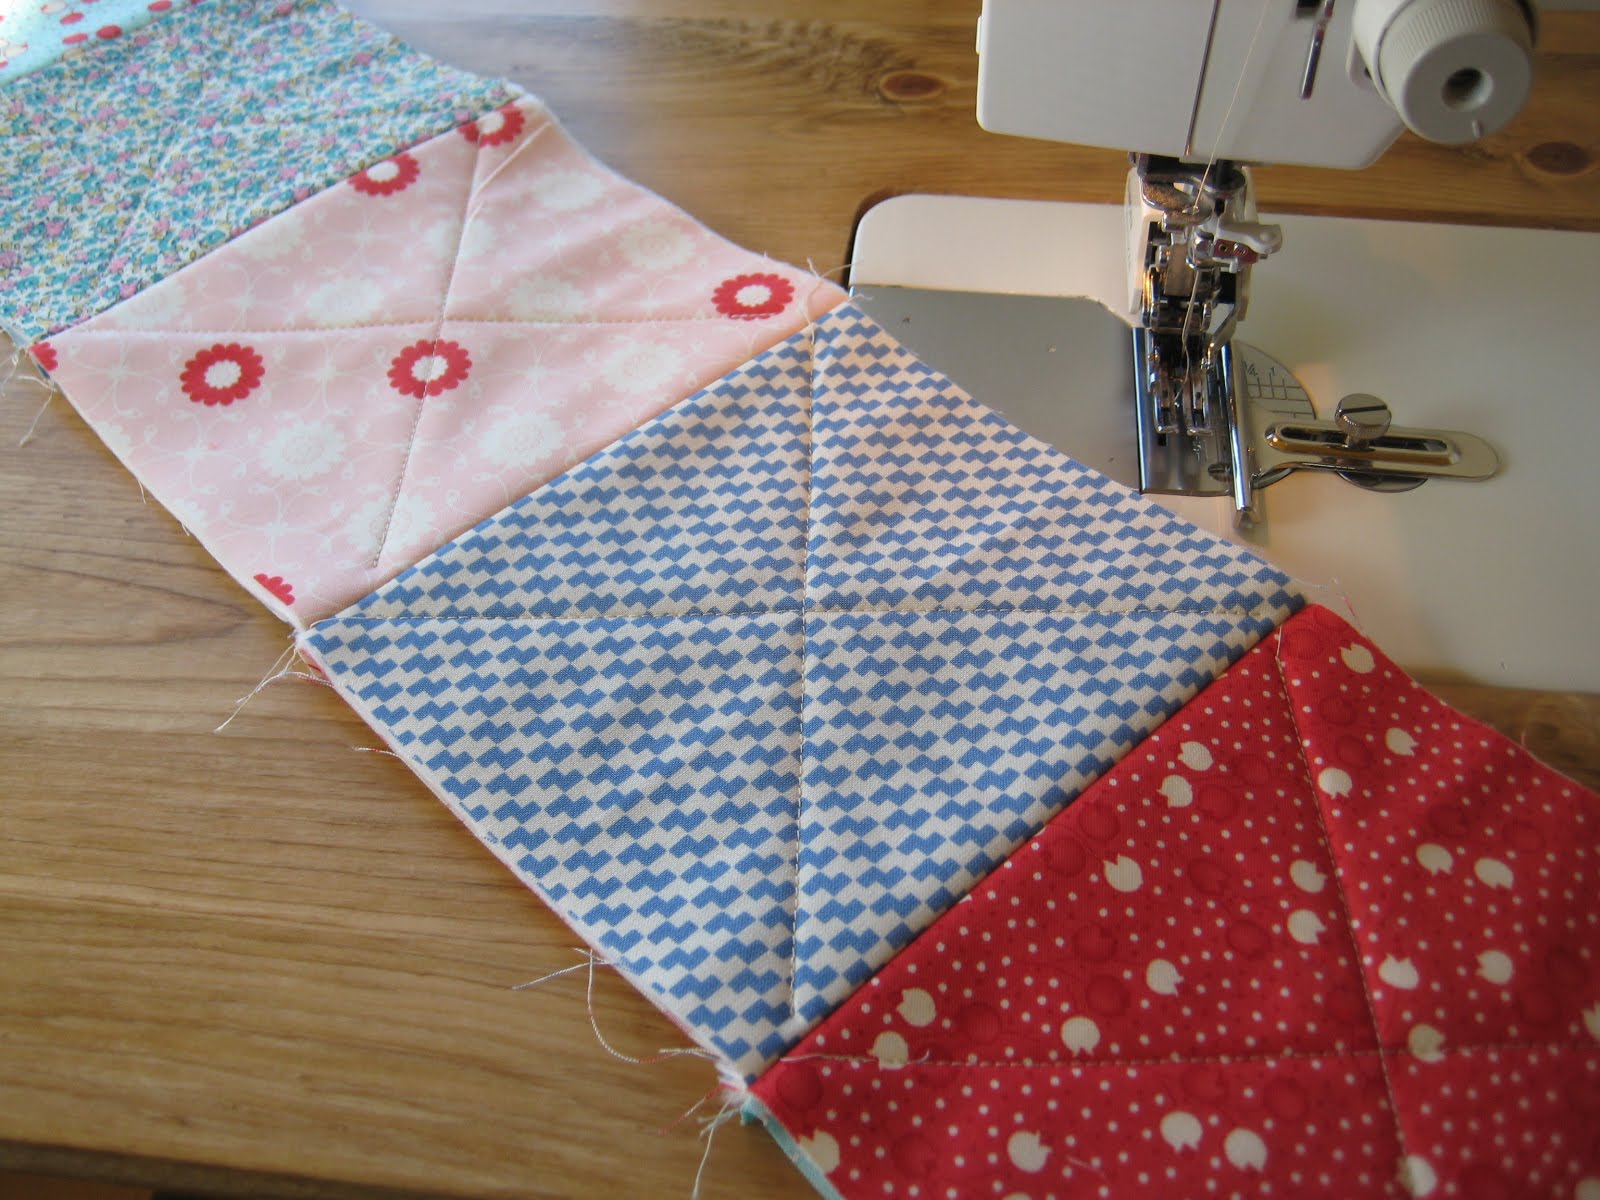
Step 5 – Then, sew your five rows together the same way, so that the 1/2″ seam allowance will be at the front of your quilt.

Step 6 – After you’ve sewn all five rows together, sew a 1/2″ seam allowance around the perimeter of the quilt. This quilt requires no binding!

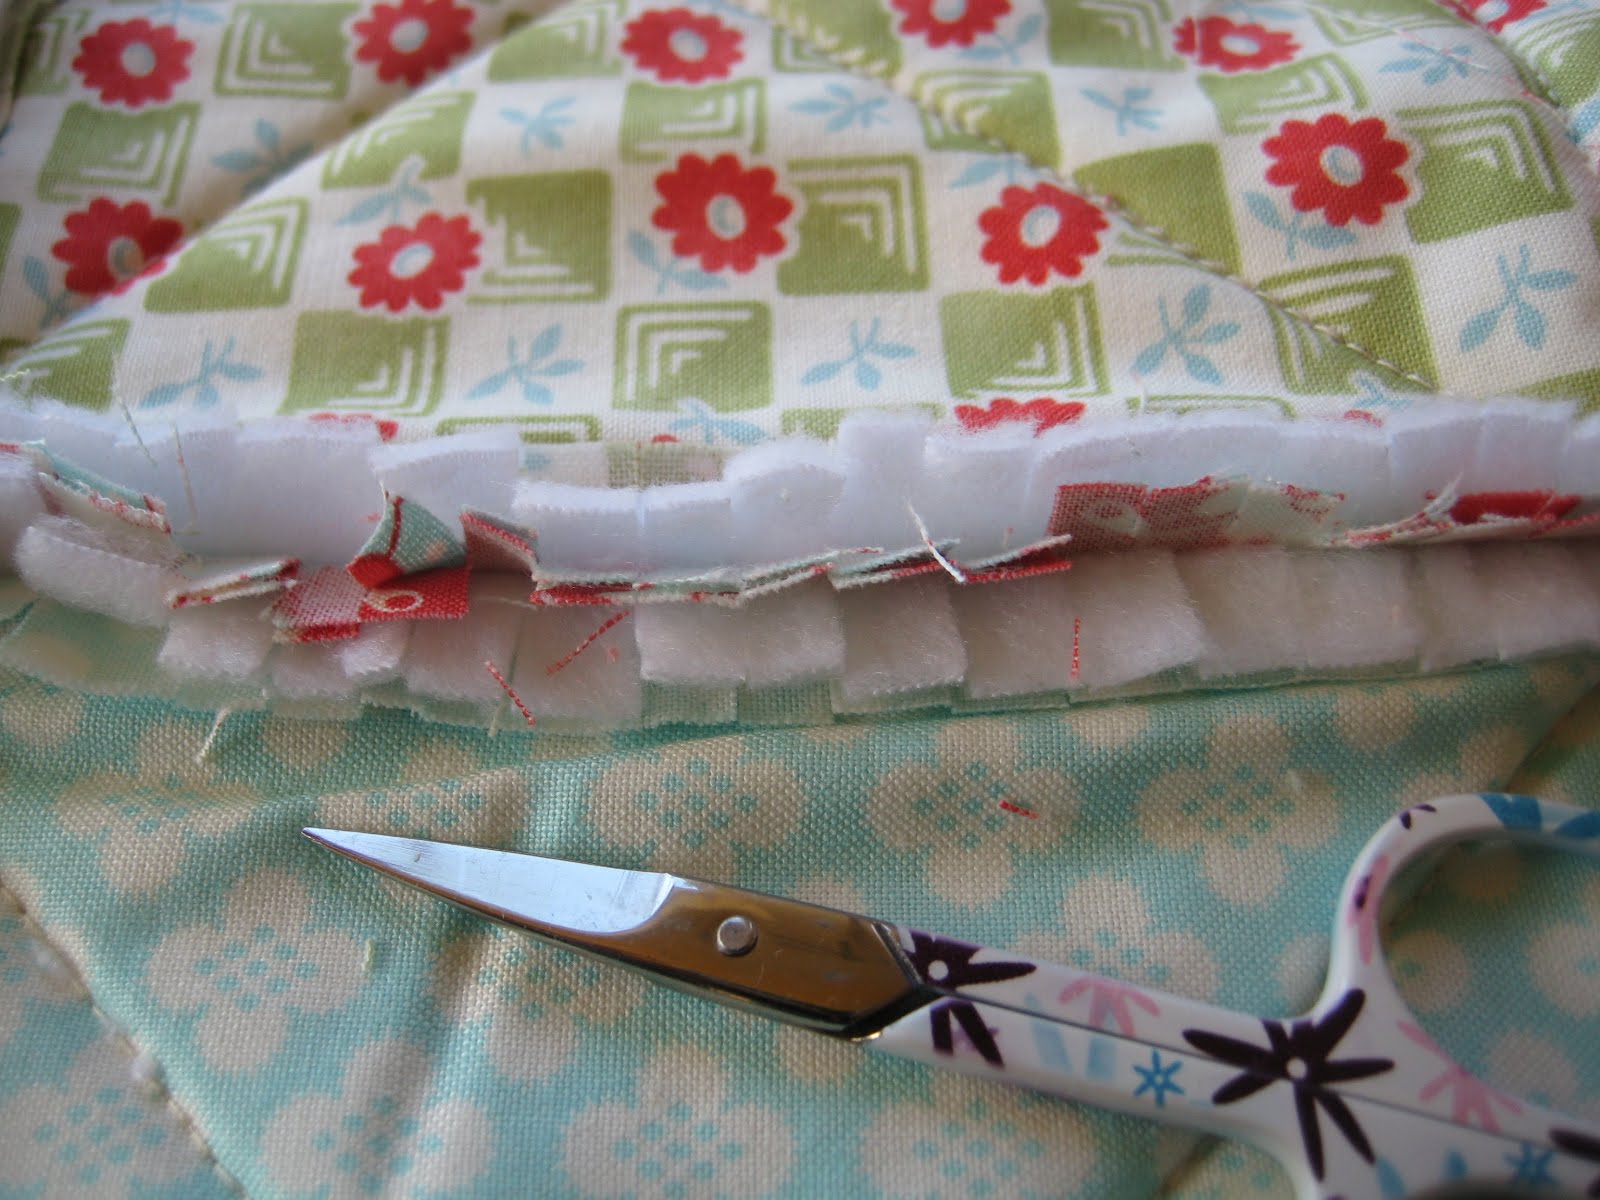
Step 7 – Snip little frays (roughly ¼” apart) along all of the ½” seams including the perimeter seam. Do not cut outside of the seam. Use scissors that have really sharp tips (I used applique scissors). I was able to cut through two fabric layers per snip.
Step 8 – Lastly, throw the quilt in the wash (cold water, gently cycle) and dryer (tumble dry low). Washing and drying the quilt will make the fringes you cut from the previous step soft and fluffy.
 That’s it! As always, let me know if you have any questions and I’d be happy to help you out.
Happy Quilting!
Cute idea…I have seen this technique but never bothered to see how to do it. I have been browsing through your tutorials and I enjoy them; they are great…not too detailed and clear. Thank-you so much for taking the time to do them!
I've never seen one done like this, I love it!! Would it work to make a normal quilt this way? The back of this looks like a normal quilt, so in theory it should work….right??
I love rag quilts! They really have good pratical purposes. Next time try cutting the fleece smaller than the fabric squares, then you won't have to sew through it or cut it and it won't show. This really gives a rag quilt a nice drape, also.
Oh, thanks so much for the tute! I'm going to try it when I finish up some UFOs!
I use a pair of Fiskar "nippers" for these and flannel rag quilts (no batting needed there.) It's soooooo much easier. I'm not usually one to put a brand name out there, but they work so dang well~~no aching hands!
Do you think this would work with batting instead of flannel? I have a lot of "dog quilts" from longarm practice sessions, and this would be a good use for them.
Hi all, thanks for your comments!
To seespotshop: Yes! As Di suggested, if you use batting instead of flannel, simply cut the batting 1 inch smaller so that it doesn't show at the 1/2 seams like the flannel does in this tutorial. For example, cut your batting (or fleece) into a 5" square, and sandwich that in between two 6" fabric squares. Then later when you sew your 1/2" seam allowance, the batting won't come through at the seams, only the fabric will. This will also make it easier later when you're snipping all the frays at the seams. I hope this makes sense…please let me know if you have any questions at all!
To Marianne: thank you for that suggestion! I am buying myself a pair of Fiskar "nippers" next time I'm at the fabric store!
To Christina: if you don't mind having the seams showing, then you can make any quilt like this. Did that answer your question?
Hi all, I made a little update to step 1 (in red). To seespotshop, hopefully it helps. To Di, thanks for the suggestion!
que lindo este trabalho voçê é muito caprichosa beijosss….
I just meandered/stumblede over from somewhere, I forget where, but sure am glad I did. Love your quilts, especially the rainy day quilt. Great instructions. Jeanne @ The Learning Curve http://jeannegwin.blogspot.com/ Sutmble over for a visit. New blog but slowly coming together. Happy days!
Your site says Malicious link.. blocked by my virus program.
I am referring to Jeanne’s link.
Your instructions look so easy that I am going to give this a try! Thanks so much!
Beautiful work and I am even more determined to get mine made!
Thanks for the inspirations and tutorial!
I just made my very first raggy quilt bag, what a disaster! will be on my blog soon if you all want a laugh.. I just found you whilst looking for help on how to get it right next time – best instructions I have seen, going to be following your blog and thank you for your help and clear instructions.
Lynda
What is I want to make this quilt but without the seams showing?? I want the front to look like the back does. How would i do that?
cut the batting smaller as suggested in Step #1. Instead of layering as shown, layer the two fabrics right sides together, then center the batting on top. Sew around all four sides of the square, leaving an opening of approximately 1 1/2 inch. Catch just the edge of the batting as you go to secure it in place. Turn right-side out and quilt as desired. Then you will need to whip stitch or zig-zag the blocks together. The opening should be closed when joining the blocks together. Someone try that and let me know if it works!
I upped the block size to 7" and did 8 rows of 8 blocks each. Turned out about 48" or 4'square. Ideal for a lap quilt or over the back of the couch. 🙂 Loved your clear, concise directions! I just about finished this in an afternoon. Still have all my clipping to do… boohoo.haha
I've spent hours on youtube looking for videos that would help….. then stumbled on your 8-step instructions…. THANK GOODNESS!!! So simple and easy:))! Thank YOU!
One quick question – The shaggy quilt I'm making came with binding material (instead of fraying around the edges), but I don't know how to do bind…. Any tips would be greatly appreciated.
Thank you in advance!
Tina
Hi Tina – I have several binding tutorials; see the link below. Hope this helps!
Binding and blind stitching tutorial:
http://quiltingintherain.blogspot.com/2011/05/binding-blind-stitching-tutorial.html
Quick Quilt Binding:
http://quiltingintherain.blogspot.com/2010/06/quick-quilt-binding.html
I have never, ever quilted before… how hard is it to really start? Would hand-stitching just be a pain in the butt?
I think hand-stitching works best for pieces that have more complicated shapes (with curved edges, for example). However, if you have never quilted before and would like to give hand-stitching a try, why not just choose one block to make and turn it into a potholder? That is a good way to get some practice and learn a little bit about the process before getting involved in a big project.
WeLL, about starting to Quilt…..Not hard at all to begin. You can do AnYThiNG you set your mind to and their are many awesome patterns for us beginners 🙂
Have fun!
Great tutorial!! I am getting ready to start my rag quilt this week, and I have a question about thread color. The back fabric of all my quilt sandwiches will be a green minky fabric. Should I try to match the thread to the green back when I quilt the "X"? Or should I use a light color? Does it matter? Thanks for any help you can offer!
ależ to proste!
I read somewhere that you should use flannel as it "rags" better. Unfortunatley, the fabric I want to use is 100% cotton, will that work as well?
I recently made a rag quilt out of flannel and I don't like it. when I washed it, it came out of the dryer looking like it was 10 years old. Don't know why that happened but next time I will use cotton.
All of mine have been made of cotton. And they look lovely. 🙂
Hi there, Thanks so much for the nice pics and great instructions. I have one question. When you attach the "rows" together, do you open up the seams to sew the rows together, or do you fold the seams over to opposit sides? I cannot tell in the pictures….
I bought 100% cotton batting to use between my flannel strips. Do I really need to cut it smaller so it won't be sewn in the seams, and why is that important. I've never done this kind of quilt w/batting before, but thought it would look fluffier using the batting as part of the seam. THoughts?
Thank you so much for this post! I saw a quilt like this when on holiday in the States and knew I just had to have a go! It is top of my list. Cheers!
http://www.beverlys.com/rag-quilt-how-to.html
I am getting ready to buy a sewing machine and learn to quilt. I have so many friends with new babies plus four of my own. I have my own baby blankets that after 30 years look like they are coming apart and thought it would be perfect to up-cycle for my little one and just add to it. I am super excited at how simple this looks and am SO GLAD I happened to stumble upon your sight on Pintrist! Cant wait to try it! <3 Love the clear simple step by step instructions and the pictures for us beginners!
Can you bind off a rag quilt
I made it on the weekend. Great instructions – thank you xxx
I want to personally thank you for your insight on quilting techniques. I've made a couple of the flannel baby quilts and they came out beautifully for gifts. I have been making quilts for 40 years using as many "shortcut" techniques as possible. Yours are by far the easiest. Next I'm going to try your "woven" quilt as seen on Pinterest. U DA BEST!
What would be the sizing if I wanted to make a throw? And how much fabric you think?
What stops the material from loosing threads when washed and fraying down to seam ?
what stitch are you using when you assemble it all together?
I love this tutorial! I have always been so intimidated to try to sew a quilt but I believe THIS I CAN do!
So wonderful of you to show us. I wish all tutorials were so SIMPLE and CLEAR and EASY to understand. You made it so simple and clear I don't think I'll even need to read it step by step AGAIN to do it…..lovely.
I am so glad I found this,I already have my squares ready (sewn front and back) but I thought "Oh no I messed up" lololol thank you for doing this.
Thank you so much! I have always wanted to make a quilt like this.
I cannot wait to try this out. It will be my first time and I will hand sew, instead of a machine. Thank you for sharing!
Thank you for great idea. Should the fabric be washed and dried prior to starting to prevent shrinkage?
Great way to use up bits of batting. I sometimes stitch them together, but this is a much better use. You could make a great group quilt this way!
Please explain how you positioned the layers of fabric when the seams of two blocks came together and how you clipped these many layers.
Hi There! I found your post through Pinterest. It looks like you have used quilting cotton material instead of flannel. I have made several flannel rag quilts, but never with cotton. I was reading another tutorial and the writer said that cotton frays so badly she would not suggest using it. How has yours held up?
I would suggest that the batting be large enough to just catch in the seam. I used 8.5 for batting and 9 for cotton. I had used the one inch smaller rule until on my fourth one, the batting acted weird and bunched up towards the center because it was not held into place. I had to tear the entire thing apart. (Luckily, I was able to pull up the batting and cut the squares down an inch to make a pad for my recliner.) On the next quilt, after I get the squares together I clipped out the extra batting as close to the seam as possible. On the next quilt, I plan to clip the corners of the batting before sewing the X to keep from having all that bulk where the 4 join. Hope this is helpful and makes sense.
Awesome tut!!! But if you want to save your hands and your sanity, get yourself a pair of rag quilt snips (less than $15 at Joanns). Trust me, it makes all the difference! 🙂
I am currently in the process of making this. I have gotten half of my "mini quilt sandwiches" sewn together. It's a slow process for me since I'm in my third trimester and also a stay at home mom to a 3 year old. This is my first sewing project, so it's not anywhere near perfect but your tutorial has made it so simple for this novice to comprehend!
If you use flannel for the batting do you have to sew an X through the 3 pieces? I am going to embrodier on some of the squares do I have to put an X through them or how do I put them together.
I would like to know if I could make a rag quilt with cotton fabric instead of flannel.
I believe for your quilt to rag, it has to be either flannel or 100 percent cotton and you can always use flannel for the batting. Lots of times you will find flannel on sale a lot cheaper than the batting. Not like material that is 60 polyester and 40 cotton. I think it needs to be 100 percent cotton. If I'm wrong on this please let me know. I have made several baby rag quilts and I cut my block and then cut my flannel or batting 1 inch smaller. Usually a baby quilt can be completed in a night. instead of putting a X on some of my squares, I put a heart on some of them (by hand) because I was making a quilt that someone had lost their Mom and the daughter had given me several pieces of her Mom's fabric that she had. Seem like it would take a long time to hand stitch a rag quilt but if you have the time, I'm sure it can be done. Hope this helps. Shirley K…
What a beautiful, happy, fun tutorial. You are so generous to share this with the world. I will be whipping one of these up today, so I won't forget your easy methods! Thank you!
Me encuentro encantada de estas explicaciones tan claras y motivantes, Dios te bendiga por todo lo que nos proporcionas.Mercy
I have made these for years. At first I used batting and sewed the X. Now I don’t put anything in the middle of my sandwich and I don’t sew the X. It’s much lighter and can be used all year long. I also figured out if you cut your fringe really close together and not so close to the seam it really gives a beautiful effect and you don’t have to fix any accidental cuts into the seam!
I’ve made several rag quilts. They are absolutely beautiful. The last one I made had several seams that came undone. I would suggest creating a double stitch or restraining each time you put the squares together. It’s very frustrating, but you don’t want to sell or give to a friend and it fail on them. Happy sewing;)
Great tutorial! Everyone can create one of these with minimal sewing skills, and this page will really help. 🙂
I have made several rag quilts with 100% cotton fabric on the top and 100% cotton denim (either recycled or off the bolt) and used fleece for the batting. I cut the fleece small enough so that it is not seen when the quilt is completed, since it will not fray like the cottons. The denim makes it heavier, but some people like the weight. They also make a great floor quilt for a baby’s tummy time on the floor, If it is made with fabrics that they can grow with, it will last them for many years of TV watching and road trips. If you put a lot of time into it, it’s nice to know that it will be used a lot, not put away after a couple of years. One of my first ones went to a 14 year old who is going through chemo treatments. Her mom says she takes it along for every hospital stay and treatment.
HELPFUL HINT: Get a pair of Fiskars clippers that are made for rag quilting–it will make the tedious job of clipping a gazillion seams so much better than with scissors!
I am curious if you cut the batting or fleece out of the fringe after you snip it? i am making my first rag quilt.
I am working on a denim rag quilt and found that the fabric was too thick for my machine so I ended up having holes in the middle of the squares. What is the best way to fix thise?
Great tutorial! I have to make this, you made it look like so much fun. Thanks for sharing.