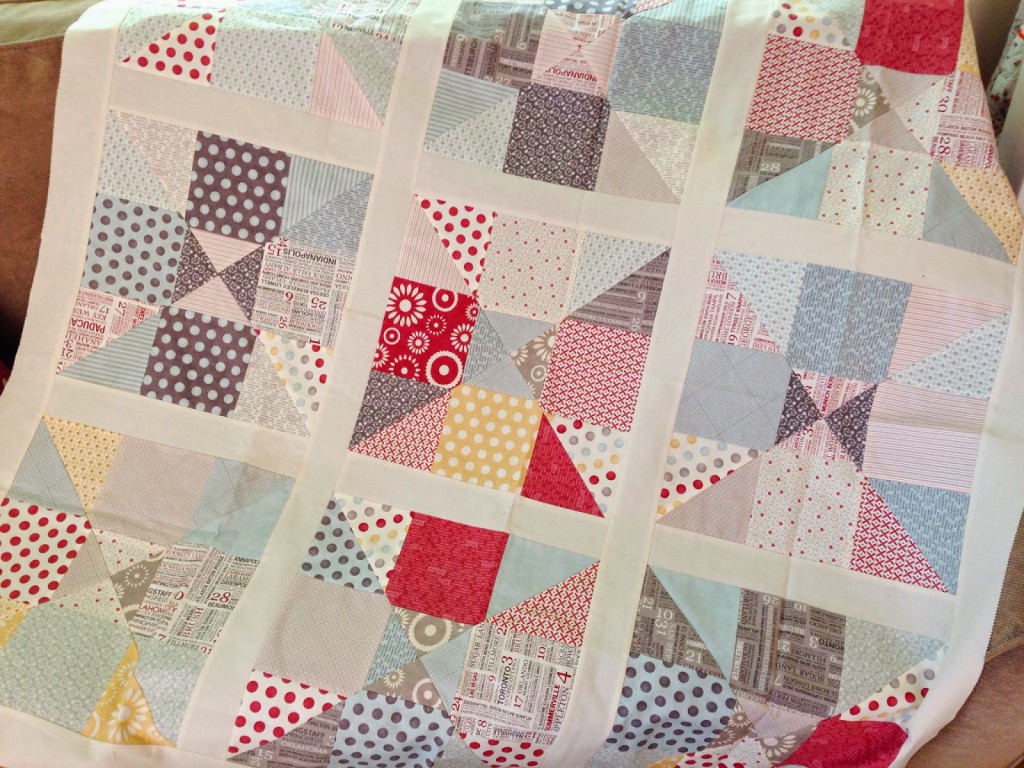
I finally got this tutorial up! Thank you ALL so much for your fabulous quilt name suggestions. I love picking your crafty brains 😉 It was a tough choice, but I decided to go with Home Sweet Home (thank you Anna from Switzerland for the idea!). If you’re familiar with my tutorials, you’ll know that I love simple and quick quilts that require little to none fussy measurements. Well, this is one of them! In fact, this quilt practically requires no measuring! That’s the beauty of pre-cut fabrics – you can whip up a quilt top over a weekend. Check out my tutorial below 🙂
A printer-friendly version can be found HERE.
Materials for a 47″ x 47″ quilt:
- 2 charm packs (or 81 pre-cut 5″ squares)
- Ten neutral colored Jelly Roll strips (or 3/4 yard neutral colored fabric; from this, cut ten 2.5″ x 42/44″).
- 5/8 yards binding fabric
- 3 yards backing fabric
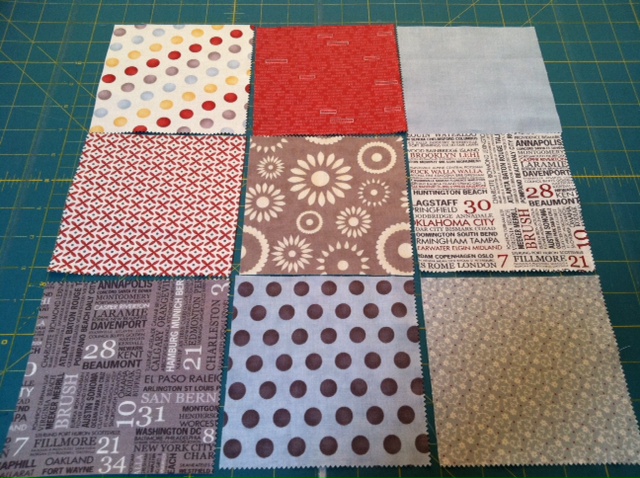
Step 1 – Choose 9 charm squares (or pre-cut 5 inch squares) and make a 9 patch block by sewing 3 rows together with 3 blocks per row.
Step 2 – Using a rotary cutter and ruler, cut 2 diagonal lines from corner to corner as shown below.

Step 3 – Repeat steps 1 and 2 to make a total of 3 nine patch blocks. Cut diagonal lines from corner to corner for all 3 blocks. This will give you a total of 12 triangle pieces.

Step 4 – Here’s the fun part! Rearrange all 12 pieces to your liking.

Step 5 – Then sew the rearranged pieces back together as shown below. This will give you a block that measures roughly 13.3″ x 13.3″. Repeat until you have a total of 9 finished blocks.

Step 6 – Take three jelly roll strips (or three 2.5″ x 42/44″ long strips), and then sub-cut each strip into three 2.5″ x 13.5″ strips. This will give you a total of six 2.5″ x 13.5″ strips. With right sides facing together, sew a strip to the side of a finished block, press flat with an iron and then trim the excess ends (since your finished block measures 13.3 inches, this is simpler then trying to measure 13.3 inch long strips). Sew the remaining strips to create sashing between the blocks that looks like this:
Step 7 – Use two more jelly roll strips (or two 2.5″ x 42/44″ strips) for the middle sashing. with right sides facing together, sew the first row of blocks to the sashing, then press flat with an iron. Repeat until all three rows of blocks are connected by the two sashing strips. Trim the excess ends.
Step 8 – Use two more jelly roll strips (or two 2.5″ x 42/44″ strips) for the top and bottom borders. After sewing them on, trim the excess ends. Lastly, sew the left and right side borders on. Each side will measure roughly 47″ long, so you will need to sew some jelly roll strips together to get two 2.5″ x 47″ long strips. I simply sewed three jelly roll strips together (or three 2.5″ x 42/44″ strips) from end to end and then cut that in half. After sewing them onto the sides of the quilt top, trim the excess fabric. That’s all there is to it! Like I said, it’s a non-fussy cut quilt and fast to piece together. Here’s a picture of my quilting buddy, Bodie, that I thought I’d sneak in. He was ready for a walk in this photo. 🙂
 Happy Quilting! And if you make this quilt, don’t forget to share it on Quilting In The Rain’s Facebook page for all to see!
Comments: 46 | Leave a comment