This is an incredibly easy zipper pouch tutorial. I’ll show you how to install a zipper and make a lining for the inside of the pouch. It’s easier than you think, and I did my best to show how it’s done with some clear how-to photos.
If you’re like me and have procrastinated on Christmas shopping, here’s a handmade craft that you can make for your friends. Once you get the cutting done, everything else comes together quickly. If you can sew a line, then you got this!
I know this would have been more helpful had I posted it a couple weeks before Christmas, but hence the whole thing about procrastinating! (oy). But the good news is this is a truly easy tutorial, and people will be impressed because you installed the forever-feared zipper.
.JPG)
Before I start, here’s a couple ideas on what to put inside:
1. For your Quilter friends make it a ‘Binding Kit’ and fill it with those mini (adorable) thread scissors (you can never have too many! I’m obsessed), those cute little red binding clips, a couple of needles and some good thread. That’s everything needed to bind a quilt all contained in this handmade pouch!
2. For your non-quilter friends, fill it with some fun lip gloss, nail polish, all that girly-girl stuff that we like.
Materials:
- Cut two 6″ x 9″ rectangles for the lining (dark gray)
- Cut two 6″ x 9″ rectangles for the main print (outside of the pouch, mine is pink)
- at least a 12″ long zipper


Note: You can use a zipper foot if you want, but I did not. I simply
aligned the edge of my presser foot along the edge of the zipper’s edge
(however, if your presser foot is wide, you may need to use a zipper foot).
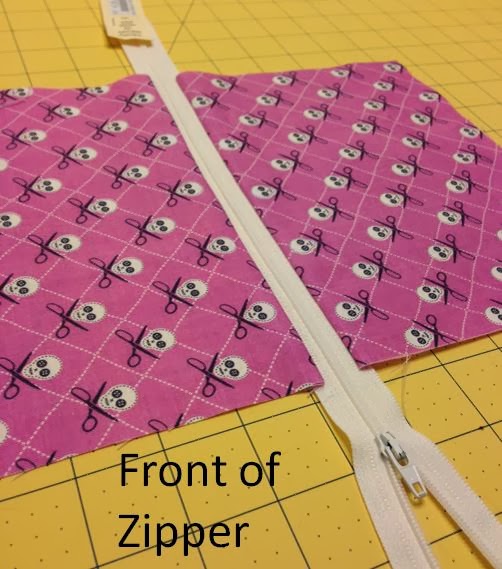
2. Press open so that the correct side of the fabric is facing you.

3.Repeat steps 1 and 2 along the other side of the zipper so it looks like this:
4. Next, flip it over so that the back of the zipper is facing you. Repeat steps 1-3 but on the back side of the zipper and using the lining fabric.

5.After both the main fabric and lining fabric is attached to the front and the back of the zipper, respectively, sew two lines along the zipper as shown below. Doing this will make it so the zipper doesn’t snag on the fabric when zipping it open and closed.

6.Now it’s time to finish it! Start by unzipping the zipper half way down the middle.

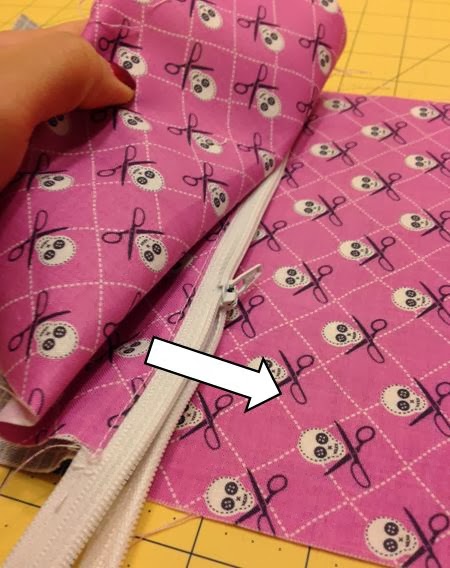
7.Next, fold the main print over so that the right sides are facing together. Do the same so that the right sides of the lining fabric are facing together. The wrong side of the fabric for both the main print and the lining should be facing you. Make sure all the edges and corners are aligned and then pin to keep in place.

The top of the zipper should be folded towards the main print, as shown below:
8. Then, Sew along the perimeter as designated by the red dashes, making sure to start (and eventually end) your stitch on the side with the lining. Remove the pins as you sew. Also, leave an opening at least 5″ wide. Start and end your stitch with a back-stich. Trim off the extra zipper.

Note: When you get to the zipper, sew slowly over it. It helps to use a walking foot.
9. Turn everything right-side out through the 5″ opening and through the zipper opening. then sew closed the 5″ opening on the lining (I simply folded the seam 1/4″ inwards and did a top-stitch).

Stuff the lining back inside the pouch, and iron everything flat for a finishing look. Aaaand you’re done!
If you want to get fancy, you can make a quilted pouch by simply adding batting to the main print and the quilt before assembling onto the zipper. The lining fabric will hide the back of the batting. 🙂
And in case you’re wondering, here’s how the zipper corners look like:
.JPG)
.JPG)
Happy sewing! And happy holidays! 🙂
Спасибо за мастер-класс! Все очень понятно!
First tutorial I’ve seen that was very easy to understand!
Thank you for this tutorial Jera!. It is perfect for a last-minute gift:)
Yes it is!!! I have been scared to try these, but I so GET this tutorial! Thank you!!!
Merry Christmas!
Thanks for the tutorial. Now I can make some quick gift for some special people. Thanks again.
Love this Thanks Tried to send pictures
This is exactly what I've been looking for – thank you!
Thank you for the tutorial. I now want to make pouches because I understand your instructions without feeling stupid.
Thank you for the tutorial. I now want to make pouches because I understand your instructions without feeling stupid.
Thank you Jera, will try making one today!!
Very simple, very cute. Thank you.
My third try in making this a little pouch. I tried two other videos, just couldn’t get the instructions correct. Very disappointing until I read your instructions and saw your step by step illustrations. COULD NOT BE ANY EASIER THE WAY YOU EXPLAINED IT. Thank you so much for making my first perfect completed pouch! Now I will try larger ones and maybe add batting as well.
Happy Sewer?
I have read 10 tutorials and this is the first one I understand. Thank you!!!
Very nice tutorial; your instructions and photos are excellent. I have made many zip pouches in a few different ways, but never quite like this. I usually fuse the lining to the outside fabric to get more body, and pink or zigzag to finish the seams. Quilting batting to the outside fabric, as you described, would add body as an alternative to fusing. I also put tabs on the ends of the zip, but that takes longer, and yours looks fine without them. Thanks so much!
Great tutorial, thank you! I finished up this little lined bag in no time, and it looks fantastic!
super easy! made this pouch for my grandson to carry a little gaming device in and it is perfect! Denim on the outside.
Made two!!! This is great.