
 Recall this quilt I was working on? I finally finished it! This one went to my Grandma in the Philippines as a gift for her 50th wedding anniversary. 🙂
It’s a simple quilt that doesn’t require that many materials. If you use the right prints, it’ll turn out looking more intricate than it really is! I used the Heirloom collection by Joel Dewberry.
If you like it, we have Heirloom quilt kits available at our shop. The kits come with all the fabric you need to make this quilt (even backing and binding fabric). Enjoy the tutorial below! Only five simple steps.
Materials for one 35″ x 46.5″ quilt:
- 8 fat quarters (or 8 quarter yard cuts)
- 1.5 yards backing fabric
- 1/2 yard binding
OR
Step 1 – From each fat quarter, cut three 7 inch squares (save the remaining scraps for step 4). This will give you a total of twenty-four 7 inch squares. For quicker cuts, stack your fabrics 2-3 at a time, press with an iron to help keep in place, and then cut.
Then, pair your fabric prints:
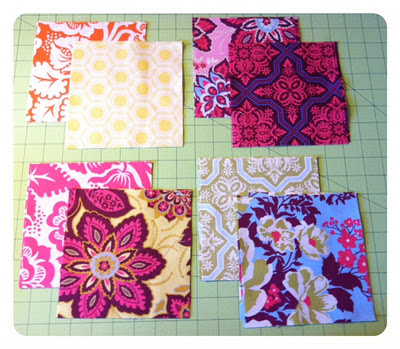 Step 2 – Choose a fabric pair to start with, and place one square directly on top of the another, with right sides facing together.
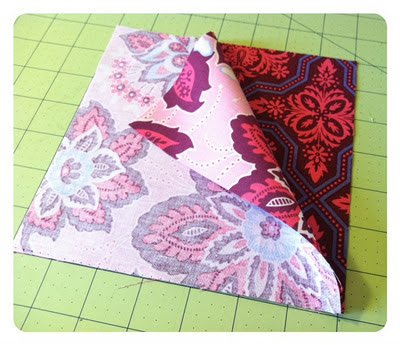 With a rotary cutter and ruler, make a diagonal cut as shown below. This will give you two half square triangles. Then, sew a 1/4″ seam allowance along each edge where you made the cut.
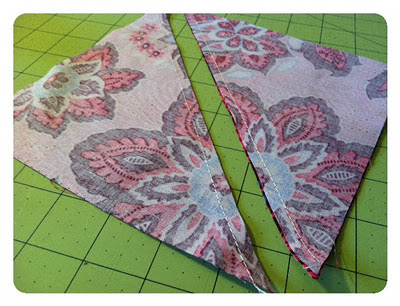 Press open with an iron, yielding two half triangle squares:
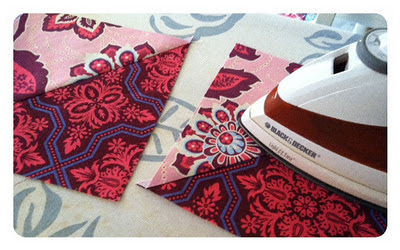 Then, make a diagonal cut on both half triangle squares as shown below. This will yield four triangles:
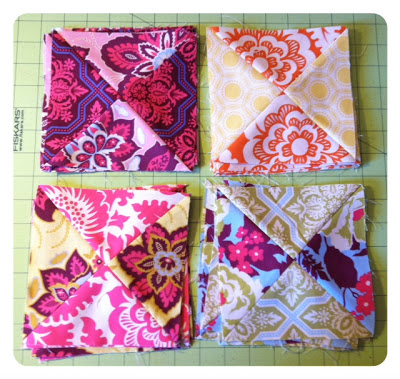
 Switch the triangles around so that opposite prints are adjacent to one another. With right sides facing together, sew the half square triangles together using a 1/4″ seam allowance. Press open with an iron:
 Step 3 – Repeat step 2 for all remaining pairs that you sorted from step 1. This will yield a total of 24 of these ‘x’ blocks (six stacks of each pair).
 Step 4 – From your remaining eight fat quarter scraps, cut three 6 1/4 inch squares from each. This will yield a total of twenty-four 6 1/4 inch squares.
Step 5 – At this point, you should have a total of twenty-four ‘x’ blocks from steps 2-3, and twenty-four plain blocks from step 4, for a total of forty-eight blocks. Rearrange all forty-eight blocks in alternating order with 6 blocks per row and a total of 8 rows, as shown below. (click image to enlarge)
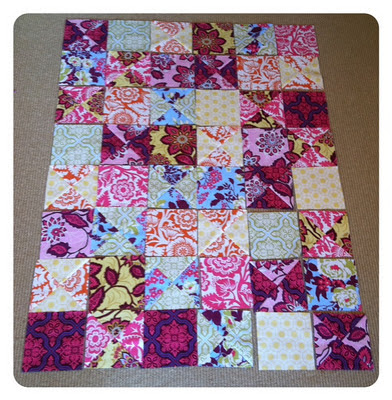 Then, piece your quilt top together: with right sides facing together, sew all six blocks in each row together, press open with an iron. And then all eight rows together.
Lastly, baste, quilt and then bind. And there you have it…one simple yet gorgeous, keepsake quilt!
Let me know if you have any questions. Happy Quilting!
-jera

Thanks or the tutorial!
this looks wonderful in the fabric you have chosen ! thanks @
I always wondered how the triangles were done. Thanks for such a clear tutorial!! Love the fabric!
what size is this quilt when it's done? I'd love to use this tutorial to make my mom a quilt for her 60th birthday in September. THANKS!
the finished size is 35" x 46.5"
Thanks,
jera
Nice
Howdy! What a amazingly looking personal blog you own! Did you customize your domain on your own?
If I want to make a queen size quilt how may blocks would I need in a row.
I also would like to make a queen size quilt like this and would love to know answer to above question too! 🙂 Thanks x
I, too would like to know the number of blocks needed for a queen sized quilt.
What technique did you use to quilt the layers together before binding? Love your quilts and tutorials. Looking forward to your upcoming book release.
I have been saving my husbands shirts that he has either outgrown, got tired of or whatever, and trying to decide what way to incorporate these into a quilt. After seeing this, I believe I will make one in this manner. Thanks for your tutorials.
how do you bind it?
Love the quilt, Jera, and so happy about the upcoming birth of your new baby.
Can you tell me the reason why you cut first and then sew and not choose to drawn a diagonal line and sew on either side en then cut them apart?
I 2nd the question of unknown dutch girl. I would make a pencil center corner to corner line; sew 1/4 inch on either side of that line THEN cut the triangles apart. no worries about stretching out the bias cut triangle.
This looks so complicated but is so simple. I'm a Newby to quilting and this is on my 'bucket list' of quilts to make. Love the fabrics you've chosen
Congratulations and blessings to you and your upcoming new arrival. P.S. I love Paige!!
It appears there was echi quilting among the hst and maybe that was all quilting done. Even maybe ditch quilting on plain squares. Jera now does do the draw, sew, then cut with hst. If you read whole tutorial she says baste, quilt then bind and you see binding on quilt.
Jera, I am new to your newsletter and so happy to have found you. This quilt does indeed look royal, all due to fabric choices for sure. By now you have had your baby who is probably toddling about on strong legs – joy! I am also happy to know you have family in the Philippines where I spent one year in 1969; my husband, then in the USA,F was assigned to flying missions back and forth to and over Viet Nam. I have a very special place in my heart for the lovely Philippino people I met, some of whom I still keep contact with. Another reason why I’m so glad to have made your acquaintance through Favquilts!
How many blocks do I need for a California King quilt?
I thought I had all of your patterns and then this morning I find this. You have so much talent and I thank you so very much for sharing it with us. Your use of color has let me let go of the neutral I’ve been using for years and it is so much fun. Thanks again.