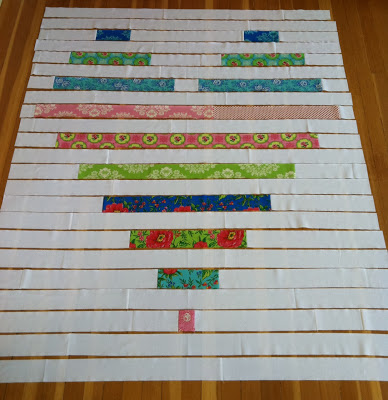
Materials (57″ x 50.5″ quilt top):
- 1 jelly roll (you will have plenty of leftover strips!)
- 1 solid white jelly roll
- 3 yards backing
Step 1 – Trim the strips from both the colored and solid white jelly roll to the exact measurements represented in the cutting diagram below. (Note: the measurements below are the exact cutting measurements of the unfinished pieces). Since a jelly roll strip is 2.5″x44″ long, in some cases you will need to sew a couple strips together and then trim it to get the measurements shown below.
Step 2 – Using a 1/4″ seam allowance, sew all the pieces in each row together, and then sew all rows together.
Step 3 – Add the borders. Sew enough strips together until you have these measurements:
- Left and right borders – 46.5″ long. Sew these on first.
- Top and bottom borders – 57″ long.
 Baste and quilt. Sew together six leftover strips to create the binding. A binding tutorial can be found here.
That’s it! Simple and absolutely beautiful! Thank you for checking out my tutorial!
Happy Quilting!
p.s. if you make my pattern, I’d be thrilled if you shared it on my Facebook page!!


I love the colours and what a simple buy lovely design
Love Marge x
LOVE!!
Adorable! I'm thinking solids too 🙂 I'm totally into aqua and gray right now…hmmm. What a great tut, thanks Jera!!
Love, love, love this one!!!! Great work! I like simple too. 🙂
WOW…I LOVE this design, it is simple, but it makes a bold statement. Thank you so much for sharing the tut with us. Happy Friday 🙂 Amy
Oh my goodness, I am in love with this quilt and it is now on my "to do" list!! Thank you soooo much!
This is a great design Jera – simple but very effective!!
How wonderful. What a great idea!! Thank you for posting the pattern!
What a wonderful design. I can think of all kind of wonderful combinations–even a scrap red with the white background. Thank you!
Deb from clutteredquilter.blogspot.com
This is sew heartfelt…great design, easy, can be done with sew many collections..I am thinking floral would be nice too…great work
I really love what you've done with this quilt. It's just awesome. Thank you for the tutorial.
I discovered your lovely heart quilt at moda's bakeshop and was curious to see your blog. So I'm here, looking around. I am not yet a very experienced quilter but have done already some quilts. I'll certainly do your heart quilt with jelly rolls made out of my stash. Thank you for this tutorial.
Greetings from Switzerland
Barbara
The BEST tutorial I've seen in blogland. Thanks for your precision and the pictures.
A very nice heart, Your blog is wonderfull.
Greetings from Kirsten in Denmark.
Love love love!!!!! Questiion??? Would I be able to make this quilt in a smaller size 36 x 40???? I thought Summer Love would be a great little baby girl quilt!!!!
Thank you for sharing your design. I have just completed my top using reds for the heart. The quilt is intended to be a gift for my husband's cardiac surgeon. My husband had open heart surgery in November 2012 and a quilt seemed the best way for me to try to show my gratitude.
Hi Libby, thanks for the comment. 🙂 You're very welcome for the pattern! What a meaningful and heartfelt gift (no pun intended). I'm sure he'll love it!
I just finished this quilt! I'm a brand new quilter so I made lots of mistakes, but I love how it turned out: http://www.dejongdreamhouse.com/2013/04/heart-quilt-for-marissa.html
Really cute, cute, cute–lovely original design!
This is such a great design, made this quilt top today with stash valentine fabrics…phew you really have to pay attention to your cuts, then just like putting a puzzle together. Thank you for the tutorial, simple and easy to follow! love it!!
I used this pattern/tutorial to make a quilt to send to the Orlando Modern Quilt Guild’s Quilts for Pulse drive. Thanks for a great idea and easy to follow directions!
http://thedarlingdogwood.blogspot.com/2016/07/fnished-heart-quilt-for-pulse.html
Thank you for this pattern! I modified it a little and the dimensions ended up changing a bit because math… https://www.facebook.com/photo.php?fbid=10154733972334926&set=a.10154733959929926.1073741833.749039925&type=3&theater
Thank you for posting this. I will be making it as a charity quilt for Hole in the Wall camp through my quilt quild!!
Thank you for this great pattern. I have done over 150 community service quilts since lockdown began. This will be a wonderful design for my donations to children’s organizations. I might experiment with wider strips to enlarge for my throw size I donate to the chemo treatment centers.
love this! I’m new to this. Can you tell me what it would take for this pattern to make for a queen size bed?