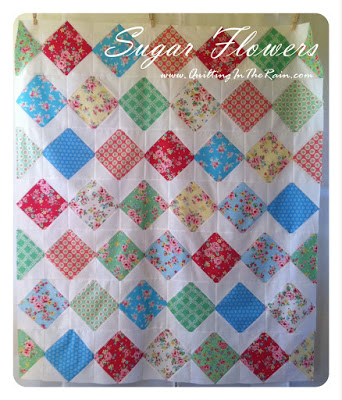
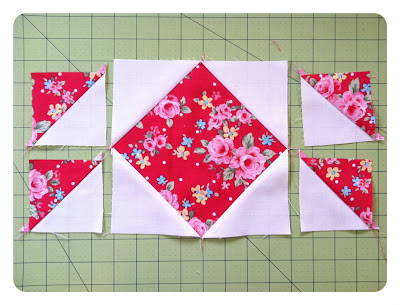
 As mentioned in my last post, this is a great quilt to showcase your favorite fabrics. It’s a simple quilt that’s made up of 46 of these blocks:
 In this tutorial I’ve also included an optional technique that shows how to turn the corner scraps into half triangle squares – these can be saved for my next tutorial or for whatever you want, so long as you don’t throw away those precious scraps! 🙂 Being a fabric addict, the thought of those babies at the bottom of the bin pains me! Enjoy the tutorial!
p.s. – you can see the finished version of this quilt in all its glory here 🙂
Materials for the Quilt Top (45.5″x53″):
- 12 fat quarters (or 1/4 yard cuts)
- 3 yards of white fabric
Step 1 – From each fat quarter or 1/4 yard, cut four 8″ squares for a total of 46 8″ squares. Layer your fabrics for quicker cuts (e.g. as shown below, I folded the fabric into quarters so there were four layers to cut through. When you fold, press flat with an iron before cutting).

Update (2/9/2016) – this tutorial has been updated to account for the 1/4″ seam allowance on the white corners, below. However, the phtos have not been updated. Thank you for your patience & i apologize for the error! I wrote this tutorial way too long ago!!
Step 2 – From the 3 yards of white fabric, cut a total of 46 8.5″ squares. Layer the fabric for quicker cuts. Cut 8.5″ strips along the width of fabric. Sub-cut each strip into four 8.5″ squares.
After you’ve cut 46 8″ squares from the white fabric, layer and then quarter them into 4.25″ squares. This will give you a total of 184 4.25″ squares.
 Step 3 – Place a 4.25″ square and align it with the corner of an 8″ square. As shown below, mark a diagonal line from corner to corner on the 4″ square. I used a Hera marker which is a plastic tool that creates a crease on the fabric when pressed with a firm hand. If you don’t have a Hera marker, simply draw a line using a ruler and pen, or fold the square diagonal and press with an iron and then unfold.
 Then, sew along the marked line.
 Step 4 – Repeat step 3 for all four corners of the square.
 Note: Steps 5 and 6 are optional for this tutorial. I’ve incorporated these steps to show you an easy way to utilize your scraps. I recommend taking the extra minute to do them. 🙂
Step 5 – After you’ve finished step 4, it will look like this. Once again, use a marking tool and mark a line 1/4″ along the outer part of the stitch that you previously sewed. Repeat for all four corners.
 Step 6 – Sew a 1/4″ seam along the line that you previously marked. Repeat for all four corners.
 When you’re done it will look like this.
 Step 7 – Cut the corners off by cutting along the marked lines that you marked from step 5. (If you skipped steps 5 & 6, simply cut a 1/4″ seam along the outer part of the lines you sewed in step 4. Or in other words, instead of marking a 1/4″ line along the outer part of the stitch as was done in step 5, cut the line instead of marking).
 Step 8 – Press open with an iron, giving you five beautiful blocks! Note: the four half squares triangles will not be used for this tutorial, so you don’t have to press them open right now. I will be using them in my next tutorial (or you use them to create whatever you please!).
 Repeat steps 3 through 8 for all 46 8″ squares.
Step 9 – Take eight of the 46 blocks, and cut them so they measure 4.25″x8″. This will yield you eight end pieces.
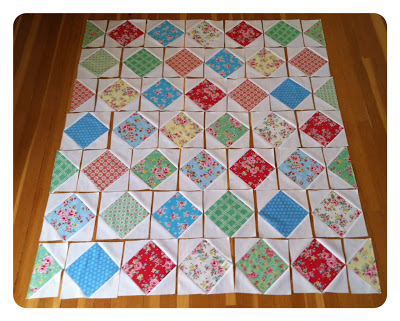
 Step 10 – Arrange all 36 blocks and eight end pieces as shown below, with two end pieces in every other row. Sew all blocks together in each row, and then sew all seven rows together.
 That’s it! And if you happen to make this quilt, I’d love it if you shared it with everyone on the QuiltingInTheRain Facebook page!
Happy Quilting!

Awesome! I have so many ideas to start a new quilt, but I think this one should go to the top 🙂 I still have that layer cake I won from you, so maybe I'll just have to use it for this. Could I use the layers and cut 10" squares out of my solid and do the same thing? Thanks for the great tut!
Hey Debbie- yes you can use the layer cake! For the corners, simply start w/ 5" squares instead of 4". you can use a solid white charm pack, or just quarter a layer cake. It'll be beautiful!
Great quilt!
Jera you are as cute as your blog and your stitching…would you consider doing this tut on Stash Manicure..it will certainly bring you new fans and they will just love you..let me know…
Now that is a very nifty technique! Thank you.
Fantastic!
Great looking quilt. Very nice. Thanks for the wonderful tutorial.
Thanks for sharing the tutorial…looks great!!
Wow! I really love this design! I want to try it out and thank you for the very clear directions.
I love this design. I think I'm going to try it with charm packs for a baby quilt.
Hi! I think I am in love. The combination of the fabric and pattern. Fabulous!
Deb
This is so cool and different – I'm going to add this pattern to my list of "to-do's"!
Jera – I'm going to get this one started today! I ordered a green FT solid to go with the layer cake I won from you, I have them cut into 5" squares…so I'm ready! Thanks again!
Working on this now. Someone needs to teach me how to upload photos onto facebook pages. Do I just tag them?
great tutorial especially step 5 and 6!
AWESOME tutorial! Thank You. I want to run up to the sewing right now~
Love this pattern. I hope to find time to piece this quilt top over the weekend. So glad that I found your shop and blog through the Diary Of A Quilter blog.
I signed up for the newsletter…that pattern is great! 🙂
Jeri, Love you as usual, my Friend Debbie in Nebraska and I in OHio, are working on your home sweet home quilt right now….;o)
I like this one! It looks nice and fast to make up for x-mas gifts this next year!
I just stumbled into your blog through pinterest, love it. I'm looking forward to making a few of your super easy quilts/projects. I do have one question, you said you need eight end pieces and you used eight squares cut in half. Did you mean cut four in half or do I need eight for layout reasons? Thanks -tamra
I am concerned that there is not a 1/4 " seem allowance..how does that work out? I will try it out and see how it works..
I also noticed there is no 1/4" seam allowance on the outside edges of the block and noted that in your finished quilt the blocks do not come together as points. Was that intentional? If you want the blocks to come together as points then your white squares will have to be larger. Or you could just make them smaller and have snowball blocks which would actually be a whole different quilt pattern but also a beautiful quilt.
I too am watching for the answer to this as I'd prefer NOT to lose the points if possible. All suggestions are welcome!
I also noticed the lack of seam allowance. After reviewing the tutorial I am wondering how it could be done differently to make sure there is allowance to match points. This is a darling quilt and one that I would really enjoy making. I think this would be an excellent 'boy' design done with browns, navy, greens, and tan. Will be anxious to read suggestions and a reply. Thank you. You are doing a great job and just keep up the great work. You are lovely. Thanks
I believe to keep the points on the squares, you would cut the white fabric into 8.5" squares, not 8" (but keep the patterned squares at 8"). You would then cut these white squares into 4 smaller 4.25" squares. As in the tutorial (beginning of Step 3), you would line up the 4.25" white square with the corner of the 8" patterned square, right sides together. However, you would NOT sew from corner to corner of the white square. You would leave a 1/4" allowance, meaning you would sew diagonally along the white square a 1/4" out from the corner-to-corner. To do this, you could mark your corner-to-corner line (as in Step 3), but THEN measure and mark another line 1/4" out from that (closer to the corner where both fabrics are aligned). This will give you a 1/4" seam allowance when you press open the white fabric into a block. Hope that helps.
I'm new at sewing but you lost me at the last 3 sentences. Would I sew on the 2nd marked I/4" line? I love this quilt and would love it to be on point! Thanks
Can you send a picture of how to do this.. I was thinking this also.. otherwise you will lose all points..
lost points on squares and rectangles this way. 🙁
thanks for the tutorial, it is awesome for a beginner like me. Happy Quilting in 2014.
JennieLou
Very beautiful quilt and a useful tutorial. Thank you.
I sew those half square triangles up when I'm doing any kind of square using them. Stick them in a drawer and hopefully by years end I can make a quilt from them.
What did you end up using the half square triangles for? I can't find them on your blog
How can you shrink this down for a baby's quilt?
this looks very cool. I need to make it a queen size can you give material amounts that I will need? I have the fabric, plenty of it. I'm not good at the math part of figuring out how much I need. Thanks!
I love what you do. I have no suggestions and love what you did. I am not a fancy quilter, do not do shows, just like making quilts and donating them. So I love this and no waste, that is all that matters to me. I also make quilts from loved one's clothes and this gives me more to work with, I buy cheap fabric, sheets anything I can get ahold of and you made my day. Thanks so much for sharing and I had no clue what the other ladies are talking about, you are clear.
Loved this pattern. Have made 2. Thank you!
Sin order to ha e them on point with a layer cattle white squares need to be 2 5/8. I altered this pattern to those measures and it worked out beautiful. Thanks for the tutorial.
Sorry for the typos. Meant to say layer cake the white squares I should read my typing before I post. Sorry about that