 You all asked for it, so here it is! A binding/blind stitching tutorial just for you. 🙂 Thanks for your patience…though binding is something I do regularly, this tutorial took a lot of thought. I try to stay away from posting lengthy and wordy tutorials, so I tried my best while still trying to depict everything clearly. Part I of this tutorial is how to attach the binding to your quilt top, and Part II is how to blind stitch. I made videos of me blind stitching in hopes it would be easier to learn.
Also, I wanted to say that I’m a self taught quilter, therefore my way of binding and blind stitching might not be as traditional. But it’s how I roll, and it works! There are many ways to bind a quilt, and this is just one of them.
One last thing (so much for not wanting to post wordy tutorials :-p), this tutorial is just one way to bind. Check out my Quick Quilt Binding Tutorial for an alternative method.
Update: If you prefer not to blind stitch the back of your binding and would rather machine stitch it, check out my Machine Binding Tutorial.
Part I – Binding (Steps 1-7)
Note: This tutorial assumes a 1/4″ seam allowance. Start and end all stitches with a back-stitch.
Step 1 – Start by cutting 2.5″ strips from the length of your fabric. If your binding fabric is less than or equal to 1 yard, then typically the length of your fabric will be about 40-44″. You can divide the total perimeter of your quilt top by 40″ to calculate how many 2.5″ strips you will need to cut (example: if the total perimeter of the quilt top is 120″, then you will need 120″/40″=3 binding strips).
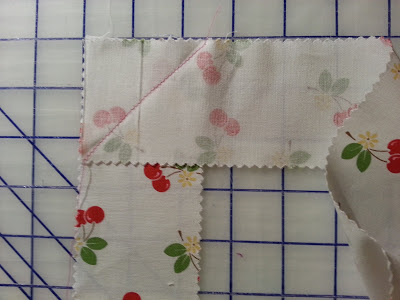
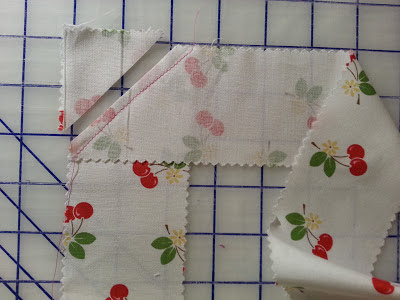
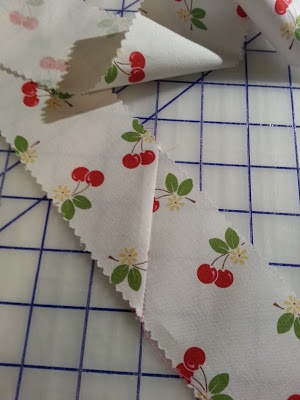
As shown below, sew the strips together to create the length of binding you will need to bind the perimeter of your quilt. To do this, align two strip so that they are perpendicular to one another with the right sides facing each other. Sew a diagonal line from the bottom left corner to the top right corner as shown below.
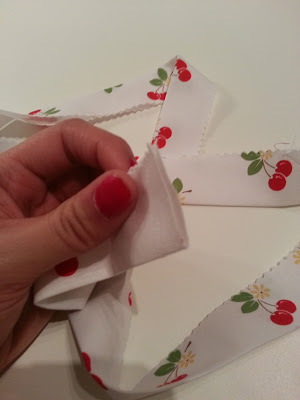
Step 2 – With an iron, press the binding in half lengthwise so that the width measures 1.25″.
Step 3 – On one end of your binding, create a 45 degree angle seam: a) Open up the binding on one end. Create a 1/4″ seam by folding the fabric over 1/4″ at the top, then press. b) Fold the top left corner down to form a 45 degree angle, press. c) Press in half lengthwise.
(Click to enlarge)
Step 4 – Start binding along the side of your quilt top and away from all corners. As shown below, attach the binding to your quilt top by opening the binding, and then sewing through the first layer. Make sure you start with the end that has the 45 degree angle seam (from the previous step). From the top of the binding, sew 4-5″ down.
Step 5 – Close the binding so that you can no longer see the 4-5″ that you previously sewed. From the top of the binding, measure about 3″ down and start sewing (as depicted with the black arrow below). You will overlap with the previous stitch by at least 1″. This will leave you with an open ‘pocket’ at the start of your binding that’s about 3″ long.
Step 6 – Continue sewing the binding to your quilt top. Use pins to help keep the binding in place. When you get to the corners, do the following four steps (a, b, c &d):
a) Stop sewing 1/4″ from the bottom of the corner. End your stitch with a back-stitch.

b) As shown below, fold the binding over so that it’s in line with the edge of your quilt top.

c) Then fold the binding over again but in the other direction; still make sure the binding is in line with the edges of the quilt.

d) Pin the corner folds and binding to keep in place…

…and then start sewing again from the top of the fold to stitch it down. Continue sewing and repeat Step 6 for all corners.

Step 7 -When you get to the end, you will come upon the open ‘pocket’ from Step 5.
Tuck the unfinished end under the flap as shown below.
And then continue sewing to stitch it closed.
Part II – Blind Stitching
Update: If you’d rather machine bind, please see my machine binding tutorial.
Now that you’ve finished attaching the binding to your quilt top, the last part is to blind stitch the binding to the backing of your quilt. Start by folding the binding over to the back, and pin it to the backing of your quilt.

When you get to the corners, simply fold the bottom edge of the binding straight up and then pin the corners down to keep everything in place.
 I made three videos showing how to blind stitch…it was just too hard trying to show it via photo.
When blind stitching, use a strong thread that won’t break. The last thing you want is your thread to snap halfway through blind stitching your entire quilt! For the purpose of the tutorial, I used a thick and bright pink flossy thread so you can easily see me blind stitching.
Video #1: This first video shows how you start the blind stitch. I typically start with at least three feet of thread and tie a knot at one end. Start by hiding the knot underneath the binding as shown in the video. And remember, when blind stitching the thread should never show on the quilt top (it should stay in between the backing fabric and batting). Once the knot is secure, your needle should come up from the quilt backing and nick the edge of the binding, and then come straight back down from where you came up. Then, come back up again but roughly 1/4-1/2″ away from where you originally started. Repeat.
Video #2: This second video shows how to blind stitch the corners of your binding. It’s the same process as the first video; the main thing I wanted to show you is when you come up to nick the binding, make sure you nick the corner flap of the binding to ensure it gets stitched down. If you stitch the corner flap down as shown in the video, the entire corner is good to go. 🙂
Video #3: This video shows how to tie a knot when blind stitching. Since you start with only about 3 feet of thread, you will have to do this a handful of times depending on how big your quilt is. This might make you go a little cross-eyed, but once you’ve done it a few times it sticks with you. 🙂
Update: Here’s a 3-step picture tutorial on how to start and end a knot.
I hope this helps. As always, I’m happy to answer any questions! And remember, this is just one way to bind a quilt. Check out my Quick Quilt Binding Tutorial for an alternative method (that doesn’t involve any blind stitching!)



My 73 year old mom does all my binding as I've never wanted to attempt it. The way you demonstrate it looks good and maybe I'll give it a try and give my mom a break.
Great tutorial for the binding. I like the close up pictures and easy to follow instructions! Thanks!
Thank you. This is a great tutorial!! I'm going to practice on a "mug rug" today.
I have never sew a quilt before…your tutorial really inspired me to start with one. Look so simple and easy. Thank you very much for sharing.
Great pictures and tutorial! I wish I had this before I finished my first quilt. Now I enjoy the blindstiching so much. Just some metres to go and the quilt is really done.
Jera, thank you very much! Great tutorial
Hugs, Irina
Thank you thank you thank you! Have just done my 1st binding onto a quilt using this tutorial! Blind stitching i've known how to do for years, but needed a refresher for the corners. But for the binding on corners I was so clueless reading other tutorials they just made no sense! This is my bible now! lol
Thanks again! :o)
I really need to thank you for this tutorial. I have not made many quilts completely mostly because of the binding and quilting portion. Recently, I made some baby bibs for my little nephew who is to be born in September. They remained not complete because of the binding. Well, you'll be proud because TODAY they are finished because of this tutorial. Thank you so much.
Hope over to my blog later I will be posting pictures and a link to this tutorial because it was so helpful to a newbie sewer like me. 🙂
http://quiltangelshaven.blogspot.com/
Hey thank you for such a clear demonstration of how to bind. I just finished a wee mug rug using your method and it looks great – really great! So simple when you know how!
Thanks you help me , I loved your blog .
http://tearpiaocupacional.blogspot.com/
I'm new to your blog! I just ran into this tutorial! After giving up on handsewing binding for Christmas gifts I went to machine binding…didn't fall too much in love with it. You made this SO easily understandable and I am for sure going to give it a try on my next quilt (I just ordered Ruby fabric from you)! Can't wait!
Thanks for this. I'm new to the blog, found it through Pinterest and am delighted to find a tutorial with the corners clearly photographed! I struggle with them sometimes on my quilts!
a
I have reviewed LOTS of binding and blind stitching tutorials and videos, and your is, by far, the best I've come across. Thank you so much, and I look forward to seeing more!
Does anyone know how to do a blind stitch by machine? I've always done it by hand, but would love a quick alternative on occation.
Thank you so much for the videos! I've never understood how when someone tries to 'tell' me and this is so much easier now! I'm sure I can do this!
I've sewn forever but am new to quilting . . . took a beginner class and got interrupted before doing the binding. So I've been watching tutorials to refresh my memory before tackling it. Your pictures and explanations are among the best I've seen . . . Thanks so much. I'm going right to the sewing room to get started!!
Arlene
That was really helpful and as clear as a bell especially the knot tying thank you I could not have got a clearer view evev if I was in person!
This tutorial might be lost on me… im not sure i understand the purpose of this tutorial. is it simply to hide the binding stitches? It does not look secure enough to use on a well used quilt. Would you then only use this on wall hangings or table top peices? I'm a beginner self taught quilter and i have not had to bind like this ever, how durable is this process…?
Hi aemiller – thanks for your question. So this is the traditional way to bind a quilt. No, it won't unravel in the wash (assuming you tie off the knots correctly as shown in my video). However, in my opinion machine-binding is always the best if you're looking for long term durability. If I'm working on a special quilt, i like to do the blind stitching by hand (as shown in this tutorial) because it gives it a nice, polished look. It my humble opinion it looks the best, but then on the other hand you pay the price because it takes much longer as well. If I'm making a baby quilt or a quilt that I know will go in the wash a lot, I'll do machine binding instead. I have a tutorial for quick quilt binding (using the machine) if you're interested http://quiltingintherain.blogspot.com/2010/06/quick-quilt-binding.html
I hope this helps! Good luck quilting! -jera
Hi!! I am not a novice quilter, I have made about 6 or so, but I have always hated doing the corners…until I found your tutorial that is!!! I am just busy doing the hand-stitching on the binding on my latest quilt, and I am over the moon happy with the corners. They are the neatest nicest corners on any of my quilts so far. THANK-YOU!!!!
Great tutorial. Thank you for putting it together. Why can't you machine stitch instead of blind stitch the last part of the binding? I'm a complete beginner but machine stitching sounds more durable and a lot faster. Thanks.
You can machine bind – check out this tut: http://www.quiltingintherain.blogspot.com/2013/01/machine-binding-tutorial.html
Great tutorial! Thank you!
Great ..thanks so much !! thanks to share with all of us !!
Margarita /linenartisan
I'm making a quilt for the first time ever and I'm not all that familiar with sewing (much less sewing terms, haha!). I found a great tutorial for the quilt itself but I kept seeing "blind stitching" when it came to the binding part. I did SO many google searches on how to do it and it just didn't make sense. But your video was EXTREMELY helpful and made perfect sense! So thank you for this!!!
Thank you so much for this tutorial. I found your site from a link on this blog: http://jembellish.blogspot.com/2012/01/pot-holders-from-jeans-pockets-tutorial.html
I'm so glad she shared your link. I have a baby quilt for my neice that is ready for the binding. I've been scared to do that part and now have the confidence I need to get it done. I can't say thank you enough for sharing this.
Thanks again! You make it look so easy. I always stress when it comes to binding =(
Great tutorial. I have followed your binding procedures, a lot easier. Thanks for sharing!
Sandi Henderson binding fabric! I love it! Don't you hope they will rerun those fabric lines again?
Thanks for the great tutorial. I am going to try it on the next quilt.
Another way to do it is to attach the binding to the back, flip over and finish the binding on the front with an embroidery stitch on the machine. The buttonhole applique stitch on the front serves two purposes, it sews the binding to the front in a quicker manner and adds a bit of interest with the stitching
I like the way that you nest the end of the binding, so you don't have to join it. Brilliant!!
Great tutorial
This is an excellent tutorial! Thank you so much for writing it. I am just getting started with quilting and your tutorial for machine-binding has been the very best one I've found. Thanks again!
Thank you so much for this fantastic tutorial!! I have just been stitching straight across for years and never really thought (I don't know why…) to do it any other way. This method is so clean and neat! Thank you, thank you!
This is a really informative tutorial, which makes blind stitching so easy. Rally Blinds Cleaning Company comes with the service of blind parts repair. Hence, you can avail this service if required.
Your tutorials are absolutely wonderful. They are little works of art. It is easy to tell someone how to do something, but you've made it so clear that even a novice would have no problems. Thank you for sharing your talent. Much happiness to you and your new house and little one.
Your tutorials are absolutely wonderful. They are little works of art. It is easy to tell someone how to do something, but you've made it so clear that even a novice would have no problems. Thank you for sharing your talent. Much happiness to you and your new house and little one.
Perfect tutorial. You have provided each and every information in detailed manner.
curtain cleaning
Due you know simple and effective ways to stitch curtains?
brisbane curtain cleaners
WOW! i just found your blog by “accident” and this is the most awesome way to bind I have ever seen!!! THANK YOU! no more pinning and shoving under the sewing machine or sewing the binding on the wrong diagonal. so excited! can’t wait to finish my next quilt! hahaha!
Thank YOU! I hope I can do you proud on my quilt waiting on me to get my confidence up to try this. I will refer back as I sew my binding .
I am searching for a simple explanation on how to sew a binding to a fleece blanket with batting in between. This is for a friend. I presently am not able to use a sewing machine and must do the whole procedure by hand. Ii shouldn’t be that difficult, Manly I am wanting to what is the best stitch to use with 2 layers of fleece and a batting between the two. I am using the hand tacking for the blanket and that is a another whole problem. But i can overcome this. just the binding is very trying. This blanket is for a baby (child) and needs to be sturdy. If my right ankle was not fractured I would be using the old faithful the sewing machine. Help please. Thank you in advance.
I have read your article and this is really an amazing post for increasing skill in this concern department. Now you can hire professional USA Digitizers for your embroidery digitizing work in cheap pricing.
love your help!
Thank you for this tutorial, as a beginner who struggled with the finish on binding this just made my sewing life much better!!