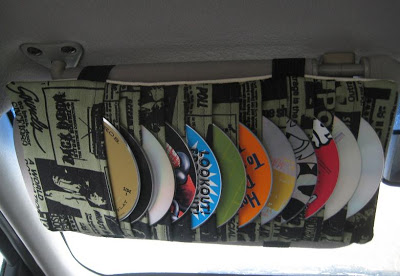
I made this handy CD holder for my husband last night. The elastic band allows it to attach to to the back of a visor. I’m really happy with how it turned out! My husband even picked out the fabric himself. 🙂 It’s a really quick project; the longest part was figuring out the measurements but since I did that, you won’t have to 😉 Check out my 8-step tutorial below.
Materials:
- ½ yard fabric
- ¼ yard heavy weight fabric for the back of the CD case
- ½ yard elastic, 1.5” wide
Step 1 – Create the main front and back panels.
From your cotton and heavy weight fabric, cut a 13.5” x 6.75” rectangle from each.
Step 2 – Create the CD pockets.
From your cotton fabric, cut 12 4.75” x 6.75” rectangles. For all 12 of the rectangles, do the following: On the side that measures 6.75”, fold the fabric inward ¼” lengthwise; press with an iron. Repeat once more, and press again.
Step 3 – Sew a ~ 1/8” seam to secure the folds you pressed from the previous step.
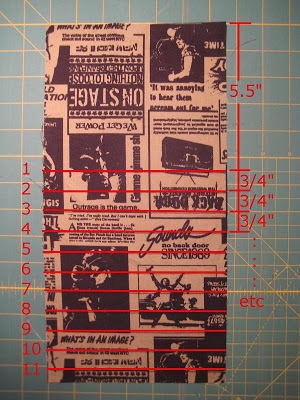
Step 4 – Using a ruler and marker, mark the following lines on your cotton panel: Starting from the top of the panel, measure 5.5” down. Mark a line, as shown in the picture below (I marked my lines in red to help illustrate where the lines should be). From that line, mark 11 more lines that are each 3/4” apart, as shown below. Step 5 – Attach the pockets to the panel. Follow steps A-D: Start with the first line you marked, and work your way down.
A. Align the seamless side of the pocket along the FIRST line you marked, as shown below. The side that has a seam should be facing the top of your panel.
B. Pin in place, then sew a ¼” seam along the edge of the pocket.
C. Repeat the above, working your way down all the lines you marked. Once you reach the 11th line, it should look like this (I put CD’s in to help you visualize):
D. Attach the 12th pocket by simply aligning the seamless side to the bottom of the panel, and secure it with a 1/8” stitch along the edge. Below is how the FRONT and BACK should look. [Click to enlarge pictures].
 |
 |
Step 6 – Attach the elastic to the heavy weight fabric panel:
Cut 2 ~7” strips of elastic. Place each strip about 3” inward from each end of the panel, as shown in the first pic. below. Secure the elastic by sewing at least 2-3 back-stitches. Trim excess elastic so it’s flush with the panel.
 |
 |
Step 7 – With right sides facing together (as shown below), align both panels.
Pin panels in place, and then sew a ¼” seam around the entire perimeter except for a 4″ opening at the top, as designated below in red. Start and end your stitch with a back-stitch.Trim excess fabric on the corners so it doesn’t bunch.
Step 8 – Finish it!
Remove the pins, and then turn inside-out through the 4” opening. Press with an iron to flatten.
Press the 4” opening closed with an iron (fold the fabric ¼” inward and press). Stitch closed, or use steam-a-seam to press/glue it closed. Yay you’re done!!


Cool!
What a great idea! I'm going to do this for my car. Great instructions, very easy to understand. Thank you so much.
I love it great gifts for the guys in my family thanks for sharing
I made this tonight…..it was perfect! Thank you!
Pretty! It is so gorgeous, what a great plan! Take a look at my fashion illustrations and art:
http://decorvilla.ca/category/wine-holders-and-cd-holders/
Helping my 10 year old great niece make this for her dad. Great tutorial! Thanks!