Archive | May, 2010

Hanging Wall Organizer Tutorial

Hanging Wall Organizer Tutorial - Quilting Tutorials and Fabric Creations - Quilting in the Rain Hanging Wall Organizer Tutorial - Quilting Tutorials and Fabric Creations - Quilting in the Rain

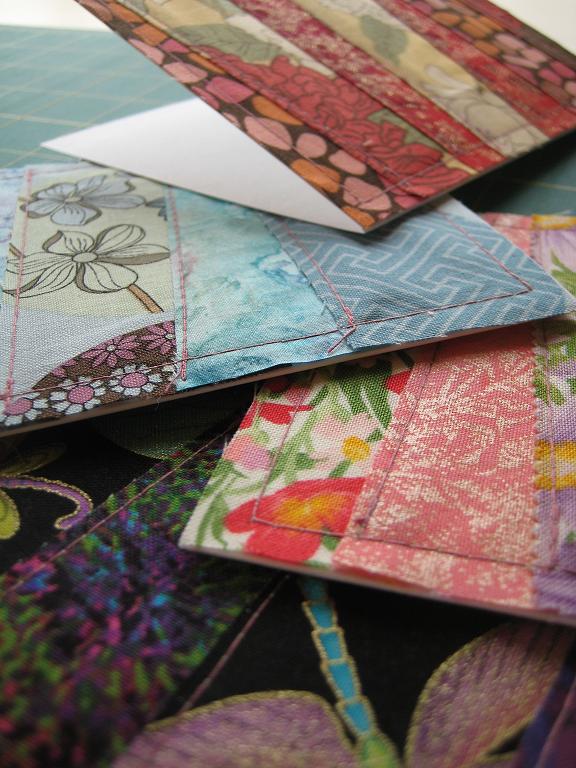
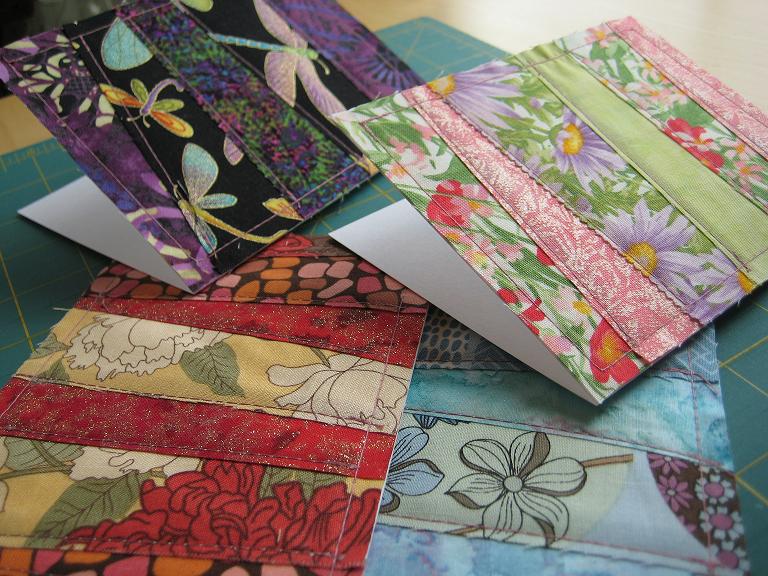
I made this organizer as a wedding gift for a friend of mine. It has three deep pockets and a smaller pocket at the top. The smaller pocket has three compartments within it, as shown in the 2nd picture above. This organizer is great to hang by your door for organizing mail, or in your office or crafts room for organizing miscellaneous things you don’t want misplaced. It’s fairly simple to make! Below is the tutorial.

Materials:

  • 1.5 yards of Home Decor fabric (home decorator fabric is thicker in weight, and measures 58”x36”/yard)
  • Double stick fusible tape
  • Extra-Large Eyelet kit. (You will need 2 eyelets)

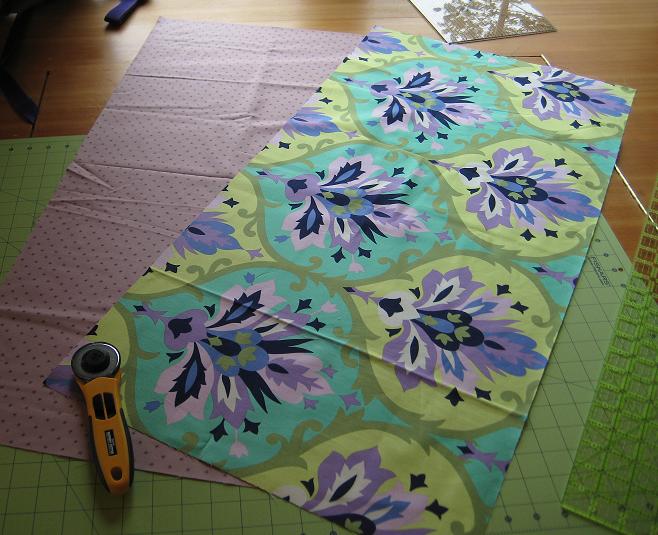
Step 1 – Cut fabric for the front and back panel

Cut 2 34”x17” panels. One panel will be the front of your organizer, and the other will be the back.

Hanging Wall Organizer Tutorial - Quilting Tutorials and Fabric Creations - Quilting in the Rain

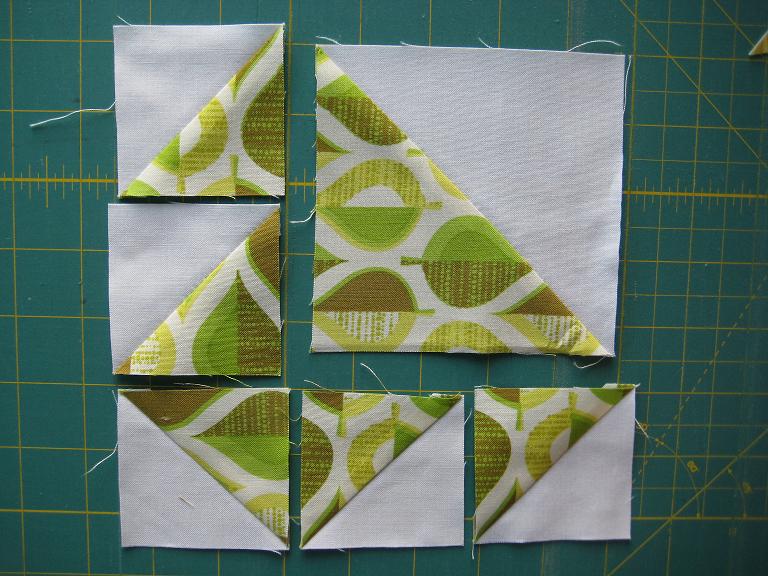
Step 2 – Cut fabric for the 4 pockets

For the three deep pockets, cut 3 18”x17”rectangles.
For the small pocket, cut 1 8”x17” rectangle.

Step 3 – Fold pockets in half, press, stitch a seam.

Do the following two steps for all 4 pockets:

  1. Fold each pocket in half width-wise so the 17” side is the length. Press with an iron.

    Hanging Wall Organizer Tutorial - Quilting Tutorials and Fabric Creations - Quilting in the Rain

  2. On the folded side, stitch a ¼” seam along the fold.

    Hanging Wall Organizer Tutorial - Quilting Tutorials and Fabric Creations - Quilting in the Rain

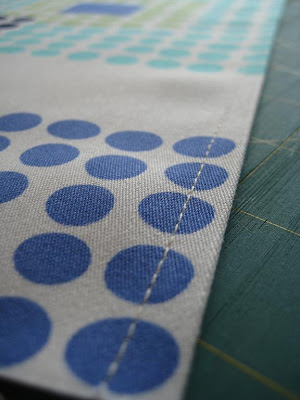
Now you should have 4 pockets, 3 measuring 9”x17” and 1 measuring 4”x17”. All pockets should have a ¼” seam along the folded length.

Hanging Wall Organizer Tutorial - Quilting Tutorials and Fabric Creations - Quilting in the Rain

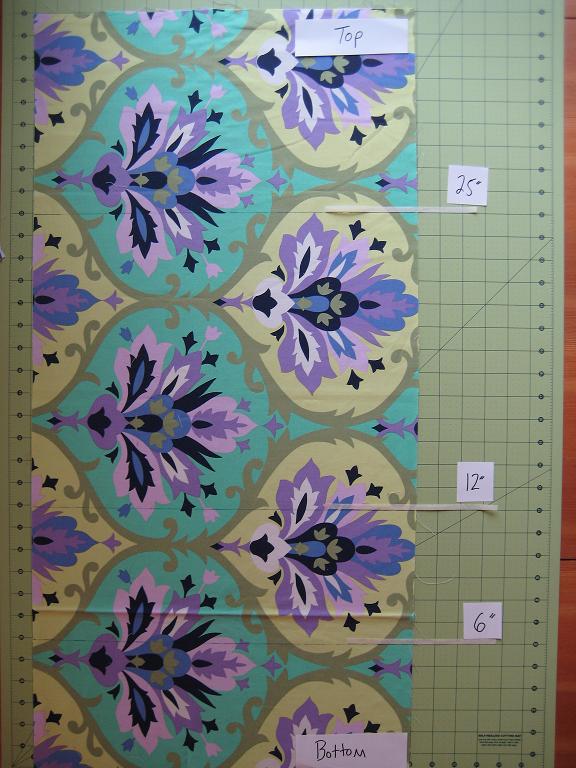
Step 4 – Measure and mark where the pockets will be sewn

Take the front 34”x17” panel you cut from step 1. Starting from the bottom of the panel and going up, make a mark at 6”, 12” and 25”. Using a ruler and marker, draw a straight line across the width of each measured mark.

Hanging Wall Organizer Tutorial - Quilting Tutorials and Fabric Creations - Quilting in the Rain

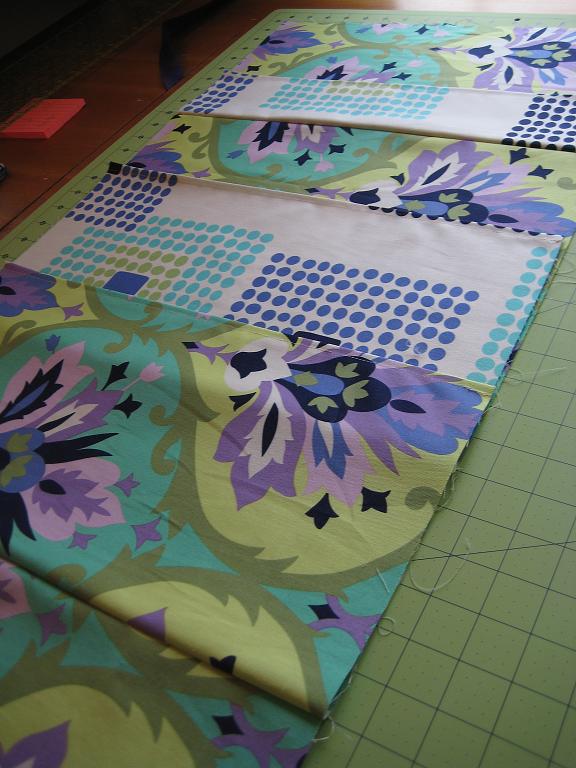
Step 5 – Attach the pockets

At the 6” line on the front panel, take a 9”x17” pocket and align the un-stitched side along the marked line. The side of the pocket with the stitched seam should be facing the bottom of the panel. Once you have the un-stitched side of the pocket aligned with the marked line, pin in place and sew a ¼” seam. Do the same for the 12” marked line. At the 25” marked line, do the same but using the 4”x17” pocket.

Flip all 3 pockets over so the seams (stitched from step 3) are facing the top of the panel, as shown below.

Hanging Wall Organizer Tutorial - Quilting Tutorials and Fabric Creations - Quilting in the Rain

As shown below, attach the bottom pocket by aligning the non-stitched side with the bottom of the panel and sew in place using a ~1/8” seam. Unlike the previous step, the side of the pocket with the stitched seam (stitched from step 3) should be facing the top of the panel.

Hanging Wall Organizer Tutorial - Quilting Tutorials and Fabric Creations - Quilting in the Rain

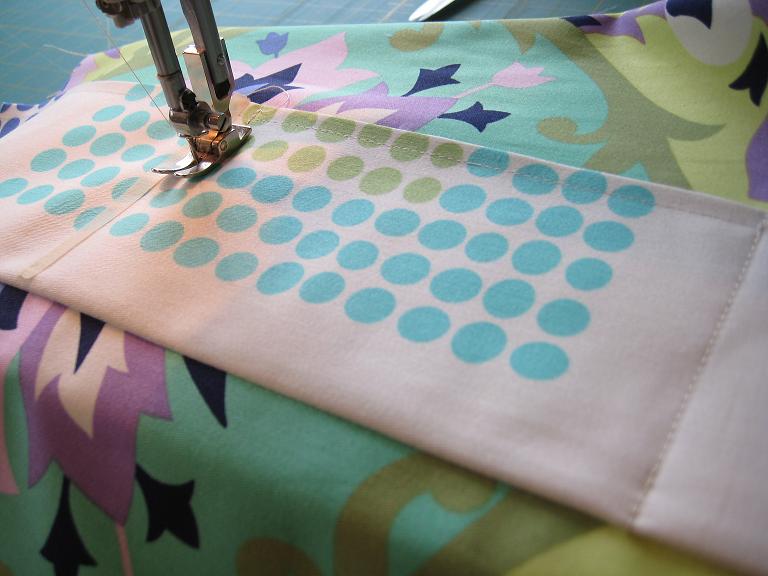
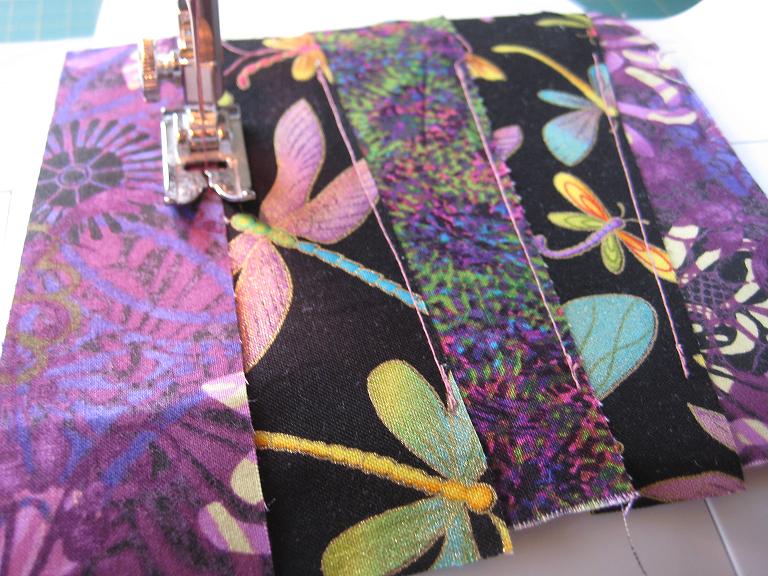
Step 6 – sew the compartments on the 4”x17” pocket

Measure 5” from the left and right side of the pocket, then sew a line to create 3 compartments. When sewing the line, you can use tape to help guide a straight line. Be sure to start and end your stitch with a backstitch.

Hanging Wall Organizer Tutorial - Quilting Tutorials and Fabric Creations - Quilting in the Rain

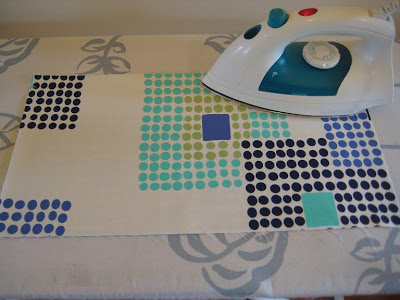
Step 7 – Press and pin

Using an iron, press all the pockets upward. Then pin all pockets in place as shown below.

Hanging Wall Organizer Tutorial - Quilting Tutorials and Fabric Creations - Quilting in the Rain

Step 8 – Pin in place the backing fabric

As shown in the first picture below, with right sides facing together, lay the back panel on top of the front panel. As shown in the second picture below, pin along the edges to keep the back panel in place. Leave a 7” opening, as designated by the blue tape.

Hanging Wall Organizer Tutorial - Quilting Tutorials and Fabric Creations - Quilting in the Rain Hanging Wall Organizer Tutorial - Quilting Tutorials and Fabric Creations - Quilting in the Rain

Step 9 – Sew a ¼” seam along the perimeter of the panel, then turn inside-out through the opening

As shown in the first picture below, sew a ¼” seam along the perimeter of the panel, making sure to leave a 7” opening; trim the extra fabric from the corners. As shown in the second picture below, turn inside-out through the 7” opening, and then press flat with an iron.

Hanging Wall Organizer Tutorial - Quilting Tutorials and Fabric Creations - Quilting in the Rain Hanging Wall Organizer Tutorial - Quilting Tutorials and Fabric Creations - Quilting in the Rain

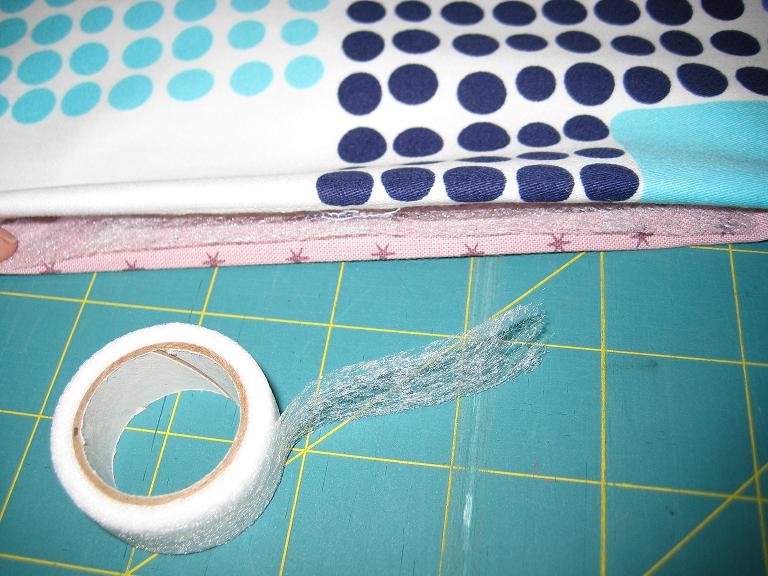
Step 10 – Close the opening, and stitch a final ¼” seam along the perimeter. Attach eyelets.

As shown in the first picture below, press the 7” opening closed using double-sided fusible tape. As shown in the second picture below, sew a final ¼” seam along the perimeter of the panel.

Hanging Wall Organizer Tutorial - Quilting Tutorials and Fabric Creations - Quilting in the Rain Hanging Wall Organizer Tutorial - Quilting Tutorials and Fabric Creations - Quilting in the Rain

The final step is to attach the eyelets; simply follow the instructions on the back of the package. From the top left and right corner, I placed the eyelets 2” over and 1” down.

That’s all there is to it! 🙂

Comments: 6 | Leave a comment


Upcoming Projects…and sweet Keylie

I just returned from vacation so I haven’t had a chance to make a post in a while. Here’s an update of what’s in the works: I have several tutorials lined up – i just need to post them. 🙂 The tutorials are how to free-motion quilt and stitch-in-the-ditch. Also, a super quick way to bind a quilt. Before posting another full-on quilt top tutorial, i’m planning to post a couple smaller quick and easy sewing projects. And before summer hits, I have a really cute pattern for a halter top dress. I’ve never been a garment girl, so that will be my first attempt. 🙂

I couldn’t end this post without showing off Keylie modeling some quilts i’ve made for my mom and step-dad. 🙂

In this picture: there’s a small quilt hanging on the wall, a small pillow that i made the case for, and obviously the quilt at the foot of the bed. And then of course there’s the beautiful fluff-ball in the middle, her name is Keylie (when pronouncing Keylie, think “keylime” pie). Keylie is my mom and step-dad’s dog. Keylie is also Paige’s arch enemy when Paige is feeling bi-polar. (Paige is 1 of 2 of my furry children).

Comments: 1 | Leave a comment


T-Block Quilt Tutorial

T-Block Quilt Tutorial - Quilting Tutorials and Fabric Creations - Quilting In The RainAs promised from my last post, here is a tutorial for this quilt top. This is one of my favorite quilts! I love the colors, and it’s a very interesting pattern. Try focusing on only the white background – do you see the upside down T’s? This quilt features the popular “T” block – this is a great block because it’s simple to make (it’s made up of half square triangles), and it can be arranged in several different ways (scroll down to Step 7 to see!).

I made this quilt for my cousin Paola who has a baby girl on the way. Paola is due August 28th!

This baby quilt measures about 48”x43”finished, and is made with a total of 30 “T” blocks (shown below). A single block measures 6.5”x6.5”. If you want to make a larger quilt, keep in mind that the materials listed below will make you 30 blocks so simply double the materials for a larger quilt.

T-Block Quilt Tutorial - Quilting Tutorials and Fabric Creations - Quilting In The Rain

(Above: 5 stacks of 6 matching T-blocks. A total of 30 T-blocks)

Materials for quilt top:

  • 6 fat quarters , assorted colors for the main block (used for the multi-colored T’s; leftovers used for the border).
  • 5 fat quarters for the background (I used white)

Step 1 – Cut fabric for your main blocks
From your 6 fat quarters (assorted colors) choose 5 for the main T-blocks. Set aside the 6th fat quarter; it will be used for the border of your quilt top. Prior to cutting, press all your fabrics with an iron for a wrinkle-free cutting surface.

From each fat quarter, make the following cuts with your rotary cutter and ruler:

  • Three 4 7/8 inch squares. (Quick cutting tip: Cut one 4 7/8 x 15 inch rectangle, and from that rectangle cut three 4 7/8 inch squares)
  • Fifteen 2 7/8 inch squares. (Quick cutting tip: Cut three 2 7/8 x 15 inch rectangles, and from each rectangle cut five 2 7/8 inch squares)

To speed up this process, I layered my fabrics so I only had to make the above cuts once. Prior to cutting, press your layered fabrics with an iron (it can help keep them in place for cutting).

Note: Get the most out of your fat quarter! When cutting your squares, make your cuts on the left or right-most side of your fat quarter (a fat quarter measures 18×22 inches). You should have roughly 7×18 inches of remaining fabric from each fat quarter. You will use these for your quilt border later.
Step 2 – Cut your background fabric

This step is similar to Step 1, except use your background fabric (5 fat quarters).
From each fat quarter, make the following cuts with your rotary cutter and ruler:

  • Three 4-7/8 inch squares. (Quick cutting tip: Cut one 4-7/8 x 15 inch rectangle, and from that rectangle cut three 4-7/8 inch squares)
  • Fifteen 2-7/8 inch squares. (Quick cutting tip: Cut three 2-7/8 x 15 inch rectangles, and from each rectangle cut five 2-7/8 inch squares)

Same as the previous step, you can layer your background fabrics to speed up the cutting process.

Step 3 – Pair, cut in half, and pin

At this point, you should have the following cuts:

  • Small squares (2-7/8 in.) – 75 squares (assorted colors) and 75 squares (background fabric)
  • Large squares (4-7/8 in.) – 15 squares (assorted colors) and 15 squares (background fabric)
T-Block Quilt Tutorial - Quilting Tutorials and Fabric Creations - Quilting In The Rain

Take 2 corresponding squares (same size), one from your colored pile and the other from your background pile. With right sides facing together, align the corners and cut a diagonal line across the middle using a rotary cutter and ruler (Figure 1, below). Pin each triangle half to keep them in place for sewing later. Continue this step until you’ve paired and cut all small and large squares in half (Figure 2, below).

T-Block Quilt Tutorial - Quilting Tutorials and Fabric Creations - Quilting In The RainFigure 1 T-Block Quilt Tutorial - Quilting Tutorials and Fabric Creations - Quilting In The RainFigure 2

Step 4 – Start sewing!

Sew a ¼” seam along the length of all your triangles (figure 3, below). You can do this quickly by chain piecing (figure 4, below).

Chain piecing is where you continuously sew a ¼” seam, piece after piece, without stopping to clip the thread. Simply stitch a seam on the piece you are sewing. Then, without removing or clipping that piece from your sewing machine, insert the next piece to be stitched. Simply clip the thread between each piece after all the seams have been stitched. It’s an efficient way to sew repetitive pieces.

T-Block Quilt Tutorial - Quilting Tutorials and Fabric Creations - Quilting In The RainFigure 3 T-Block Quilt Tutorial - Quilting Tutorials and Fabric Creations - Quilting In The RainFigure 4 – chain piecing

Step 5 – Press open the triangles to form squares

At this point, you should have a pile of small and large triangles, each with a ¼” seam stitched along the length. The right sides of the triangles should be facing together, with the seam stitched on the wrong side of the fabric.

Using an iron, press all of your triangles open (figure 5, below) so that the right side of the fabric is now facing up. Pressing the triangles open will form a finished square (figure 6, below). When you press open the triangles, press the seams toward the darker fabric (i.e. I pressed toward the colored fabric to prevent the seam from showing through the white background fabric).

As shown in figure 6 (below), cut the corner tags off for a clean-cut square.

T-Block Quilt Tutorial - Quilting Tutorials and Fabric Creations - Quilting In The RainFigure 5 – press open triangles T-Block Quilt Tutorial - Quilting Tutorials and Fabric Creations - Quilting In The RainFigure 6 – snip off tags

Step 6 – Piece together your blocks!

To make one block, you will need 5 small finished squares and 1 large finished square, as shown below (figure 7).

Note (for beginners): When sewing 2 pieces together to form a single unit, use the same method for when you stitched the half square triangles together (i.e. with right sides facing together, align and pin, then sew a ¼” seam. Press open, making sure the seams are pressed in one direction).

T-Block Quilt Tutorial - Quilting Tutorials and Fabric Creations - Quilting In The RainFigure 7
  1. As shown in figure 8 (below), first sew the three small squares (on the left) together to form a single unit. Next, sew the two small squares (right bottom corner) together to form a single unit. Press open.
    T-Block Quilt Tutorial - Quilting Tutorials and Fabric Creations - Quilting In The RainFigure 8
  2. As sown in figure 9 (below), sew the right bottom unit to the larger square. Press open.
    T-Block Quilt Tutorial - Quilting Tutorials and Fabric Creations - Quilting In The RainFigure 9
  3. As shown in figure 10 (below), sew the right unit to the left unit to create a finished T-block.
    T-Block Quilt Tutorial - Quilting Tutorials and Fabric Creations - Quilting In The RainFigure 10

Repeat this process until you have a total of 30 T-blocks (you will have 5 stacks of 6 matching T-blocks).

Step 7 – Arrange your blocks

Here’s the fun part! Arrange all 30 blocks however you want them to look for the quilt top. Below (Figure 11a,b) are a couple examples of different ways the T-block can be arranged:

T-Block Quilt Tutorial - Quilting Tutorials and Fabric Creations - Quilting In The RainFigure 11a T-Block Quilt Tutorial - Quilting Tutorials and Fabric Creations - Quilting In The RainFigure 11b

For my quilt, I arranged all 30 blocks as shown below (figure 12), in 6 rows of 5 blocks each.

T-Block Quilt Tutorial - Quilting Tutorials and Fabric Creations - Quilting In The RainFigure 12

Step 8 – Sew your blocks together to form the quilt top

In each row, sew all five blocks together using a ¼” seam, and press open (as shown in figure 13, below). After you’ve sewn the blocks together in each row, sew the rows together, then press open.

T-Block Quilt Tutorial - Quilting Tutorials and Fabric Creations - Quilting In The RainFigure 13

Step 9 – Combine scraps from Step 1 to create a border

Referring back to Step 1, you should have roughly 7×18 inches of remaining fabric from each of your five assorted fat quarters. Trim each of the remaining fabric scraps into 5×18 inch strips. Also, cut your one remaining fat quarter (mentioned in Step 1) into three, 5×22 inch strips. This will give you enough fabric to create a border that is 5” in width.

Use the diagram below (click to enlarge) to create a border using the 5×18 inch and 5×22 inch strips.

T-Block Quilt Tutorial - Quilting Tutorials and Fabric Creations - Quilting In The Rain

Sew together enough strips (should take 2) to create the length of the right and left border pieces (panels A, in diagram). Sew panels A (left and right borders) to the quilt top first, using the same piecing method as above (with right sides facing together, align the fabric and pin along the length to keep it in place, and then sew a ¼” seam. Press open). Lastly, sew together enough strips (should take ~2.5) to create the width of the top and bottom border pieces (panels B, in diagram). Sew panels B (top and bottom borders) to the quilt top, using the same method as above (with right sides facing together, align the fabric and pin along the length to keep it in place, and then sew a ¼” seam. Press open). For a printer friendly version, please click here.

Comments: 8 | Leave a comment


My latest projects!

I haven’t made a post in too long because I’ve been in my hidey-hole trying to finish this project! Anyway, here it is.=) I am really proud of this one. I finished this quilt top last weekend and am currently working on the tutorial for it. It’s simpler than it looks – if you can cut squares and sew a 1/4 inch seam, you can make this. Stay tuned, i should have the tutorial posted tomorrow.

My inspiration for this quilt? My cousin Paola in the Philippines is having a baby girl! I couldn’t be happier for her. :*) She is due August 28th. What better inspiration could I ask for!?

Some other projects I’ve been working on: I finally finished quilting the Strip Tease quilt on my Imperial Quilting frame (below). 🙂 I was able to bind it too (a binding tutorial to follow 🙂 So many projects, so little time! If you enlarge the 2nd picture, you can see my quilting. I did loopy-loops all over.

And I couldn’t finish this update without posting a picture of my faithful pups, aka as my furry children. They’re not allowed in my sewing room because they shed too much, but they still manage to keep my company. 🙂

Meet Bodie and Paige Brandvig. Bodie is the taller of the two. Paige is the nugget-shaped, shorter of the two.

Comments: 4 | Leave a comment


Patchwork Fabric Greeting Cards

Patchwork Fabric Greeting Cards - Quilting Tutorials and Fabric Creations - Quilting in the Rain Patchwork Fabric Greeting Cards - Quilting Tutorials and Fabric Creations - Quilting in the Rain

Don’t throw away your leftover fabric scraps! Instead, save them to make these unique patchwork fabric cards. By using baby shower or Christmas or Halloween, etc.-themed fabrics, you can easily customize these cards for a one-of-a-kind holiday or special occasion greeting card.

Materials:

  • Fabric scraps
  • Plain cardstock (you can get this at your local crafts or paper store)
  • Coordinating thread (I used white colored thread in the bobbin to match my cardstock)

Instructions:

  1. Start by cutting your fabric scraps into random size strips. Make sure the strips are at least ½ an inch longer than the front of your cardstock. You will trim the extra fabric later (in step 4).
    Patchwork Fabric Greeting Cards - Quilting Tutorials and Fabric Creations - Quilting in the Rain
  2. Starting from the right end of the cardstock, place one strip of fabric on top of the front of the card. Take a second strip of fabric and place it to the left of the first strip, overlapping the first strip by at least ¼ inch (shown in figure 1). Next, sew along the edge of the second strip making sure to stitch through both layers of fabric (shown in figure 2). When you sew, start and end your stitch with a backstitch.
    Patchwork Fabric Greeting Cards - Quilting Tutorials and Fabric Creations - Quilting in the Rain
    Figure 1
    Patchwork Fabric Greeting Cards - Quilting Tutorials and Fabric Creations - Quilting in the Rain
    Figure 2

  3. Continue the process above using the rest of your strips until the front of the card is covered (shown in figure 3). Be creative and place the strips however you like – you can make the strips extra wide or perfectly straight; you can even use a zig-zag stitch or your favorite embroidery stitch if you wish. For this example, I used a simple straight-stitch. Figure 4 (below) is how the stitching on the back of the card will look after the front is covered.
    Patchwork Fabric Greeting Cards - Quilting Tutorials and Fabric Creations - Quilting in the Rain
    Figure 3
    Patchwork Fabric Greeting Cards - Quilting Tutorials and Fabric Creations - Quilting in the Rain
    Figure 4

  4. Turn your card face down, and trim off the excess fabric around the card (shown in figure 5). I used a ruler and rotary cutter for a clean cut. Lastly, sew a ¼ inch seam around the border of the card to stitch the fabric in place (shown in figure 6). Start and end your stitch with a backstitch.
    Patchwork Fabric Greeting Cards - Quilting Tutorials and Fabric Creations - Quilting in the Rain
    Figure 5
    Patchwork Fabric Greeting Cards - Quilting Tutorials and Fabric Creations - Quilting in the Rain
    Figure 6

  5. And that’s all there is to it! Now you have a beautiful, one of-a-kind patchwork card! =) The 2nd picture below is how the back of the card top will look. I think it looks really cool and emphasizes that it really is patchwork, while showing off your awesome sewing skillz (yes, with a “z”, because you’re that kewl). But if it bothers you or if you wanted that extra space to write in, simply glue in a sheet of card stock or paper cut to size and cover. Enjoy!
    Patchwork Fabric Greeting Cards - Quilting Tutorials and Fabric Creations - Quilting in the Rain Patchwork Fabric Greeting Cards - Quilting Tutorials and Fabric Creations - Quilting in the Rain

Oh and one minor note – set aside a sewing needle for your patchwork cards only as paper will dull your needle.

Comments: 25 | Leave a comment


Site by Spunmonkey.